1. Introduction
This document describes the user interface of the OpenText™ Web Experience Management Motion, version 2.6.
WEM Motion is a web application designed to simplify content migration. The WEM Motion Connector is a web application used to allow WEM Motion Engine to connect with your WEM or Vignette Content Management (VCM) environment.
1.1. Document Revision History
| Revision Number | Modification Date | Section Modified | Modifications |
|---|---|---|---|
1.0 |
2016-06-19 |
All |
Initial release |
1.1 |
2019-02-27 |
All |
Release of WEM 16.2.2 and SQL Server 2017 support |
1.2 |
2021-02-26 |
All |
Release of WEM 16.7.1 |
1.2. Web Experience Management Motion overview
WEM Motion primary goal is to help developers migrate contents between different WEM installations.
It has two main components, the Motion engine and the Motion connector.
The Motion engine provides a way to resolve dependency problems when moving data and an interface to select data to move from an origin to a target and is agnostic of the type of data.
The Motion connector speaks the same language as the origin/target content manager and streams the data to the Motion engine. So in the case of WEM Motion the connectors will use WEM API to stream the data to the Motion engine.
WEM Motion is able to handle big sets of data with complex relations between them, has a simple web interface and also provides a set of tools to tackle common problems with migrating data.
These are the most common uses cases for WEM Motion:
-
Upgrading to a more recent WEM release
-
Synchronization between Management stages in different environments
-
Moving data from Delivery to Management
-
Synchronize contents between Production, Staging and Development Environments
-
Offline backups
-
Offline migrations
It also provides tools for solving several common problems related to migrations and maintenance of WEM installations:
-
Comparison of two environments
-
Transformation of content in bulk
-
Auditing and Traceability
2. Quick start
This section will guide you through the creation of an offline connector and the job that will move a site from the already configured WEM Motion connector to the new offline connector. There is also a brief description of how to start both the computation and the migration phases of an execution.
Before starting, ensure that:
-
You have completed the installation of both Motion engine and Motion connector.
-
The Motion engine has a valid license.
-
A Motion connector is configured properly in Motion engine.
-
WEM contains a small site with some associated contents (for instance,
Innovate).
To create an offline connector:
-
Access Motion engine:
http://<Motion Engine host>:8080/
-
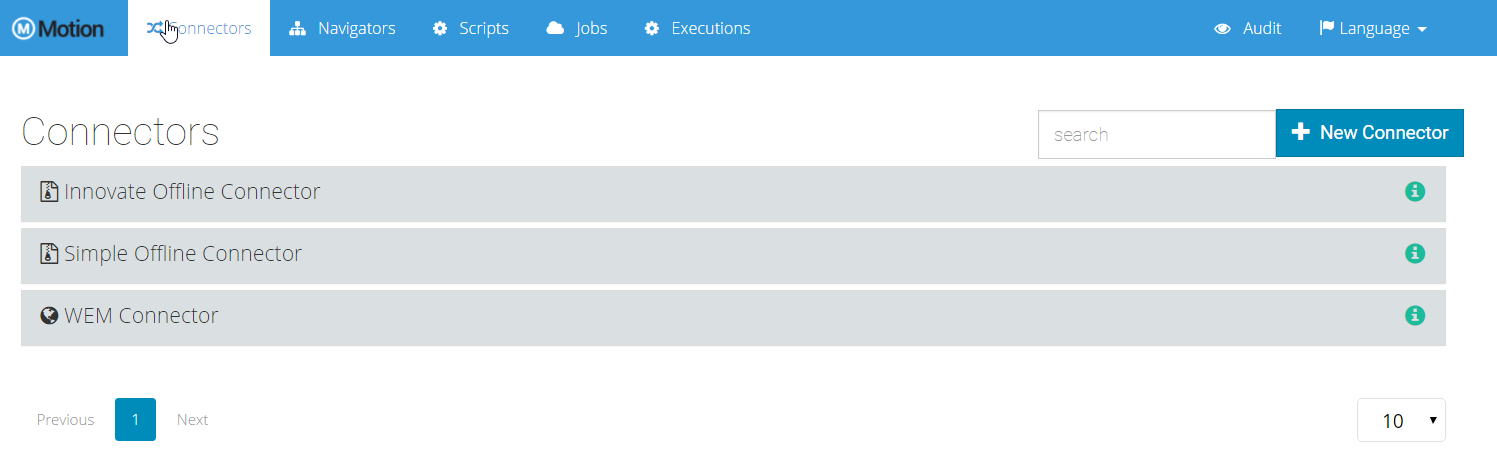
On the Connectors tab, click New Connector.
-
Fill the following fields:
Name
Offline Connector
Connection Type
Offline
Offline directory path
<Some empty folder in your Motion engine host file system>
Zip
true
-
Save the connector
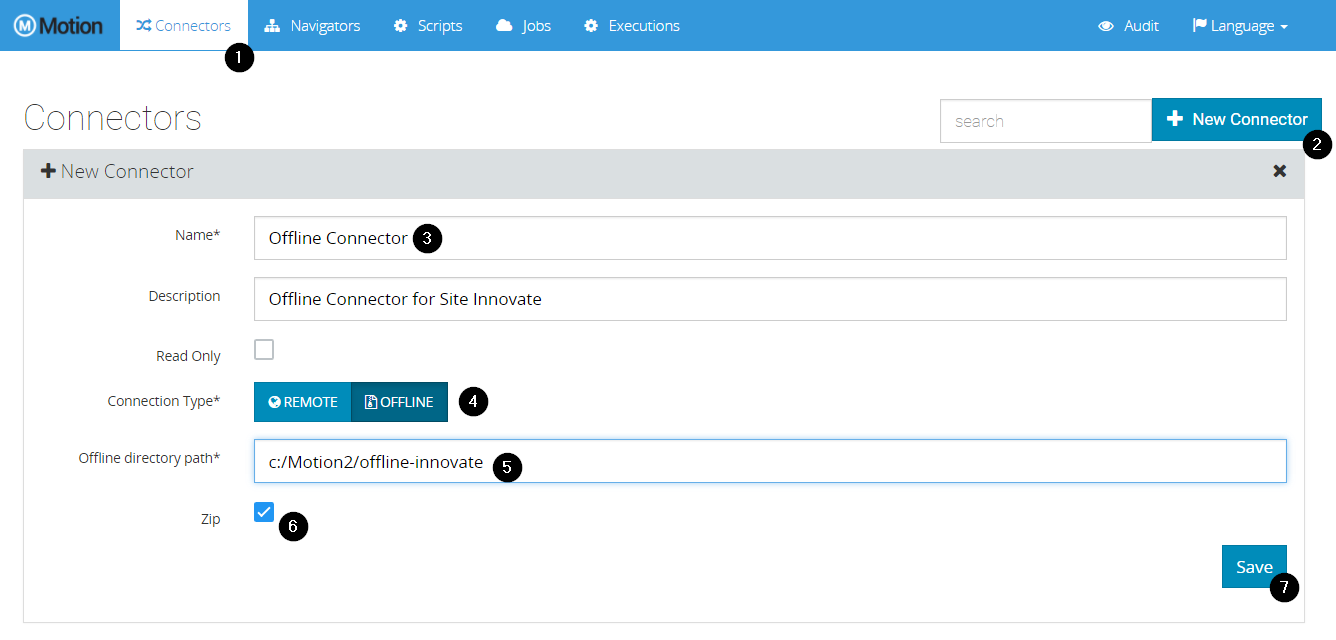
Next, you will configure a job to migrate contents from WEM to the offline connector you created.
To create a job:
-
On the Jobs tab, click New Job.
-
On the General tab, fill the following fields:
Name
Export Site to Offline
Source
Motion connector
Source tag
mgmt
Target
Offline Connector
Target tag
latest
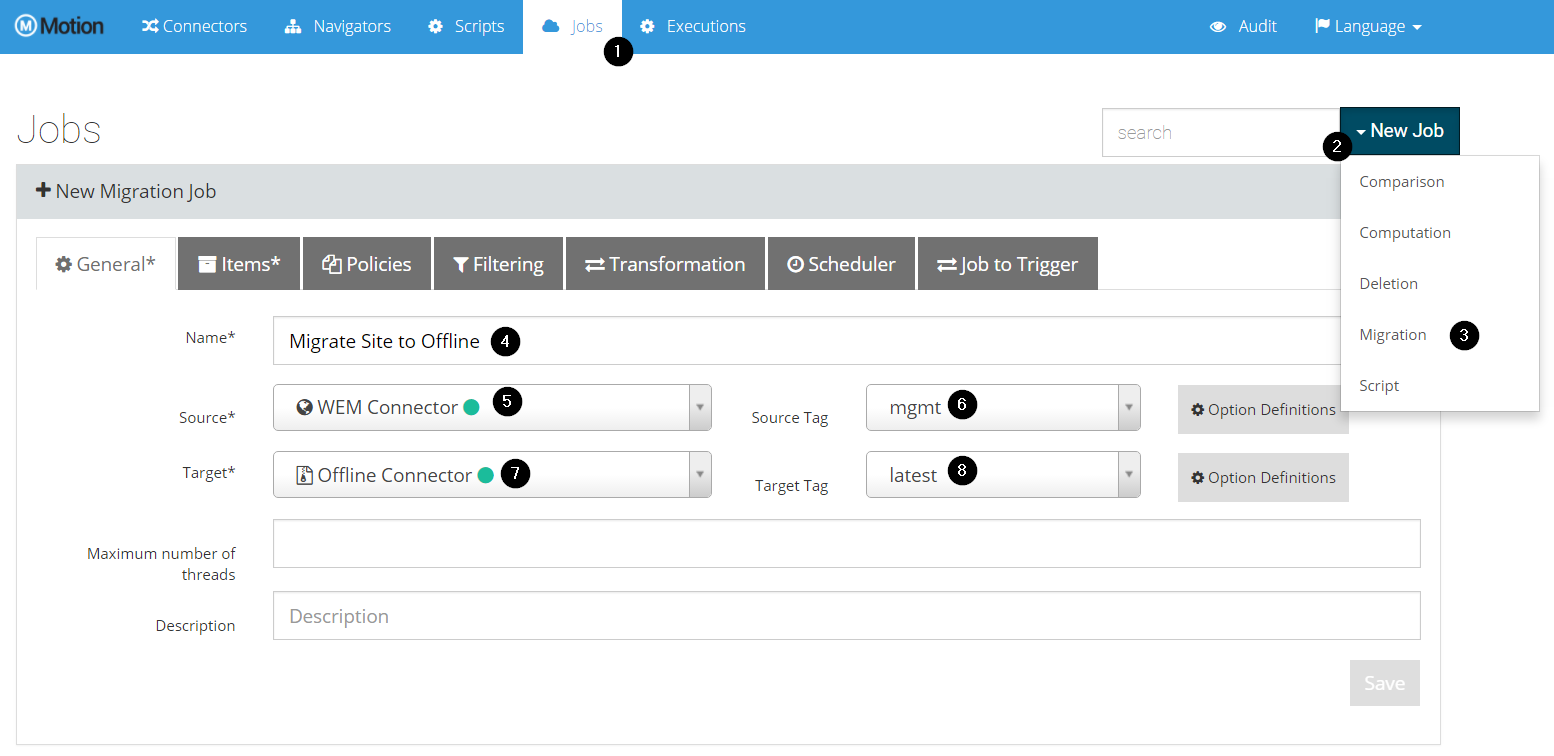
-
On the Items tab, click Add items.
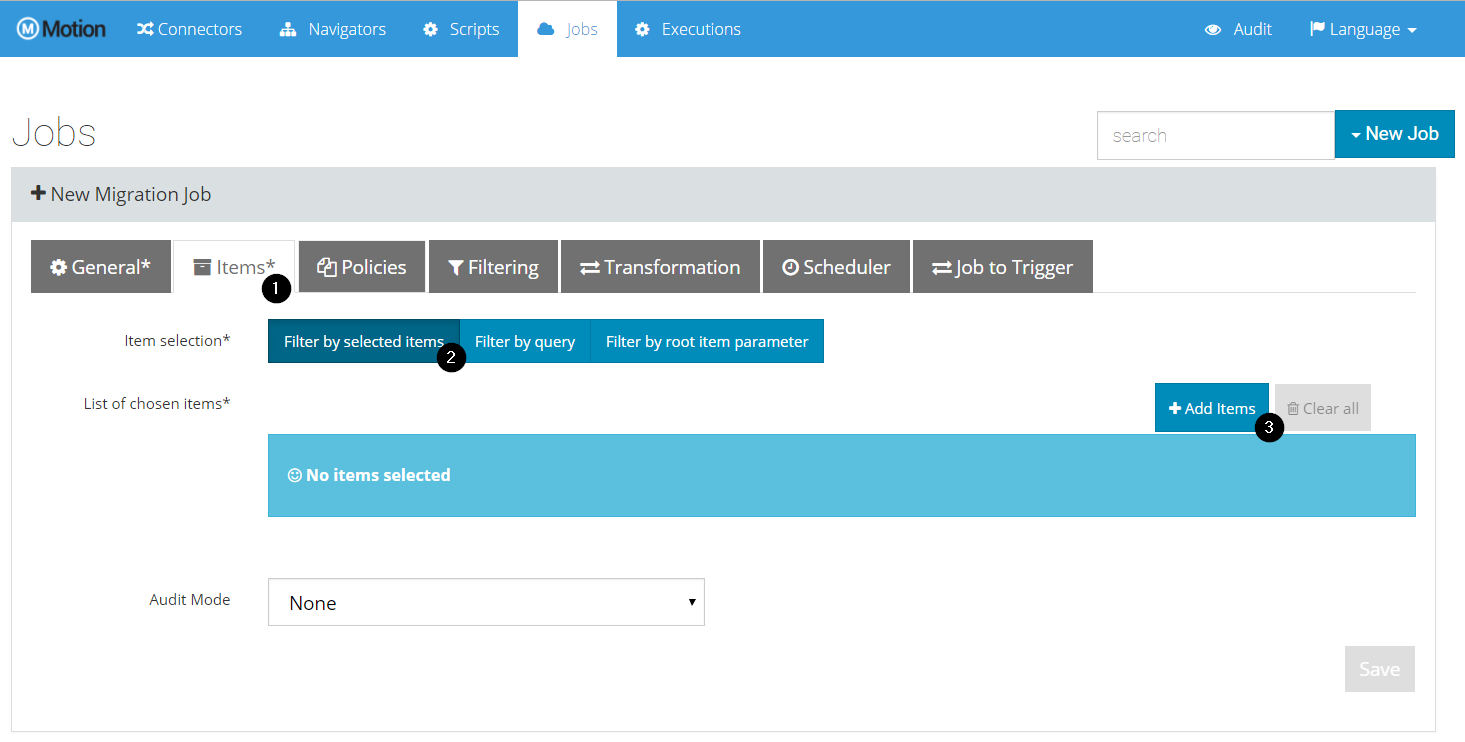
-
Select Site Navigator from the Navigator list.
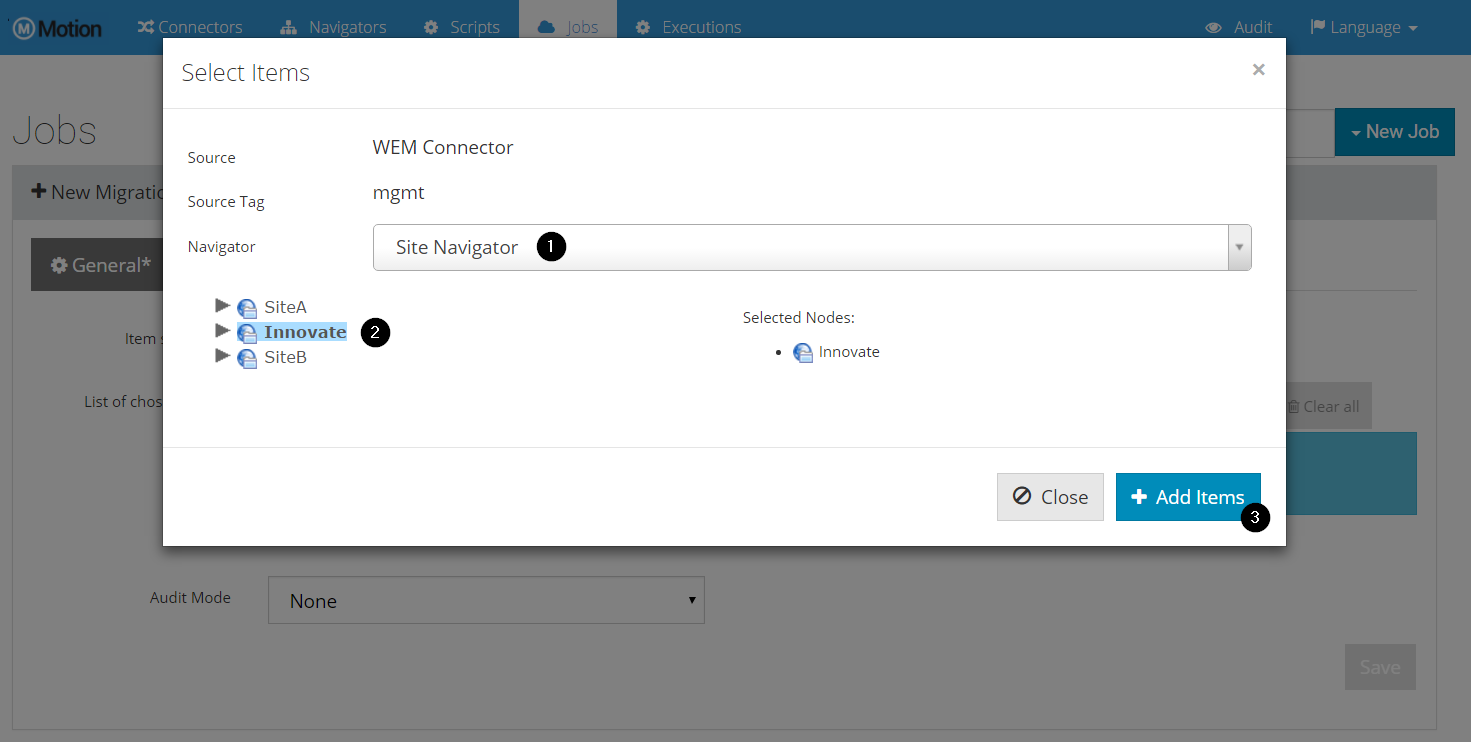
-
Select the site to export
-
Click Add Items
-
-
On the Policies tab, select both Channel Contents and Children Channels reference types, and select Exapand Strong References.
-
Click Save
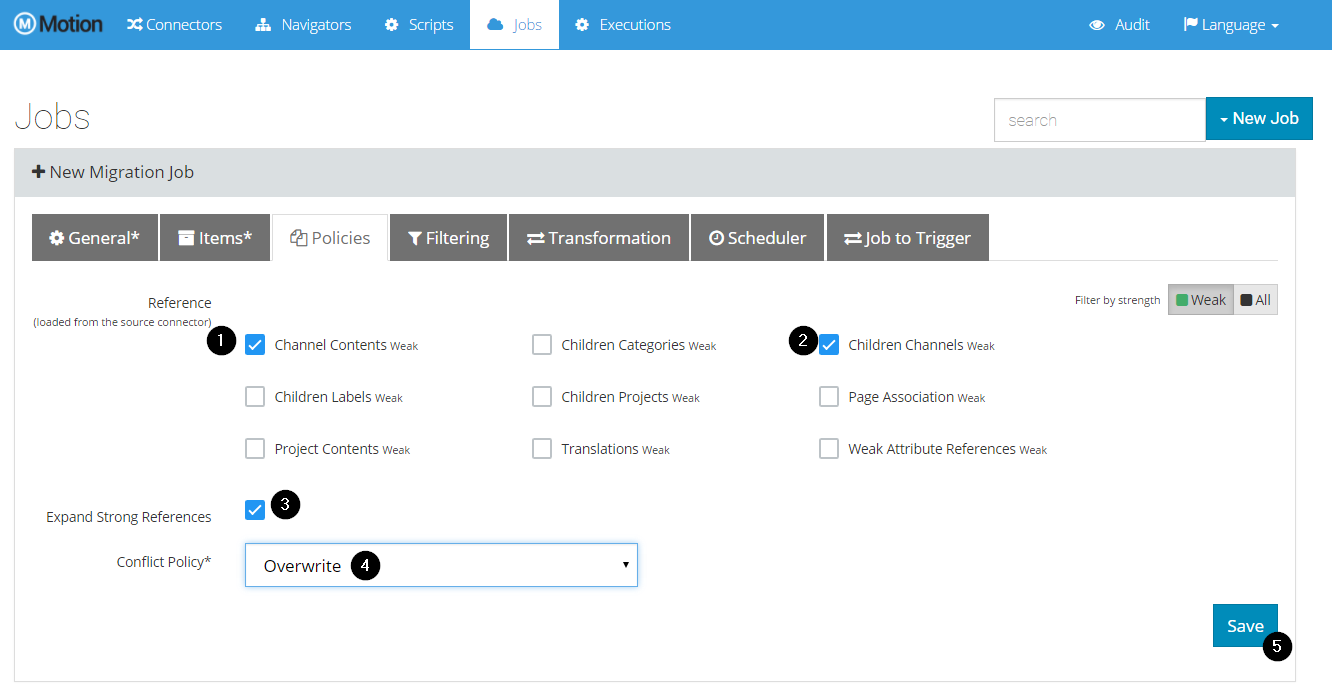
You can now launch the job. Next, you will run computation and migration phases in different steps; a job can run computation and migration in a single step.
To start computation:
-
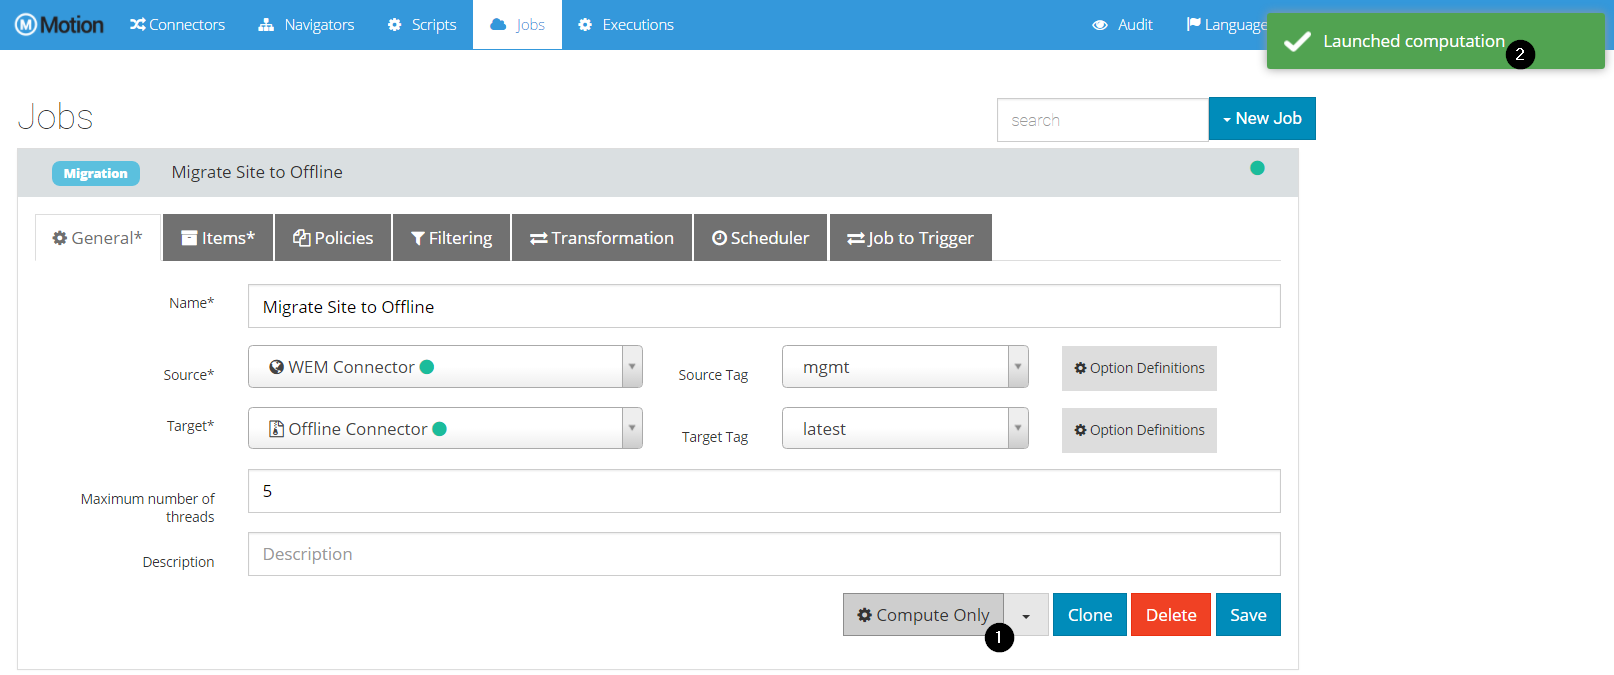
Click Compute only on the Export Site to Offline job. If successfull, a success notification will appear in the top-right corner.
-
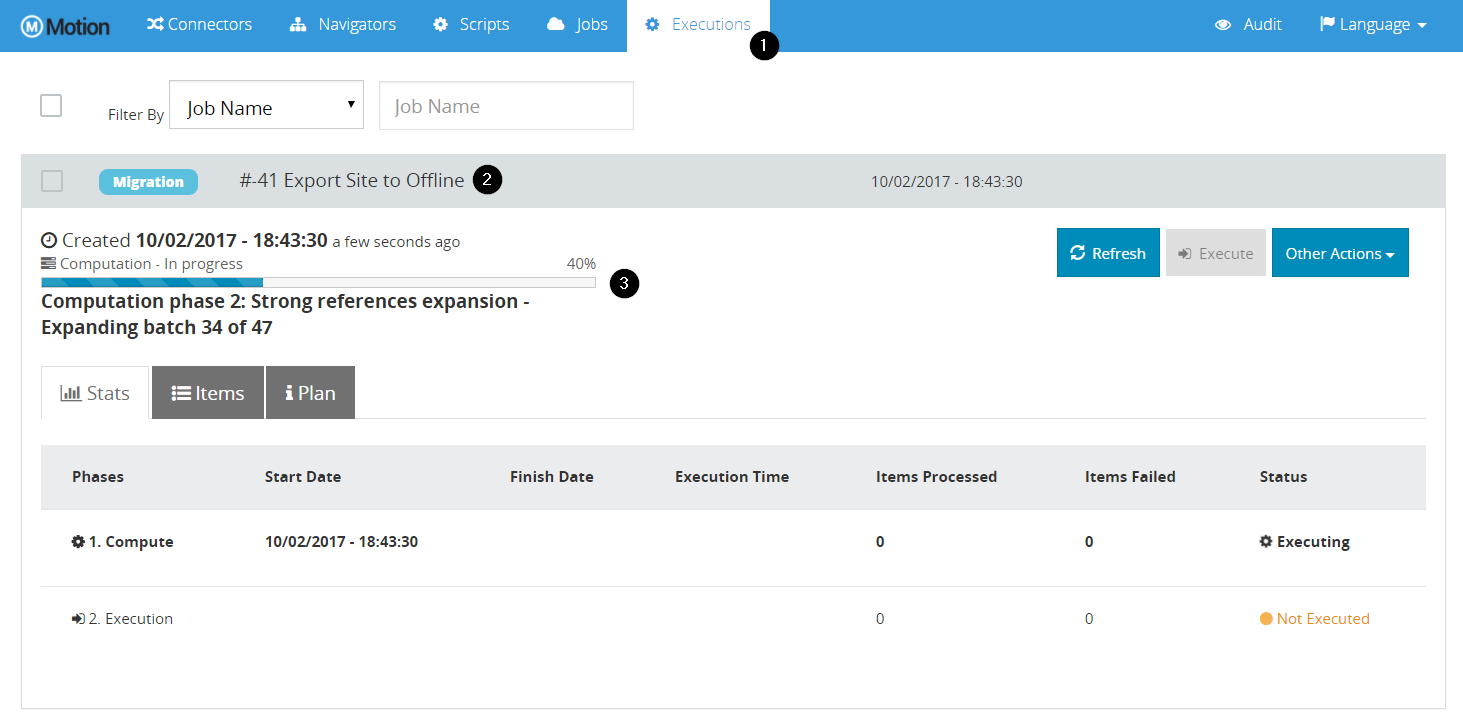
Click the Executions tab.
-
Expand the execution corresponding to the Export Site to Offline job. There you can see the progress for your execution.
-
Click Refresh to explicitly refresh the execution information, otherwise it will refresh every 10 seconds. After Computation is completed, you can see how many items were processed.
-
Click the Items tab to display all computed items. You can filter by any column (for instance, look for all custom Innovate type instances).
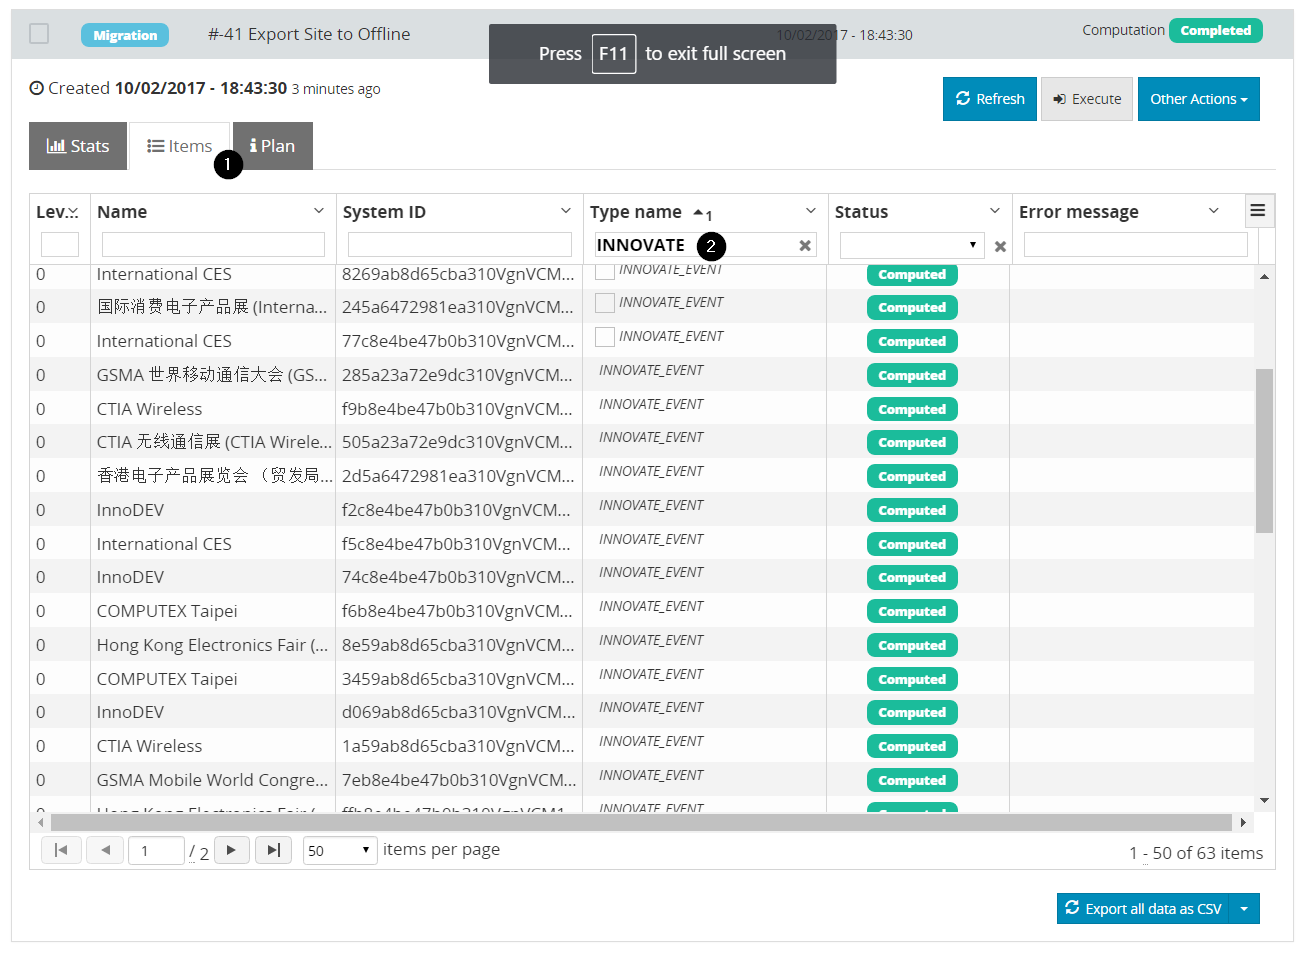
Now that computation is completed, you can migrate contents to the offline connector.
To start migration:
-
On the Executions tab, Select the Export Site to Offline execution and click Migrate.
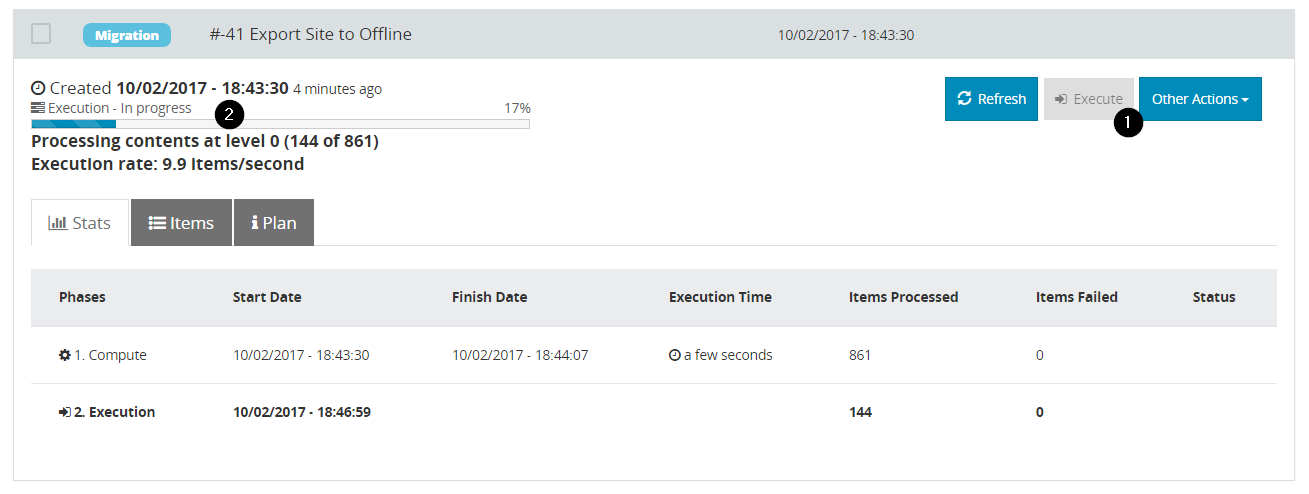
-
Click the Items tab to check for failures (even during migration).
After migration is completed, you can see the offline connector in the folder provided.
To verify items in the offline connector:
-
On the Navigators tab, expand Site Navigator panel.
-
Click the Test tab.
-
Choose the offline connector from the dropdown list. The Innovate site shows in the tree.
-
Expand the tree and view an item data in the Data tab in the right pane.
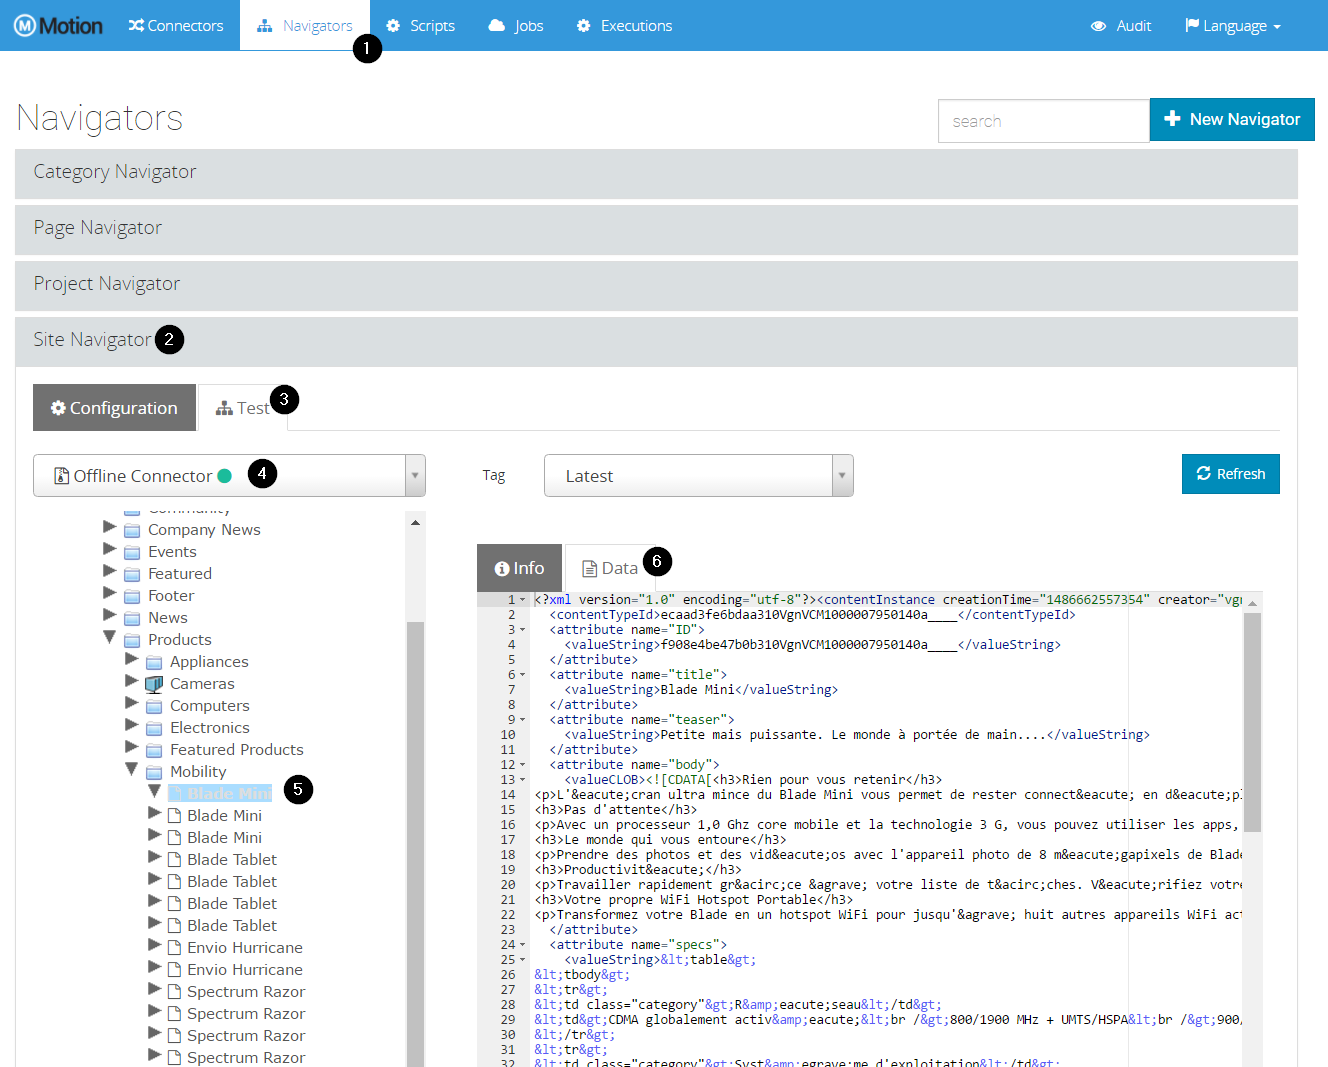
Part 1 - WEM Motion Engine
3. Basic Concepts
This chapter discusses basic notions about WEM Motion. These concepts are important for you to understand better why an item ends up being included or excluded from a WEM Motion Job.
-
Items and References — Describes how data is organized within the WEM Motion engine and connectors
-
Computation — Describes the phases of the computation process and explains how WEM Motion engine solves cycles.
-
Execution — Describes the execution process of a job. An execution might deal with both exporting (read) data from a source connector and importing (write) data to a target connector.
3.1. Items and References
The data present on each Motion connector is represented as a directed graph. The nodes and edges refer to the Items and References, respectively.
All items have data such as modification times, display names, or even information specific to the service (such as WEM specific information). Optionally, an item can also have attached data that points to files available on the file system.
For example, the following graph shows a simple file system with items and references:
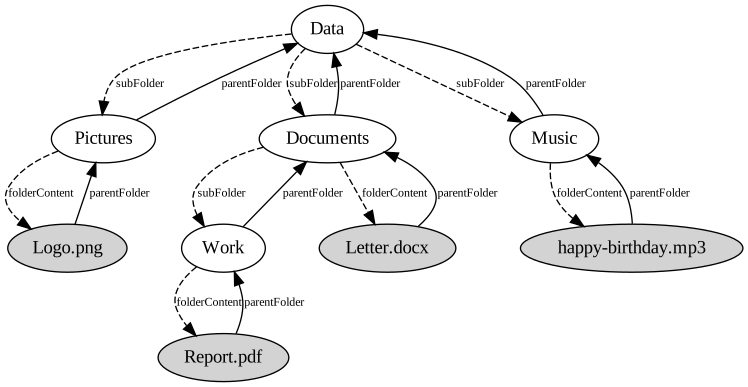
References can be either weak (dashed lines) or strong (solid lines).
A strong reference means that an item can only be created or updated after the item it points to is created.
For instance, on the Pictures to Logo.png weak reference, Pictures can be created without the presence of Logo.png.
But since the reference from Logo.png to Pictures is strong, Logo.png cannot be created if Pictures does not exist.
While not shown in this graph, items can have associated metadata such as the path, modification times, or ownership values. In the case of files, they also have attached data that represents the actual file contents.
3.2. Computation
For a WEM Motion Job to be executed it first needs to compute what items to process. The computation consists on expanding a graph (as shown in Items and References on page 10), given a set of Root Items and the Reference Types to expand.
Computation depends on the following options:
| Option | Description | Notes |
|---|---|---|
|
Source Connector |
Mandatory option |
|
Where to start the graph expansion |
Mandatory option |
|
Which reference types use for the expansion |
|
|
Include Strong references in the expansion |
Default value is |
|
Filter items and references during expansion |
|
|
Filter items and references after expansion |
Having configured the computation options, the Motion engine can start expanding the graph. Computation expansion is performed on five (5) phases:
- Phase 1
-
-
Process root items and explicit references (expand root nodes).
-
Expand by explicit references and with expansion filter.
-
- Phase 2
-
-
Expand by strong references (starting from items computed on phase 1).
Note:
This phase only executes ifincludeStrongReferences = true.
-
- Phase 3
-
-
Apply post expansion filter.
-
- Phase 4
-
-
Obtain strong references between all expansion elements.
Note:
This phase only executes ifincludeStrongReferences = false.
-
- Phase 5
-
-
Resolve possible cycles using a cycle resolver (see page 12 for more information).
-
Apply the Topological Sort (using only strong references).
-
After expansion is complete, items are organized into Levels that are calculated by applying a Topological Sort on the expanded graph (only strong references are considered). The item’s level indicates that an item on level N can only be created if all items on level N - 1 have already been created.
With an expanded graph organized by levels, Motion engine can then write on the target connector because all items dependencies are clearly defined.
3.2.1. Cycle Resolver
The resulting graph from computation may contain strong references cycles.
A strong reference cycle is when an item A1 depends on an item B1, B1 depends on an item C1 and C1 depends on A1.
This would create a problem during the migration phase where an item would end up being imported on the wrong order.
To mitigate this problem, connectors can define which strong references from a cycle can be converted to weak references, thus breaking the strong references cycle. The Boolean property weak-on-cycle can be added to the references definition no the connector properties.
This cycle resolver policy is applied on phase 5 of the computation. The following diagram demonstrates how this works:
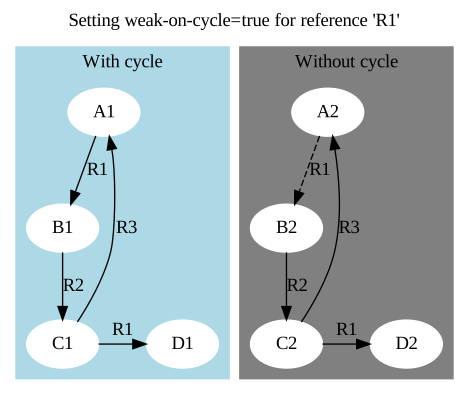
Since R1 from A1 → B1 was converted into a weak reference (dashed line), there is no longer a cycle on the strong references graph.
|
Note:
That C1 → D1 is not part of the cycle, so it has not changed to weak.
|
3.2.2. Example
The following graph shows an example of how computation is performed in all five phases:
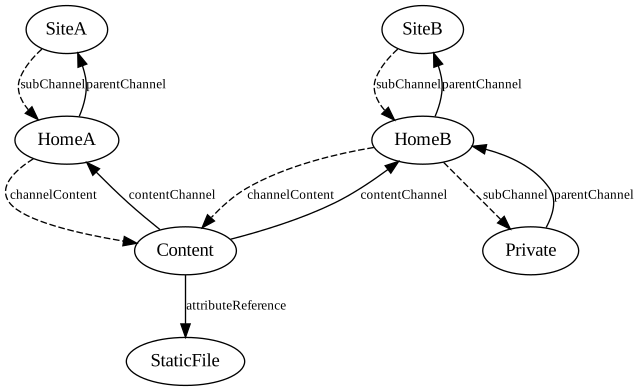
This graph has five types of references: subChannel, parentChannel, channelContent, contentChannel and attributeReference.
There are four item types: Site (SiteA and SiteB), Channel (HomeA, HomeB, Private), Content and StaticFile.
For example, to compute a graph with SiteA, but exclude SiteB the computation options for this expansion can be defined as follows:
| Computation Option | Value |
|---|---|
|
|
|
|
|
|
|
|
|
|
The results for each computation phase are as follows:
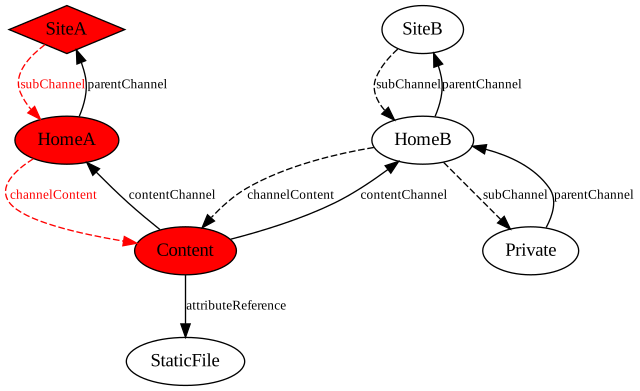
- Phase 1
-
The items marked with a diamond are root items. All items and references shown in red are part of phase 1.
- Phase 2
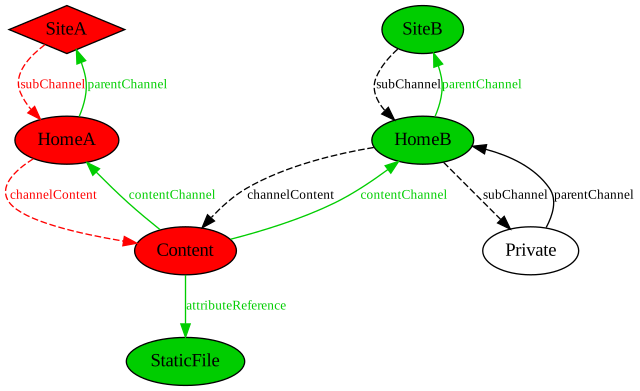
-
Starting from the phase 1 graph, all strong references are expanded during this phase (shown as green):
- Phase 3
-
SiteBand its references are removed from the graph (indicated with light gray color):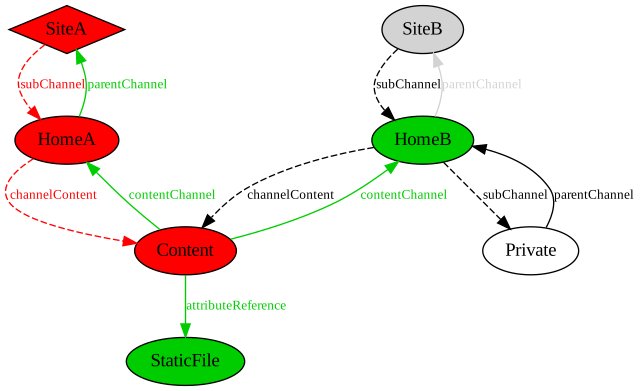
- Phase 4
-
All strong references between all expansion elements are already expanded, so there is nothing to do on this phase for this example.
- Phase 5
-
Since there are no cycles, there is no need to use a cycle resolver. Only the topological sort is performed with the calculated level number annotated on the top left side of each computed item.
Note:
SinceSiteBis not included on the computation,HomeBstays on level 0 because it doesn’t have any strong references to other items.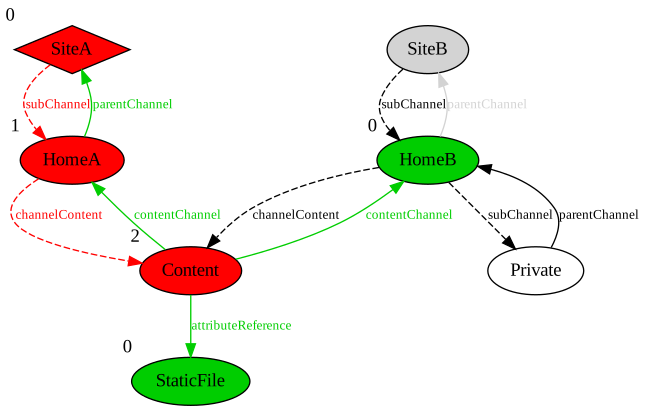
3.3. Execution
The execution phase can proceed after the computation is complete. Execution consists in exporting (read) data from a source connector and importing (write) to a target connector.
Since every item from computation comes annotated with a level number, the execution can be performed level by level, where items from each level are processed in parallel.
3.3.1. Failed by reference
When an item execution fails, its strong referring items on superior levels should also be marked with a failed status. This way, an execution will not attempt to create an item on the target connector unless all of its dependencies are already there.
Refer to the following graph to view what happens with failed by reference.
The execution of B (level 1) fails, and thus C and D are marked as failed (by reference):
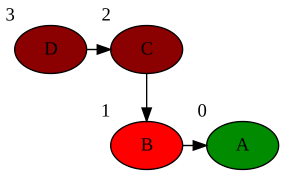
In this case, A is the only item that migrates, B is marked as failed, and C and D are marked as failed by reference.
4. Connectors
Connectors are a key concept to WEM Motion as they allow the Motion engine to access different services (such as VCM or WEM). These connectors all share a common API, which makes it easy to add new connectors for new services.
Before starting to configure a connector using the WEM Motion Engine interface, you must first install it on a host that can connect to the service host (such as a WEM host). Refer to the given connector installation guide for more details.
All connectors have associated metadata that includes important information about what it supports, as well as options to use during computation and migration. This metadata usually includes data such as the items and references types, tag names, or option definitions. A complete list of metadata options for each connector is present on the respective connector User Guide.
There are two types of connectors:
-
Remote — The connector is linked to an external service (such as a WEM)
-
Offline — The connector reads and writes data from the file system
The offline connector might be useful for migrations where the source and the target connectors are on different or restricted networks, where it can be used as an intermediary between them.
In that case, a migration is performed from the source remote connector to an offline connector, where migration data is stored on file system. Then the contents on file system can be moved to the target host connector, and a migration from an offline connector to the target remote connector can be performed.
4.1. Offline Connector
An offline connector stores data from any connector on the file system. By default, it packages that data into ZIP64 files (one file per migration thread).
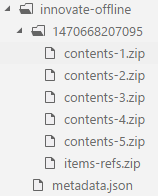
For each execution that has an offline connector as the target, a tag with the execution time will be created. This tag translates into a folder in the file system named with this time in milliseconds. For example, consider the following file structure:
|
Note:
Although the same offline Connector can be used in several jobs it is recommended that they are associated only to one Job. |
You can move the created folder to a different system and it is ready to be used by another instance of Motion engine.
|
Important
Currently, the item date and time columns are exported without timezone information (they use the current system timezone). For that reason, environments where a specific offline connector data is used must all have the same timezone, otherwise dates / times columns will differ from one environment to another. |
4.2. Connector Configuration
After having the connector running, you must configure it on the Motion engine.
To configure the connector on the Motion engine:
-
Select the Connectors tab in the Engine interface
-
Click New Connector
-
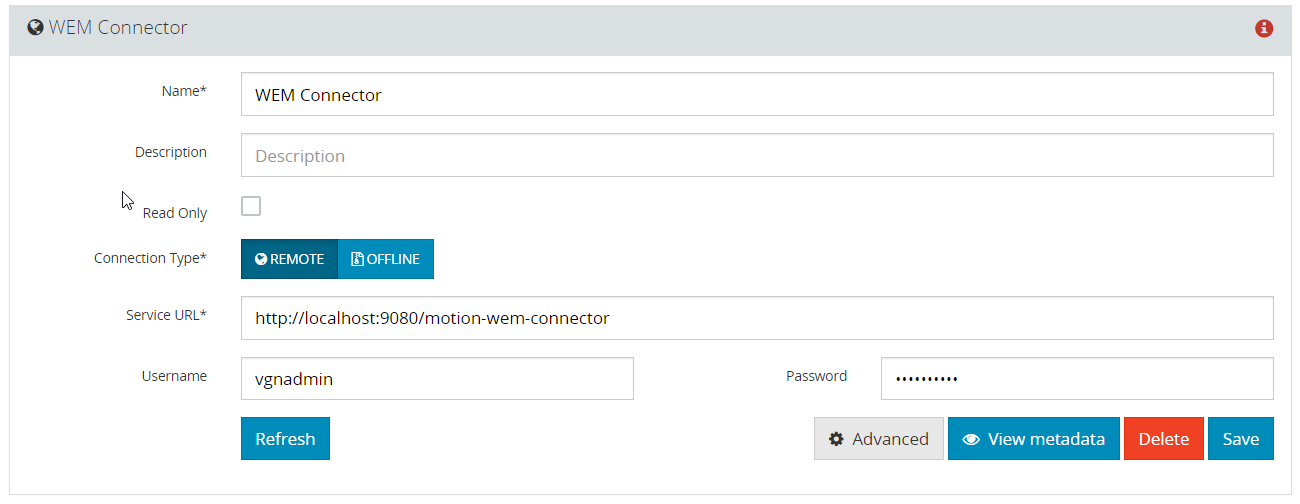
On the form, provide the following information:
-
Name - Display name of the connector on Motion engine.
-
Read Only - Whether this connector will be read-only or not.
Note:
In case the connector is configured as read-only, it will not be possible to configure it in Script and Deletion jobs, as well as a target connector in Migration jobs. -
Connection Type - Choose either Offline or Remote to enable the following options:
-
Remote
-
Service URL - URL where the connector is running (Example: http://<host>:<port>).
Important
This URL must be accessible from the Motion engine’s host. -
Username/Password - Credentials for authentication on the connector.
Note:
The user must have Read/Write privileges on the platform targeted by the connector. -
Max Connections - (Optional) Maximum number of connection allowed to the connector.
-
Time to Live - (Optional)
-
-
Offline
-
Offline Directory - Directory to where offline connector should write
Important
You must have read and write permissions on this directory. -
Zip - Whether to package the data as a ZIP or not
-
-
-
-
Click Save
|
Important
Ensure that the number of connections will always cover the worst case scenario. |
4.3. Health Information
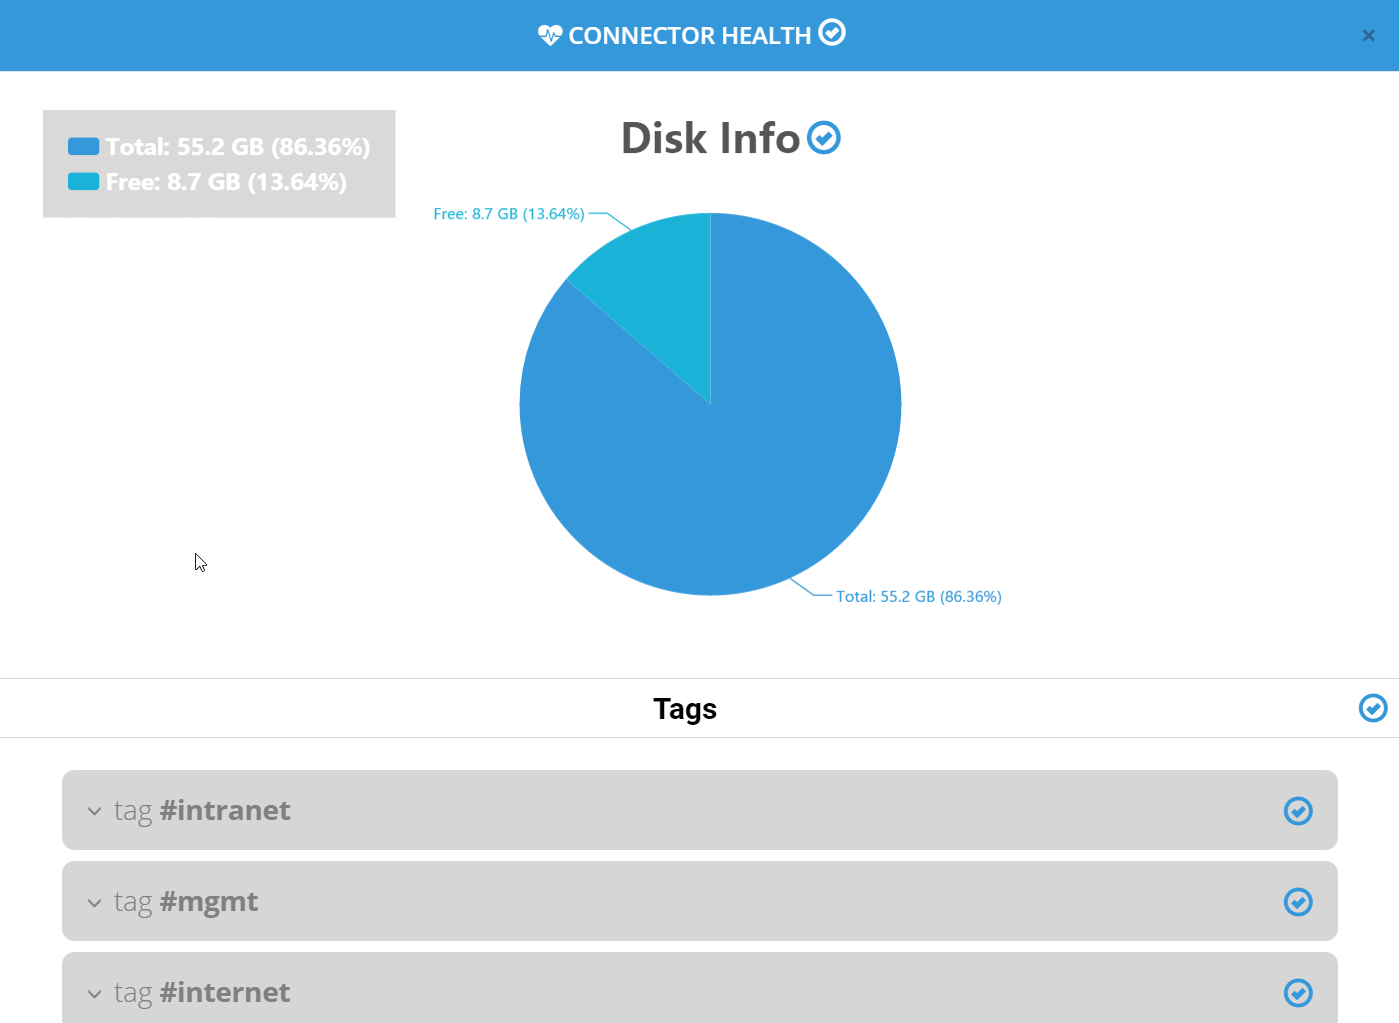
To make sure that your connector is properly set up, select your connector and click Refresh. If this is the first time, there might be a brief delay due to the initial setup.

When the refresh finishes, a small circle will appear on the right side of your connector’s entry.

Motion engine automatically refreshes connectors every 10 minutes by default.
|
Note:
The Refresh button updates both health and metadata of the connector. |
You can click the circle icon to obtain more information about a connection failure, or to obtain more information about the connection. A window opens with detailed information about the connector health.
4.4. Metadata Information
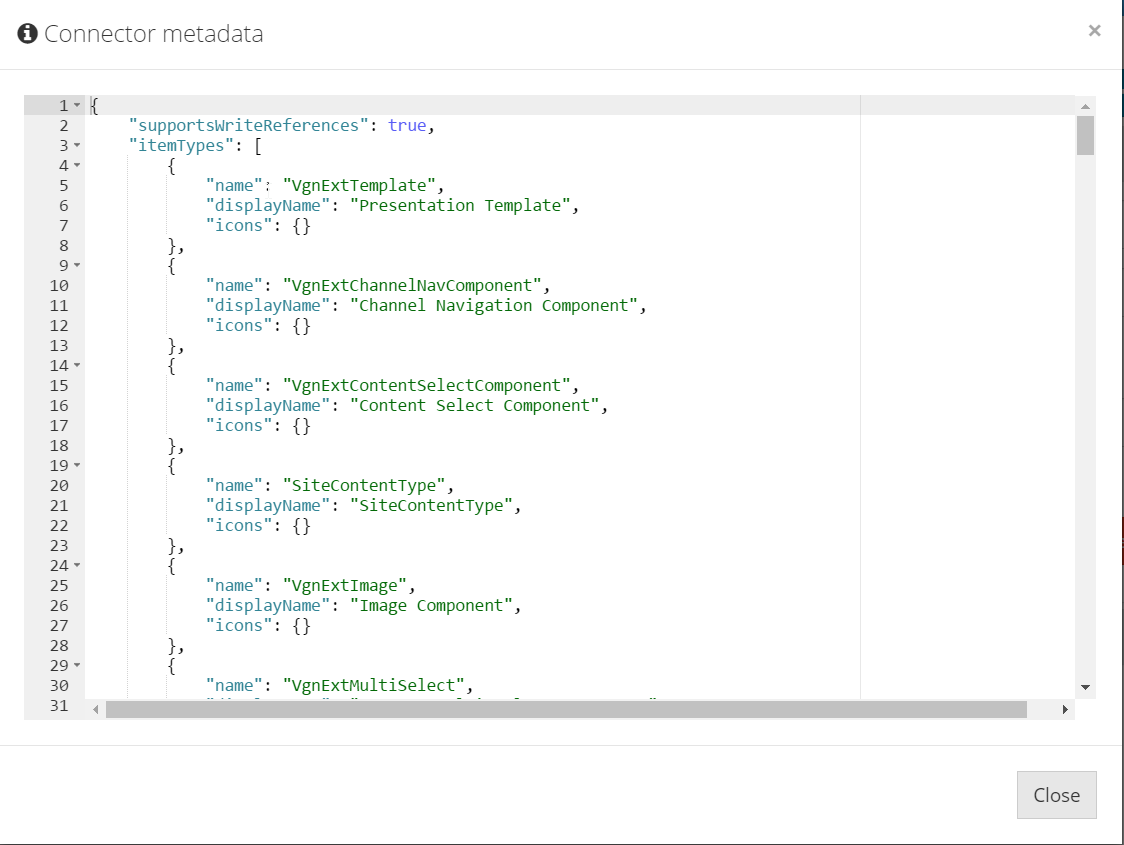
The metadata of a connector gives more information about how the connector is configured.
When the connector is running, you can click View Metadata to open a window displaying the metadata of the connector expressed as JSON.
5. Navigators
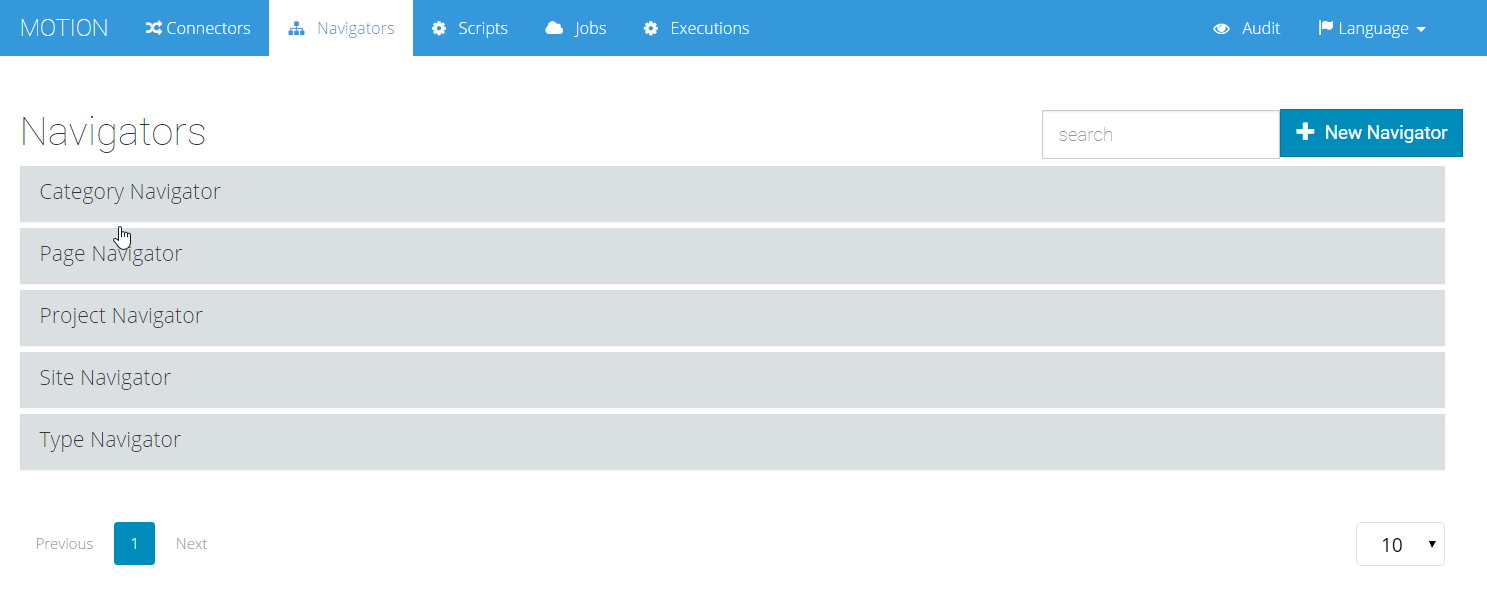
Navigators allow you to navigate through the actual contents of a connector and view detailed information of items present on the connector.
This information can be used later for scripts, job queries, or to verify that a certain item is present on the connector.
To create a new navigator:
-
Open the Navigators tab in the Engine interface
-
Click New Navigator
-
On the form, provide the following information:
-
Name - Display name of the connector on Motion Engine
-
Root Item Filter - Where clause to select the root items of the navigation
Note:
The Root Item Filter should respect the source system SQL syntax flavor. Also, available columns depend on which columns are available for connector items.
-
Reference - Select which references you want the navigation to be expanded upon
-
-
Click Save
-
After the navigator is created, use the Test tab to navigate through the data of any of your configured connectors.
5.1. Navigator Example
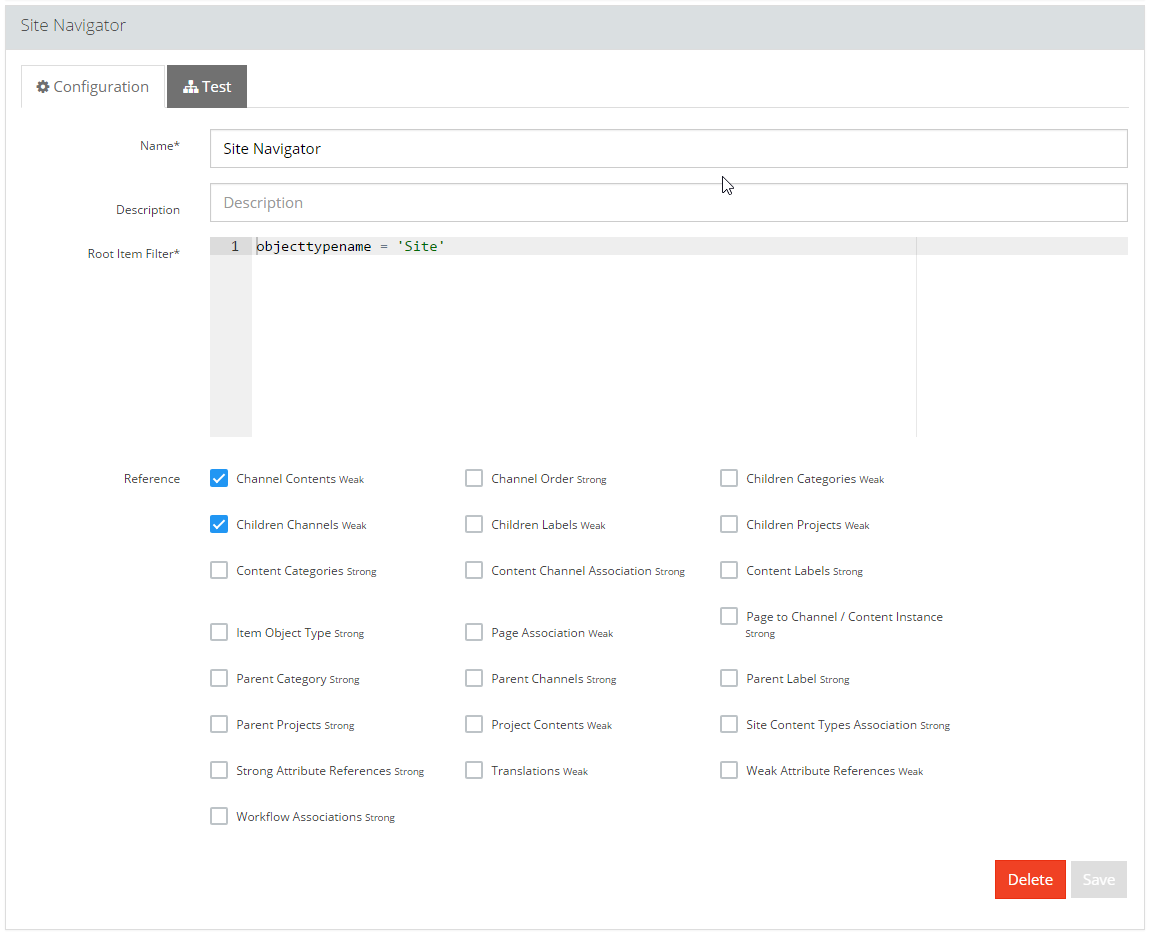
To create a navigator that allows you to navigate on a Motion connector site structure, the Root Item Filter value must be objecttypename = 'Site', and Reference should include the following references:
-
Children Channels
-
Channel Contents
This means that at the root of this navigation, you will find all Site items and when expanded, all of their children channels and channel contents appear.
5.2. Testing the Navigator
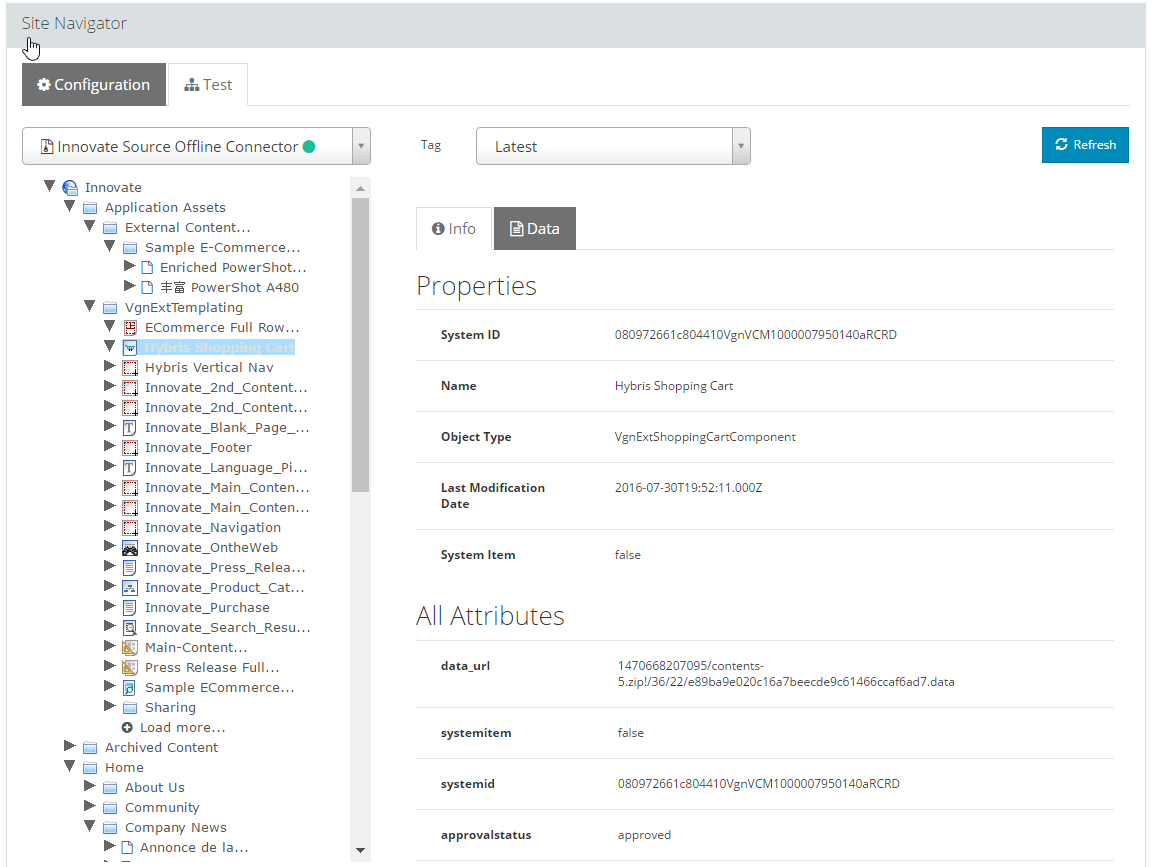
The Test tab offers you means to test and understand how the Engine performs the expansion.
To test a navigator:
-
Select a connector from the drop list on the left.
-
Select a connector tag (if available).
-
Click Refresh. If there are items that satisfy the configured Root Item Filter query, you will see a tree view of your connector.
There will be two panels:
-
The navigation tree (on the left) allows you to navigate between the different elements.
Note:
To preserve performance, the tree view will only load 20 child items for each node at a time. To load the next 20 items click Load More. -
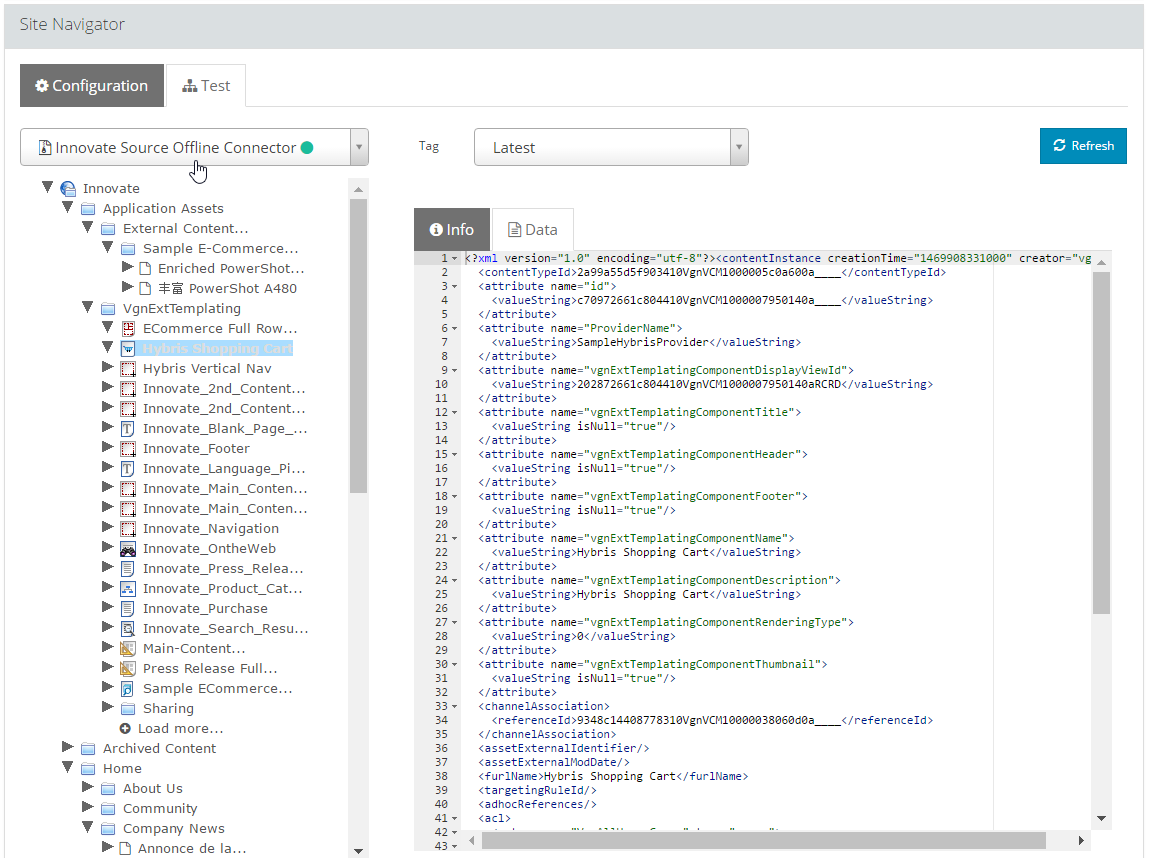
The right panel displays the properties and attributes, as well as the associated data in XML or JSON format (depending on the service associated with the connector) to each selected element in the navigation tree.
The following images ilustrate both panels:
6. Scripts
A new feature introduced with WEM Motion 2.1 is the Scripts tab. This feature allows a script to be used by multiple Jobs, which can vastly reduce a Job’s configuration complexity.
These scripts can be used with the different types of new Jobs also introduced on WEM Motion 2.1.
|
Note:
See the Jobs section for more information about the new Job types. |
All scripts are written using Groovy. See the Groovy documentation for more information.
The scripts are written accordingly to the scope where they will be executed:
-
Script to be called on a Script Job
-
Script to be called on a Comparison Job
-
Script to be called on a Migration Job
-
Script to handle execution errors
6.1. Job Script
A job script will be executed directly on the WEM Motion Connector.
Since the script is executed on the Connector’s scope, it is possible to access the libraries and APIs available on the Connector.
|
Tip:
Samples of scripts for script jobs are available in the section Job Scripts Examples on page 62. |
On the script body, you have the following variables available:
| Variable | Description |
|---|---|
|
Instance of SLF4J Logger, can be used to write logging information to WEM Motion Connector’s logs |
|
Instance of
|
|
a Datasource to the target WEM Motion Connector product (i.e. WEM) |
6.2. Comparison
A comparison script is used to compare two items: the source and target items. By having a script performing the comparison it is possible to exclude from the comparison information that is not important.
|
Important:
|
|
Tip:
Samples of comparison scripts are available in the section Comparison Scripts Examples on page 62. |
The following variables are available:
| Variable | Description | ||
|---|---|---|---|
|
Instance of SLF4J Logger, can be used to write logging information to WEM Motion Engine’s logs |
||
|
Instance of |
||
|
Instance of |
||
|
Instance of
|
||
|
Instance of
|
||
|
|||
|
A |
||
|
|||
|
A |
6.3. Migration
A migration script (formerly known as a transformation script) is used to edit a particular item or set of items right before writing to the target connector. That means that the script is applied during migration after reading the item from the source connector, and before writing it to the target connector.
These scripts are useful to add, remove, or update item properties (or associations, etc.) that are specific only to the environment where they reside.
For instance, if the property named abc found on source connector items has been deprecated on the target connector, you can use a migration script to remove it.
|
Tip:
Samples of migration scripts are available in the section Migration Scripts Examples on page 62. |
| Variable | Description |
|---|---|
|
Instance of SLF4J Logger, can be used to write logging information to Motion engine’s logs |
|
Instance of
|
|
|
|
A |
6.4. Error handling
During a Job Execution it is common to have expected errors that will occur several times in long executions. The solution for common recurring problems can be achieved by using an error handling script to automate that process.
The basic idea behind these scripts is that sometimes an item execution fails because there is something on one of the connectors that needs to be updated or deleted. These are sometimes simple operations that can easily be incorporated on a script.
|
Important:
|
To directly access the Connectors the sourceConnector and targetConnector are available.
With these you can perform direct operations on any tag of the Connectors.
The script must explicitly set statusInfo.status = JobItem.Status.FAILED_RETRYABLE so that WEM Motion Engine is aware that the item execution is to be repeated, this time without errors.
|
Tip:
Samples of error handling scripts are available in the section Error Handling Scripts Examples on page 62. |
| Variable | Description |
|---|---|
|
Instance of SLF4J Logger, can be used to write logging information to WEM Motion Engine’s logs |
|
Instance of
|
|
Instance of Job. Contains the following properties:
|
|
Instance of
|
|
Instance of
|
|
Source connector |
|
Target connector |
7. Jobs
After configuring the license key, you can access the Jobs tab.
|
Note:
See the OpenText™ WEM Motion Engine installation guide for further instructions on how to generate and configure your License Key. |
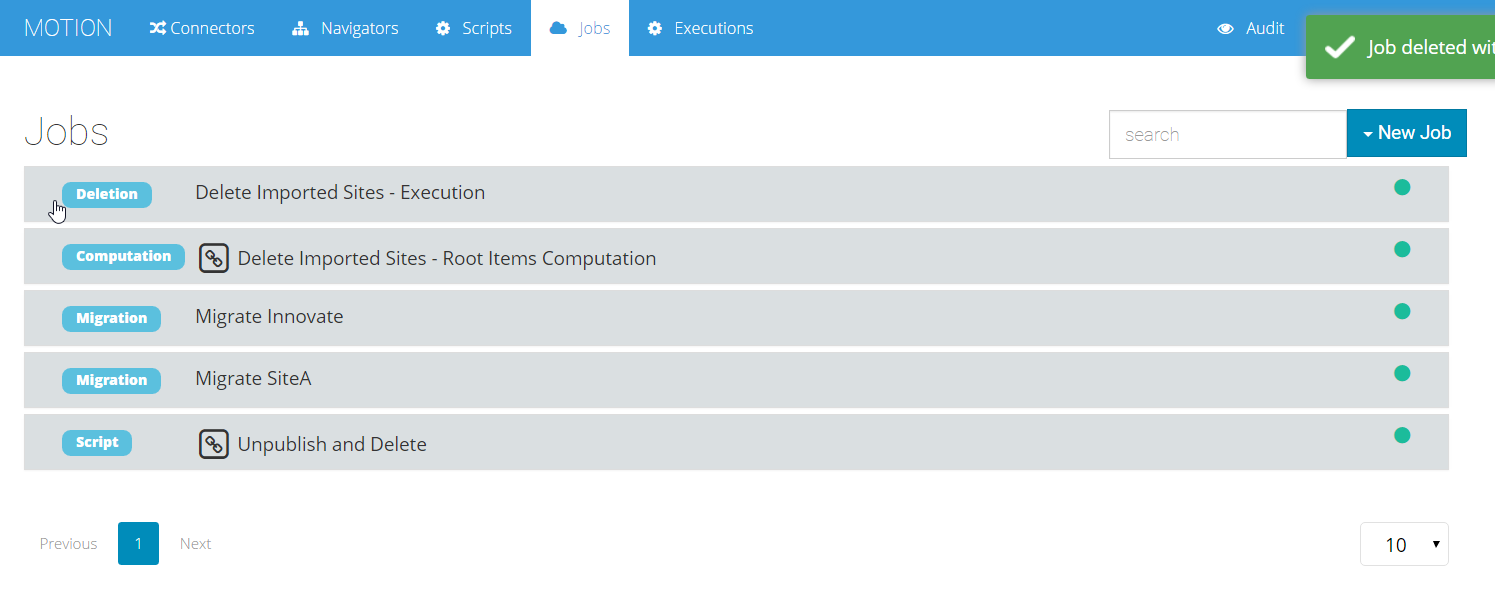
Starting with WEM Motion 2.1 there are not just Migration jobs, but rather five different types:
- Comparison
-
Compare a source and target connector.
- Computation
-
Only perform the computation phase on a source connector.
- Deletion
-
Delete items from a connector.
- Migration
-
Write contents from a source connector to a target connector.
- Script
-
Execute a script on a target connector.
7.1. Configuring a Job
For all Job Types the job configuration is similar with just a couple of minor changes. However, the following seven configuration phases are common to all Job Types:
-
General configurations for source and target connectors/tags.
-
Selection of Items to process.
-
Policies for expansion and conflicts.
-
Filtering during and/or after expansion.
-
Transformation scripts to be applied.
-
Parameters to be applied.
-
Scheduler of executions.
-
Select a Job to Trigger when execution completes.
To configure a job:
-
On the General tab, enter the following values or selections:
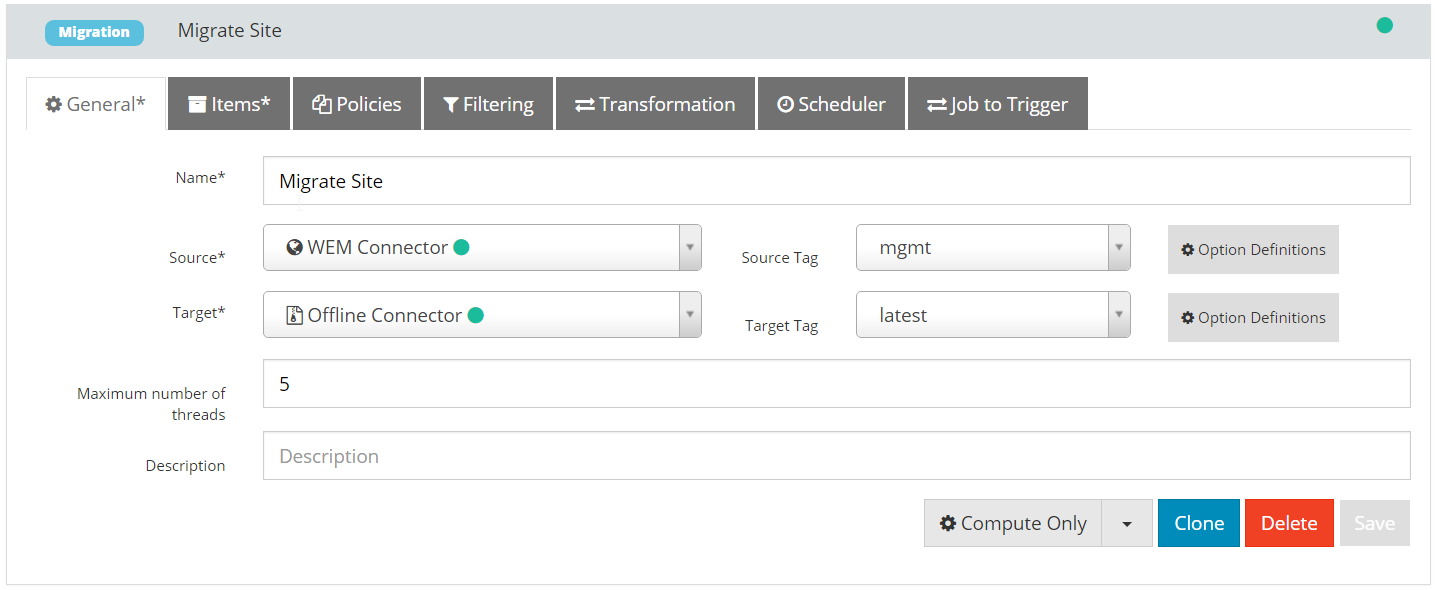 Figure 14. General tab
-
Name - Unique name for the job.
-
Source (and Target) - Choose the connector. Additionally, for Comparison and Migration Jobs select the target connector.
-
Tag - Select the connector tag. The default selection is the
defaultTagNameas defined on the connector metadataNote:
Read-only connectors and / or tags won’t be displayed in case the job type is either Script or Deletion, or in the target configuration in Migration jobs. -
Option Definitions - Configure various options available to the connector.
With Option Definitions you can configure certain settings that are specific to each connector.
The following options are available for all connectors:
Name Description Default Value systemItemOverwriteAllowedAllow system items on the target connector to be overwritten. Important: Use this option with care as it may compromise your target system!
falsemarkFailedByReferenceWhen an item migration fails, all items with a strong reference to that first item will be marked as failed also.
trueNote:
See the selected connector documentation for a complete description of the connector’s specific Option Definitions.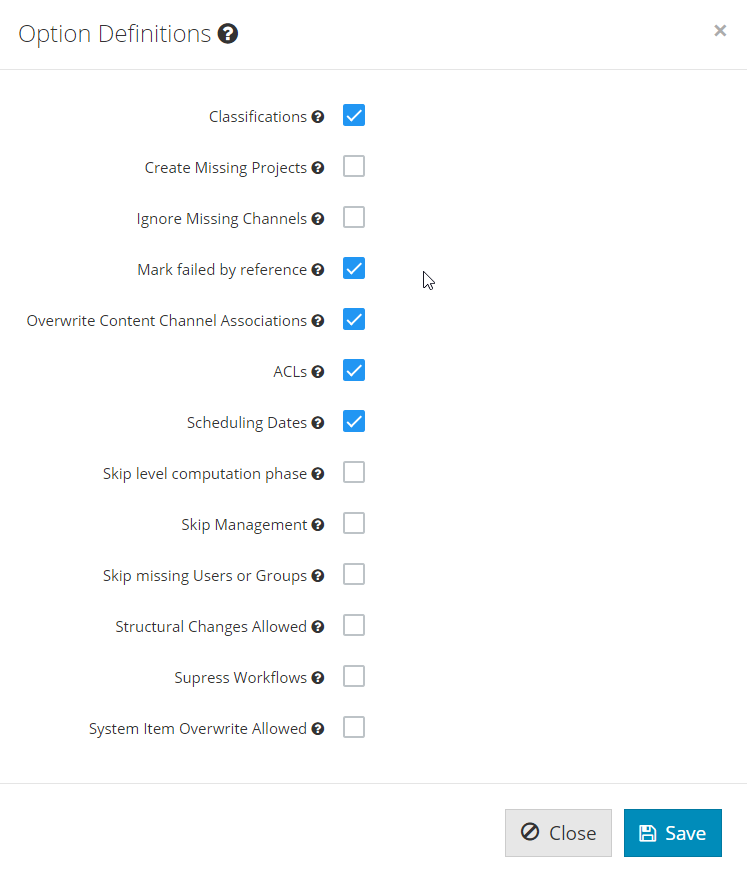 Figure 15. Option definitions example
-
-
Description - Optionally provide a job description
-
-
On the Items tab you can select items that you want to start the computation’s graph expansion:
-
Selecting Items — Use this option to select items, either using an existing navigator or specifying a list of ids.
-
To select items, click on the Add items.
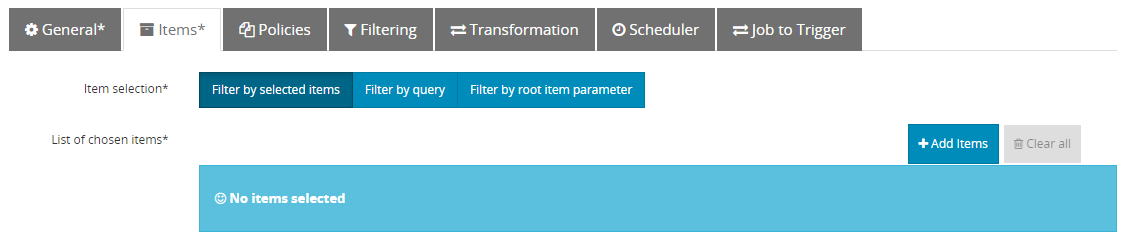 Figure 16. Items tab
 -
On the Select Items dialog, you can choose between By Navigator and By Id tabs.
-
Using By Navigator tab, select a navigator from the Navigator list. If there are items that satisfy the configured Root Item Filter of the selected navigator, you will see a tree view of your connector.
There will be two panels:
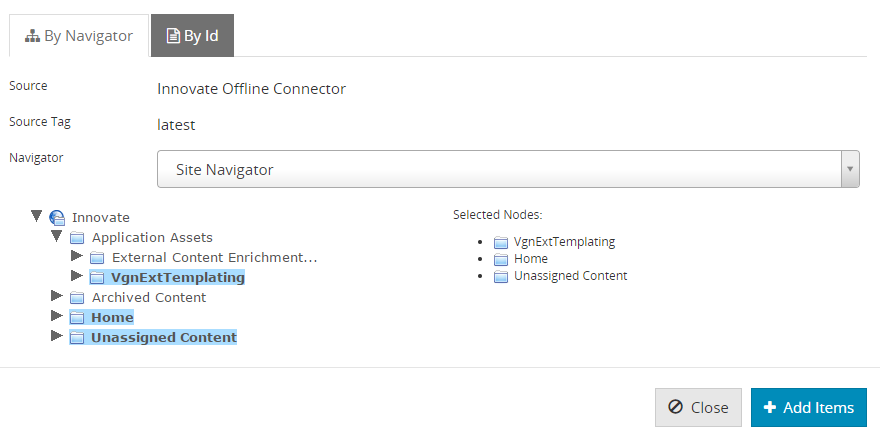 Figure 17. Select items dialog - By Navigator
-
The navigation tree (on the left) allows you to navigate and select the elements.
-
The right panel shows the selected items from the navigation tree.
-
-
Using By Id tab, set the list of items on the panel. Each line should have one item id -
systemId, as shown below: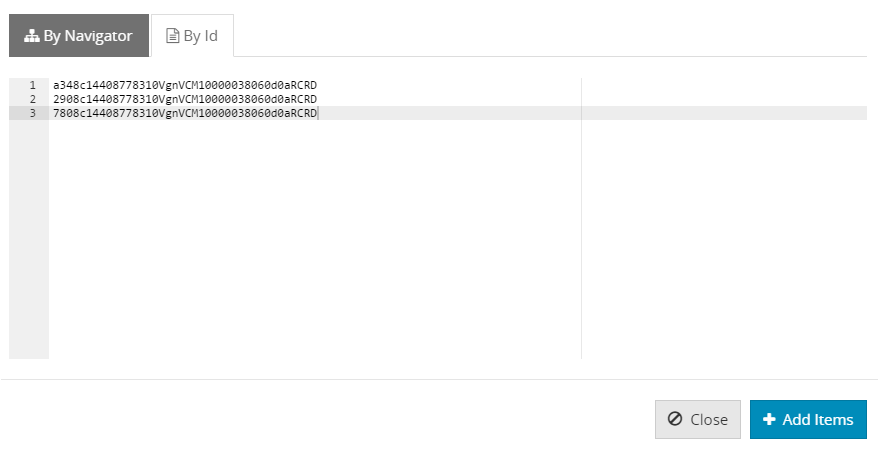 Figure 18. Select items dialog - By Id
-
-
Select all required items and then click Add Items.
-
Selected items appear in the Job panel, displayed in a list with pagination, as shown below:
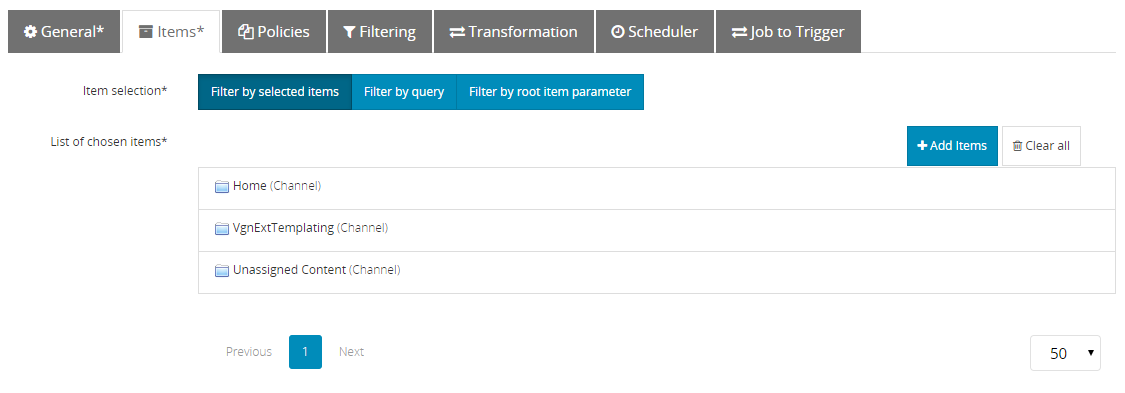 Figure 19. Select items manually
-
-
Query — Write an SQL
Whereclause of a query on the Root Items Filter field. Figure 20. Select items with a query
 -
Root Item Parameter — Use the output of a previous job an the input the this job.
-
Filter by Root Item — Use this option to select items by root item parameter.
 Figure 21. Select items with a root item parameter
 -
Audit Mode — In Migration Jobs you can define the audit mode.
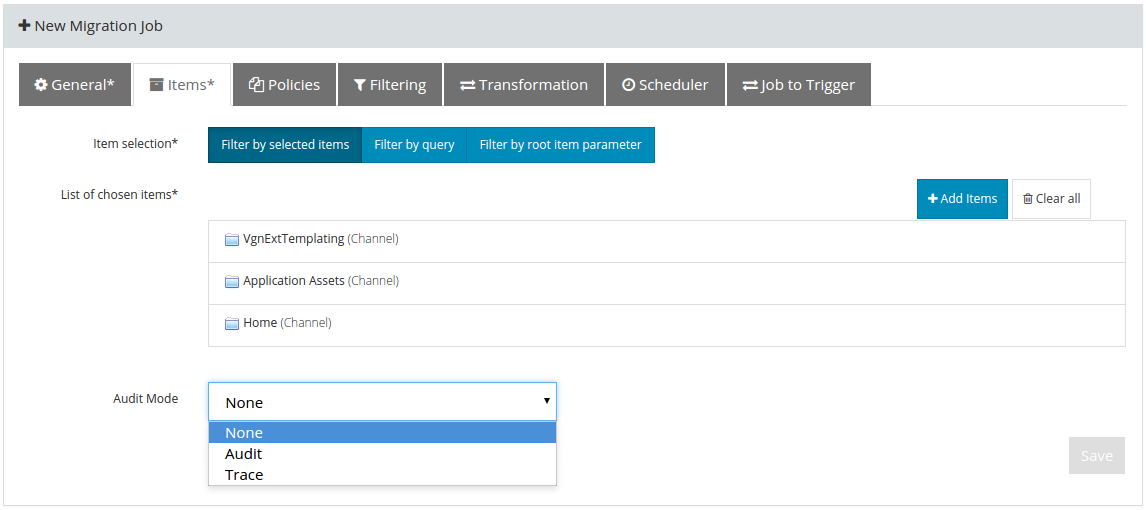 Figure 22. Select items with a root item parameter
-
None — The Job Items will not be audited.
-
Audit — The Job Items will be audited with generic information.
-
Trace — The Job Items will be audited with detailed information and the user can choose a script to select the items to be audited.
Important:
Both Audit and Trace may have some performance impact. It will also occupy more space in the database, because more data needs to be computed and stored. For instance, in Trace mode, a MD5 checksum is computed for item attachments, and it also stores the exported and transformed data for each traceable item.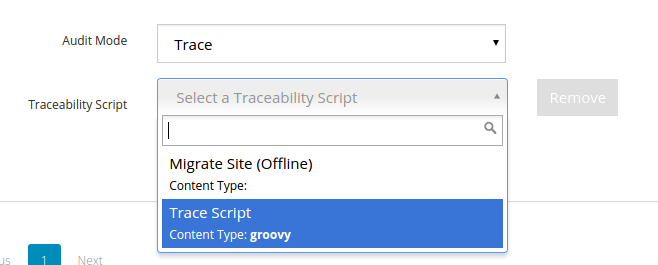 Figure 23. Select script to filter items to audit
-
-
-
On the Policies tab you can select computation and migration policies.
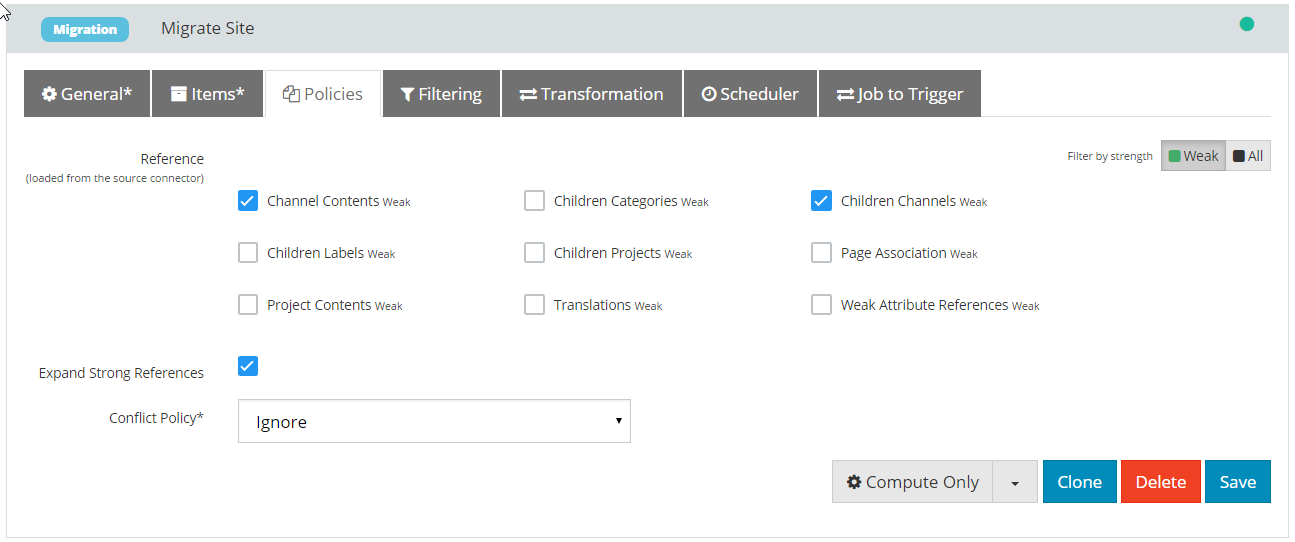 Figure 24. Policies tab
-
References — In order to perform graph expansion, the Motion engine needs to know which types of References to include.
-
Expand Strong References — This option is enabled by default so you need only to select weak reference types.
Note:
If you disable this option, you must pick both strong and weak references carefully. -
Comparison Policies (only for Comparison Jobs) — Select which comparison method use for Item comparison.
Note:
To compare by data and/or attachments, you have to add a comparison script in order to transform the origin xml structure to be the same of the target. -
Conflict Policy (only for Migration Jobs) — defines how item conflicts on the target connector should be handled. Select one of the following options from the dropdown list:
Note:
By default only the weak references are shown, but you can view all the references by changing the Filter by strength setting.-
Ignore - Do not migrate item if it conflicts with another item in target.
-
Overwrite - Always write items in target.
-
Overwrite if newer - Only overwrite item if the source item is newer than the target item.
-
Overwrite if timestamp differs - If the timestamp is different, migrate the source item, and overwrite the target item.
-
-
-
On the Filtering tab, configure an SQL
WHEREclause to filter out items during and after the graph expansion: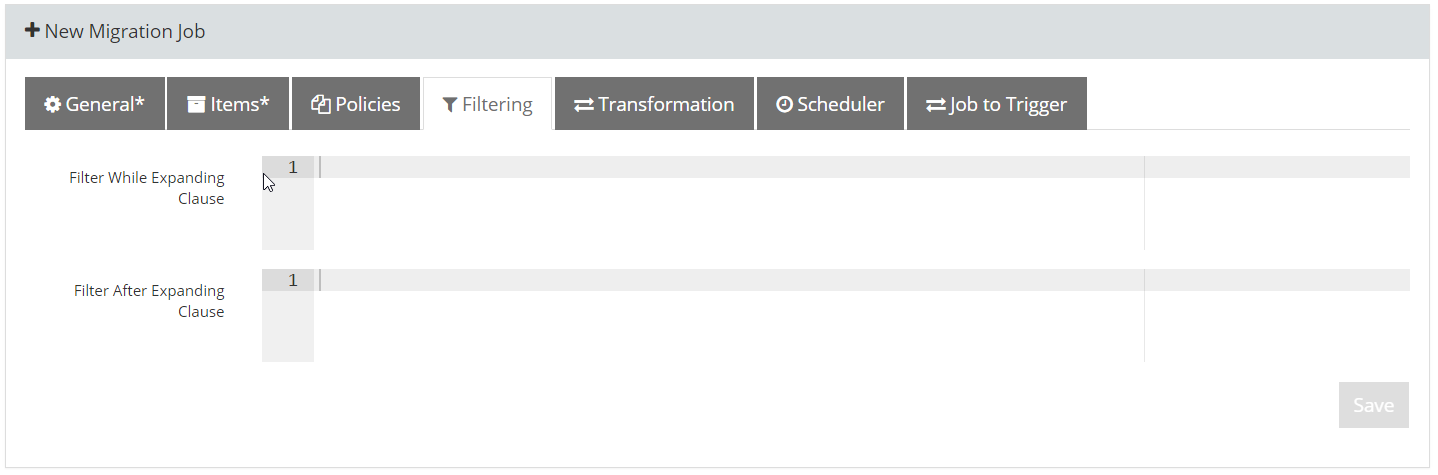 Figure 25. Filtering tab
-
Filter While Expanding Clause — This filter is applied during the graph expansion. If an item is to be filtered out, the sub graph formed by its referent items and references is pruned.
-
Filter After Expanding Clause — This filter is applied after the graph expansion. If an item is to be filtered out, only that item is removed from the graph (and the corresponding to/from references). All of its children items and references are kept on the computation graph.
Caution
The Filter After Expanding Clause filter needs to traverse and process all items in the graph, it can be slower if the graph is very large.Note:
If you want to perform date filtering, it is advisable to use a after expansion filter.The reason for this is that the while expansion will prune the sub graph with referent items and references, while the after expansion will simply filter out the item and respective to/from references from the graph.
The following diagram illustrates the before and after of how filtering while expanding works. This example shows how filtering while expanding to filter out item
Balso removesCfrom the graph. Notice also that itemDis only included because there is a direct reference fromAtoD, otherwise it would also be removed from the graph.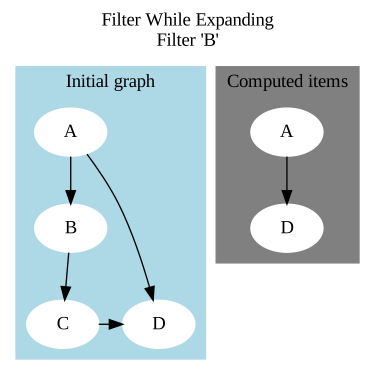 Figure 26. Filter While Expanding
The following diagram illustrates the before and after of how filtering after expanding to filter out item
Bworks. In this case, onlyBand its to/from references are removed from the graph.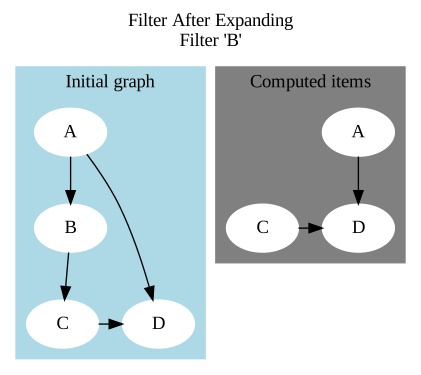 Figure 27. Filter after expanding
-
-
On the Transformation tab (or Script tab for Script Jobs), select a script from the dropdown.
Depending on the Job Type, these are the available options:
-
Comparison Job — Select a Comparison Script and an Error Handling Script
-
Computation Job — Select a Comparison Script and an Error Handling Script
-
Deletion Job — Select a Error Handling Script
-
Migration Job — Select a Comparison Script and an Error Handling Script
-
Script Job — Select a Script
Tip:
Refer to the Scripts section for more information about the different kinds of WEM Motion scripts.
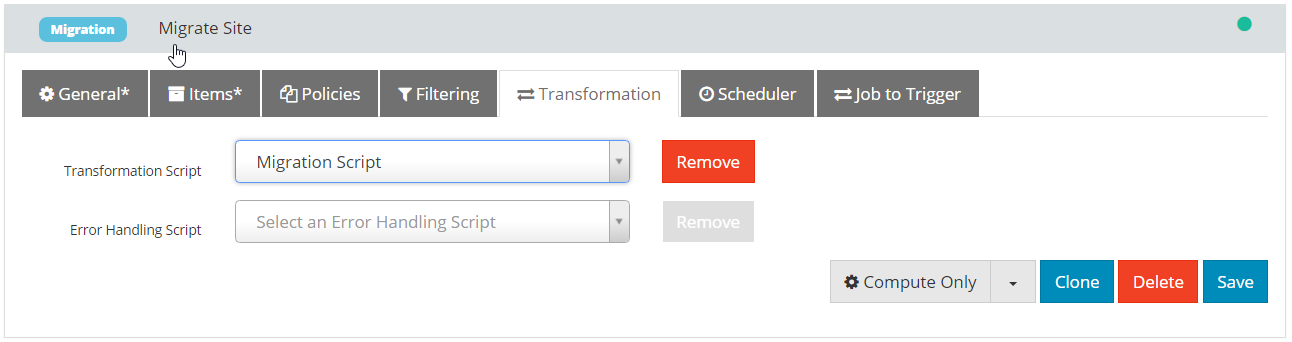 Figure 28. Transformation tab for Migration Jobs
 -
-
On the Parameters tab, you can define parameters for the job.
-
Define Parameters — Define the parameters to be used by the job, providing the
Name,Display NameandTypefor each parameter.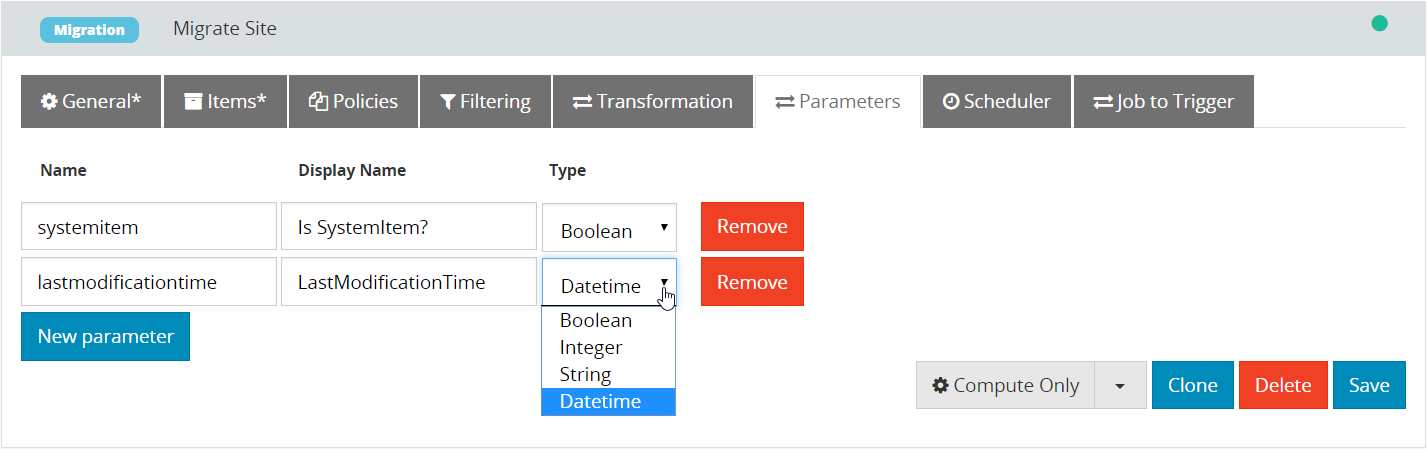 Figure 29. Parameters tab
Available Types:
-
Boolean -
Integer -
String -
DatetimeNote:
A job with parameters cannot be scheduled (see Scheduler tab).
-
-
Use Parameters — The defined parameters can be used, with the syntax
:<parameter-name>, on the following job filters:-
On the Items tab:
-
Root Items Filter
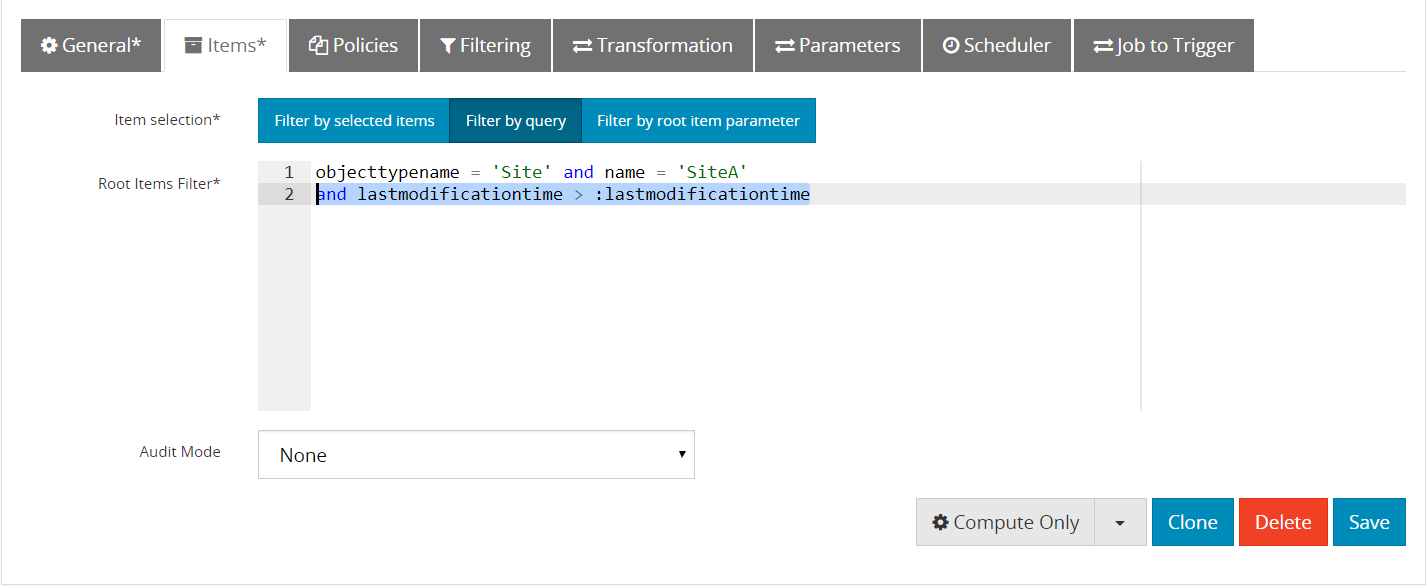 Figure 30. Using parameters on Root Items Filter
-
-
On the Filtering tab:
-
Filtering While Expanding Clause
-
Filter After Expanding Clause
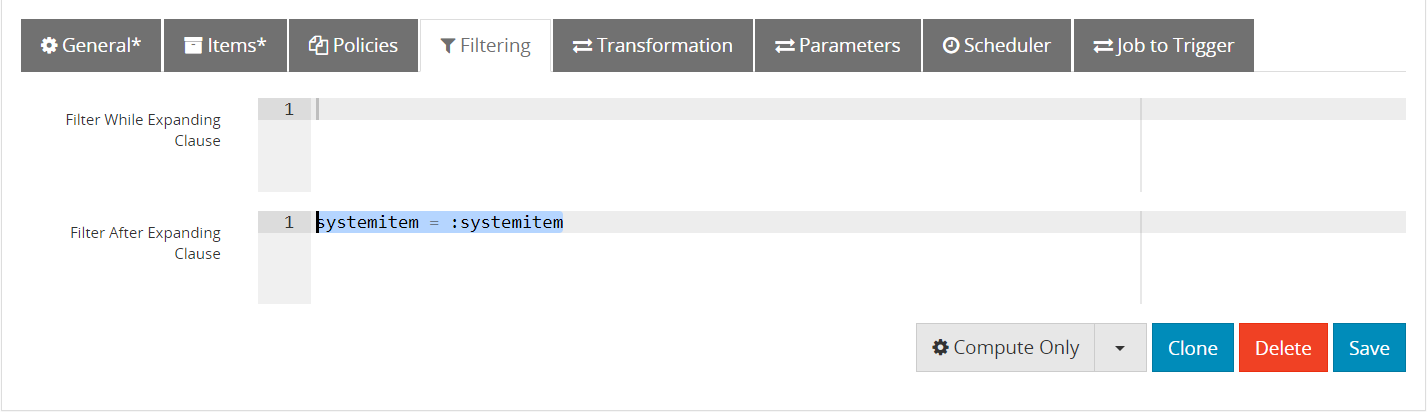 Figure 31. Using parameters on Filter After Expanding Clause
-
-
-
Provide Parameters Values — The value for each defined parameter should be provided every time the job is launched. See Launching job with parameters for more information about launching a job with parameters.
-
-
On the Scheduler tab, choose how job executions will launch: You can also set an email address to receive a report of execution status of this jobs.
-
Run Manually — (default) You must execute jobs manually.
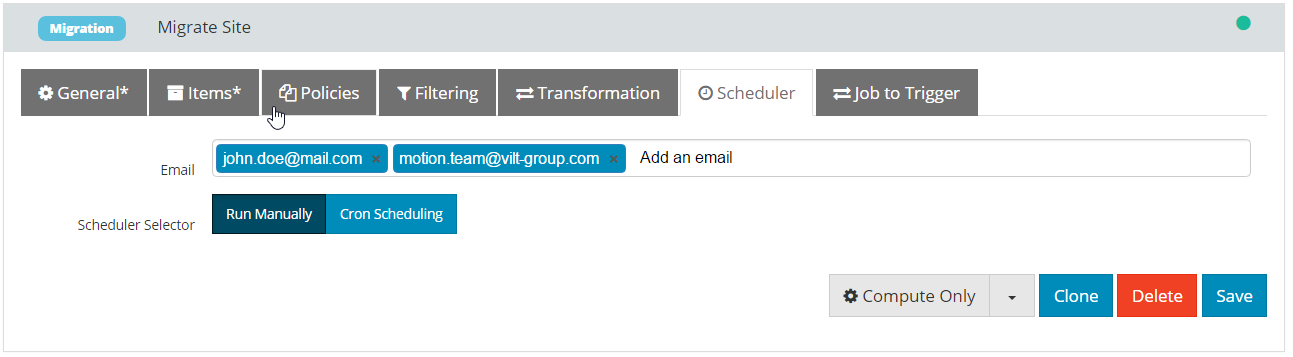 Figure 32. Manual executions
 -
Cron Scheduling — Select the day, time, and how often to run the job.
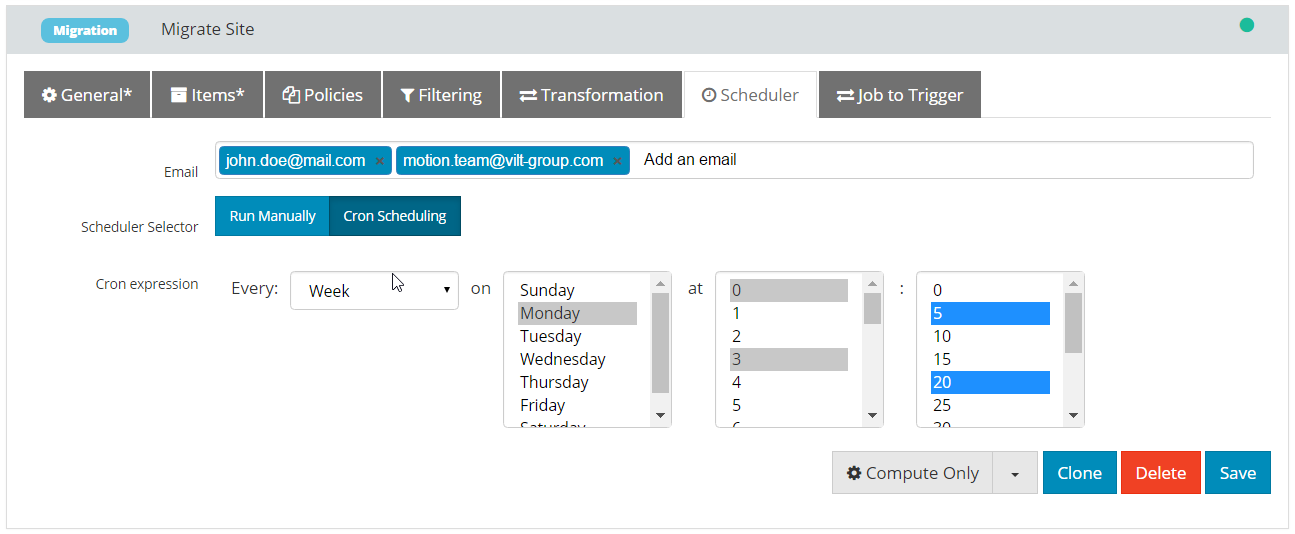 Figure 33. Schedule executions
-
-
On the Job to Trigger tab you can select another Job that can be immediately executed when the Job Execution finishes with success. See About Trigger Jobs for more information about Trigger Jobs.
-
Click Save.
Saving will enabled the following buttons:
-
Clone — Generate another job using the same configuration
-
Delete — delete a job.
7.2. About Trigger Jobs
Trigger Job is a new functionality introduced with WEM Motion 2.1 that allows a given Job to execute another Job. The triggered job can optionally receive Items from the calling job.
A usual pattern with Trigger Jobs is to use one Job to compute something, and then send the computation result to another job.
7.3. Launching a Job
Once you configure a job you have two ways to launch it:
-
Compute Only — Starts a Job but only executes the computation step. The next steps will be executed later from the Executions. The computation step is common to all Job Types.
-
Compute and Execute — Runs all the execution steps (the computation step followed by the execution step, if any). The execution step is particular to each Job Type.
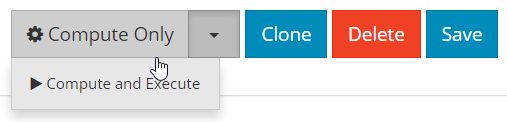
Note:
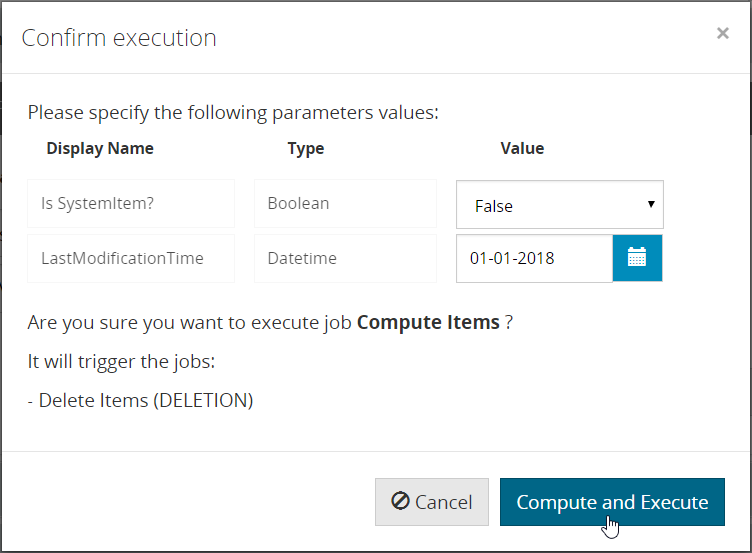
If a Job to Trigger is configured, then a popup will appear to warn about the job chain you are about to start. The popup looks like the following: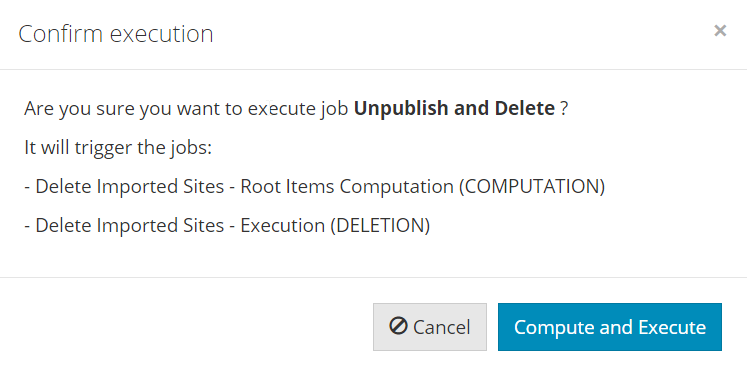
|
Note:
Jobs are executed one at a time, sequentially, by order of request. |
Either way Motion engine will create an execution for the selected job.
7.3.1. Job with Executions
When a job has executions, it cannot be updated or deleted and all its fields will be read only. This way, you will never have an execution that cannot be reproduced. You can view how many executions a job has on the Job tab.
|
Note:
If you want to update a job with executions, clone that job and update it instead. Cloned jobs will have the same name prepended with "Copy of". |
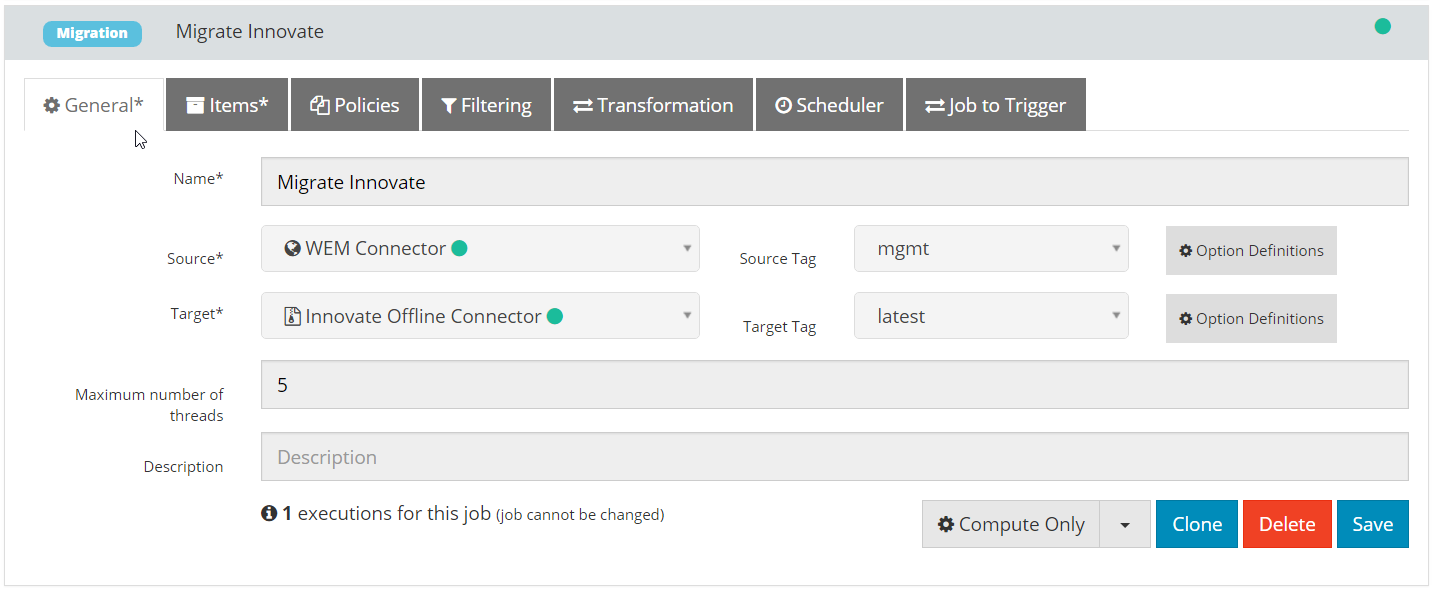
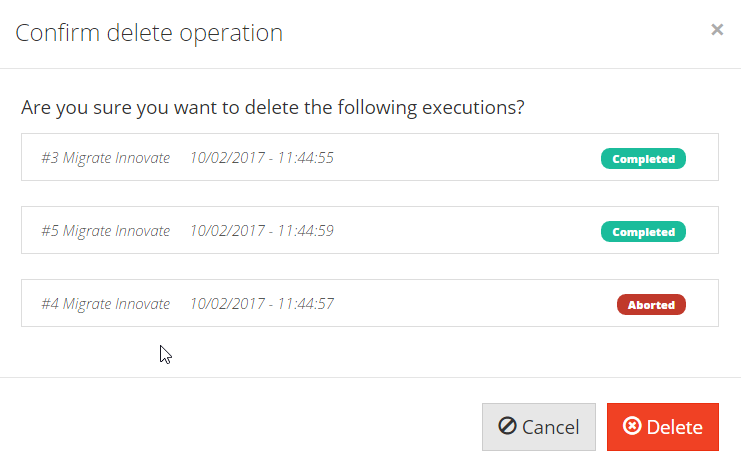
In order to update a job that has executions, you need to delete them first from the Job panel. You can delete the completed executions for a job.

Clicking delete completed executions opens a dialog showing the executions that can be deleted. Click Delete on the dialog to confirm.
7.3.2. Job with Parameters
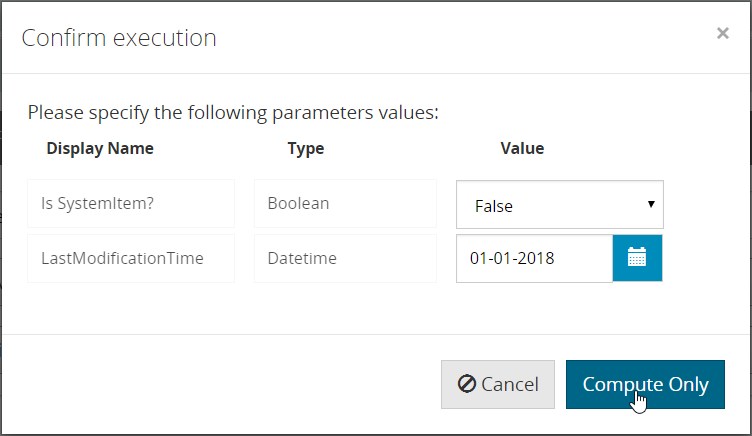
When a job with parameters is launched, the value that will be used for each defined parameter should be provided. A popup will be displayed after clicking on Compute Only or Compute and Execute:
|
Note:
When launching a job with parameters, the values for all defined parameters on the trigger job chain will be requested at once. |
7.3.3. Launching a job via REST API
It’s possible to launch a job calling a REST API.
-
Compute Only
-
URL
/api/jobs/<jobId>/compute
-
Method
POST -
Data Params
Optional json key-value map with parameters. Sample data:
{"lastmodificationtime":"2018-01-01T00:00:00.000Z","systemitem":false} -
Success Response
-
code: 200, content: jobExecution json
-
-
Error Response
-
code: 401 [UNAUTHORIZED]
-
code: 404 [NOT FOUND]
-
code: 500 [INTERNAL SERVER ERROR]
-
if <jobId> on url is not valid.
-
if the job has parameters, and not all values have been provided on Data Params.
-
-
-
Sample call using command line
curl:curl --verbose -H "Content-type: application/json" -X POST \ --data '{"lastmodificationtime":"2018-01-01T00:00:00.000Z","systemitem":false}' \ http://<host>:<port>/motion-engine/api/jobs/<jobId>/compute
-
-
Compute and Execute
-
URL
/api/jobs/<jobId>/run -
Method
POST -
Data Params
Optional json key-value map with parameters. Sample data:
{"lastmodificationtime":"2018-01-01T00:00:00.000Z","systemitem":false} -
Success Response
-
code: 200, content: jobExecution json
-
-
Error Response
-
code: 401 [UNAUTHORIZED]
-
code: 404 [NOT FOUND]
-
code: 500 [INTERNAL SERVER ERROR]
-
if <jobId> on url is not valid
-
if the job has parameters, and not all values have been provided on Data Params
-
-
-
Sample call using command line
curl:curl --verbose -H "Content-type: application/json" -X POST \ --data '{"lastmodificationtime":"2018-01-01T00:00:00.000Z","systemitem":false}' \ http://<host>:<port>/motion-engine/api/jobs/<jobId>/run
-
|
Note:
|
8. Executions
The Executions tab shows you all current and previous job executions.
A job execution has two phases:
-
Computation — If you launched the job with Compute Only, the execution launched only executes the Computation phase.
-
Execution — If you launched the job with Compute and Execute, the execution phase is executed right after computation finishes.
Having these two phases allows you to edit items manually before running an actual execution, which is essentially equivalent to manually apply a migration script. This can be useful if you have very specific one-time changes to just a few items.
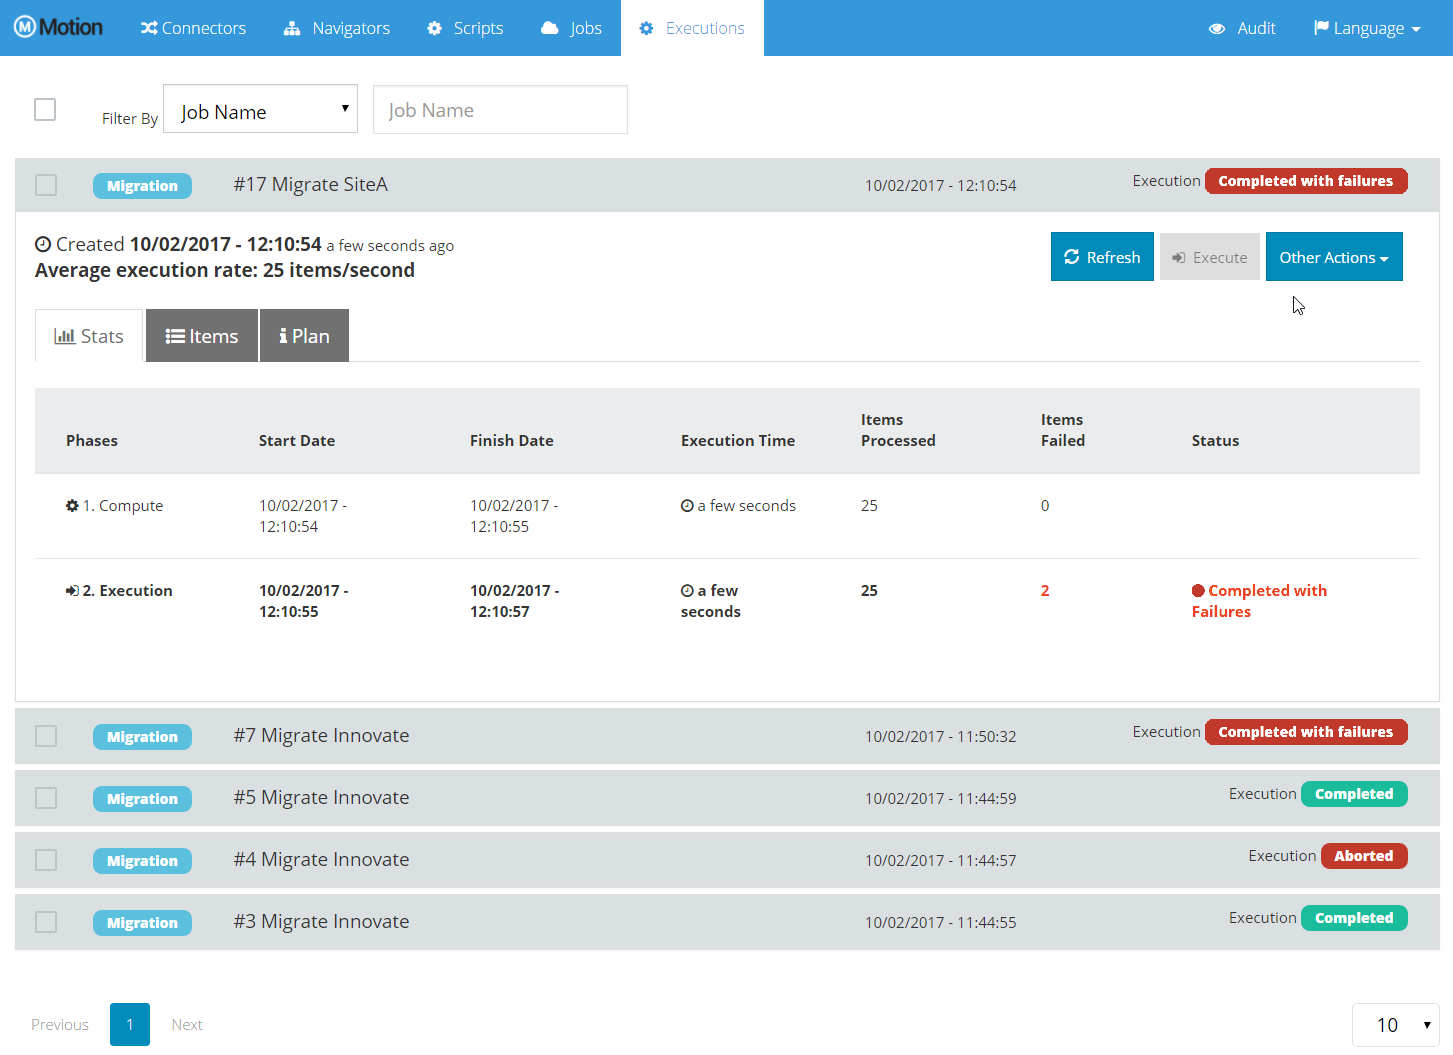
During the computation phase, you can check the Items tab to see the items that are already computed. Just as with computation, while an execution is running you can check the Items tab for more specific information about processed items.
|
Note:
The Items tab, contrary to other tabs, will not update automatically. Use the Refresh option for this. |
When the computation finishes, the Items tab displays all computed items. The Execute option becomes enabled so that you can proceed to the execution phase right away.
When an execution is in progress, a progress bar displays the percentage of completion of the actual phase of the execution and a label with a more detailed information about the action performed. This provides feedback about what is executing at any point of the execution while it is still in progress.

The execution view has three tabs: Stats, Items, and Plans.
8.1. Stats tab
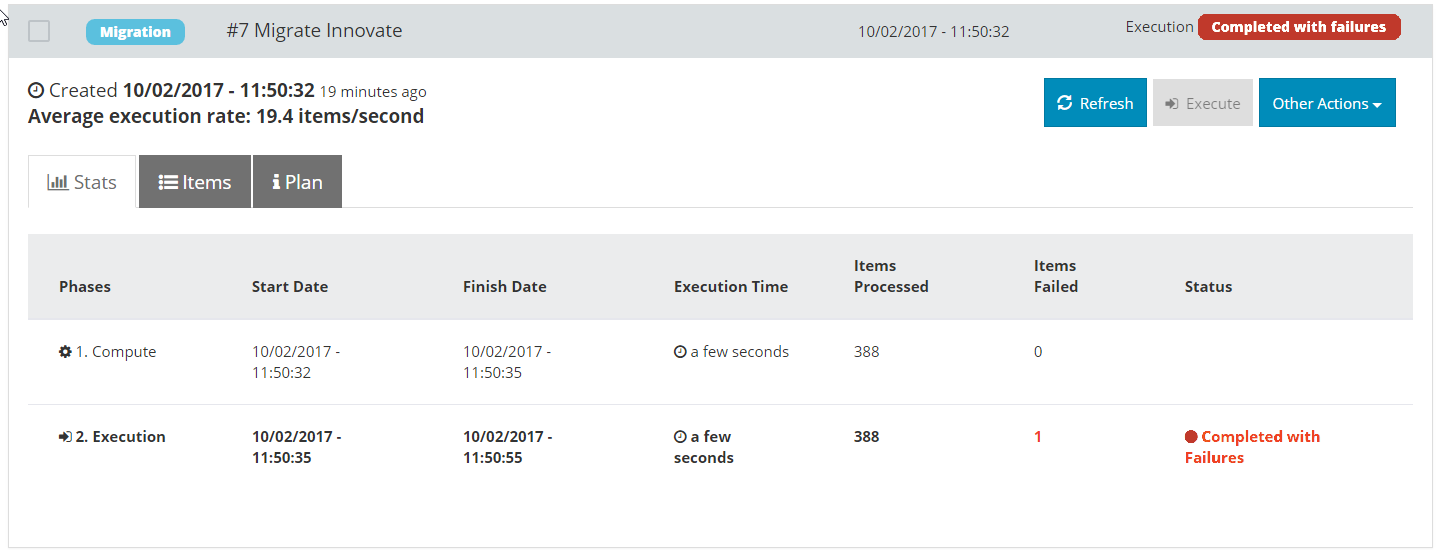
On the Stats tab, you can view the details for each phase (such as timestamps, execution time, the number of processed items, or the number of errors and the status).
8.2. Items tab
On the Items tab, you can view information about all items related to a job execution and the state of each element (such as computed, exported, imported, or failed).
|
Note:
If an item fails, you can see the error on the items details. |
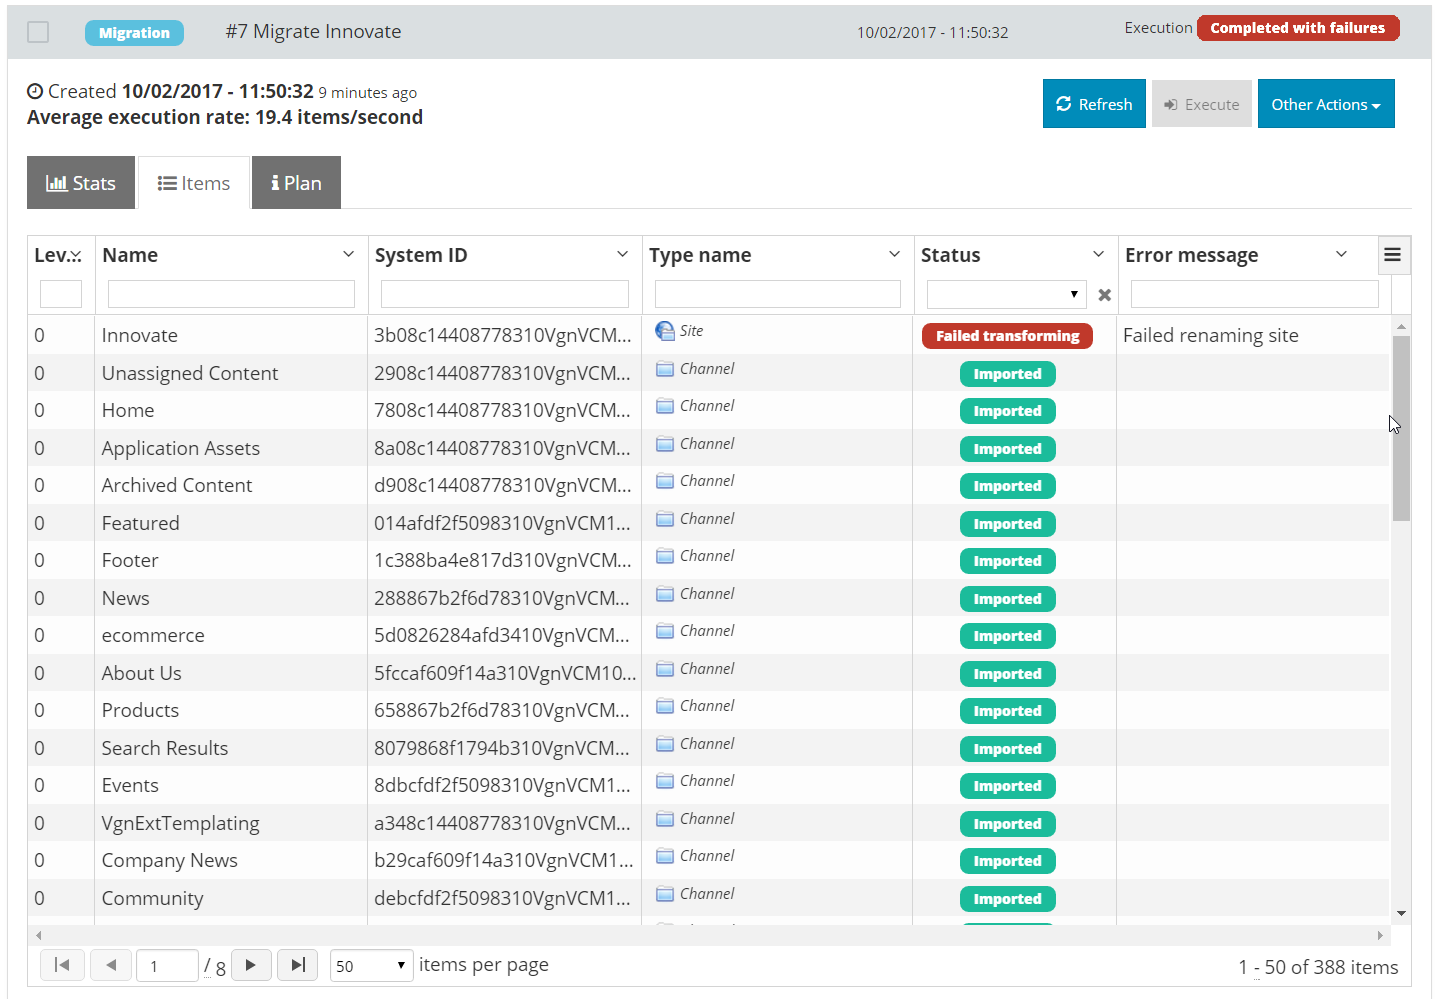
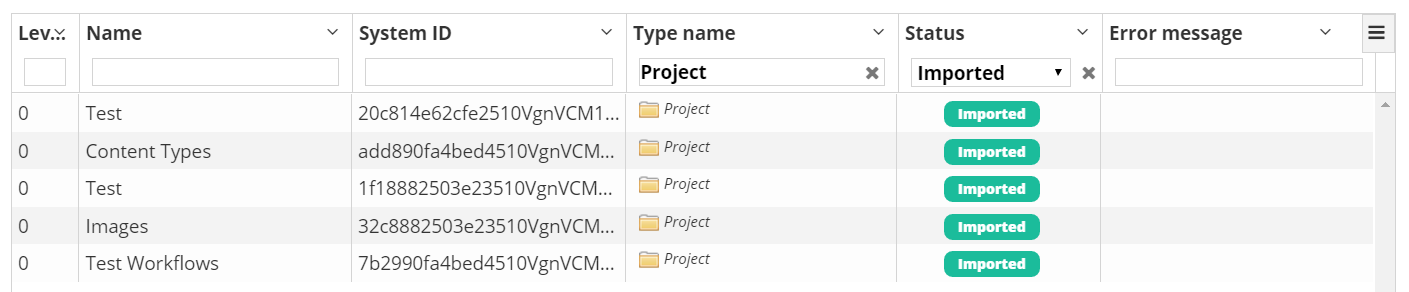
By default the items are sorted by Level. You can search and sort the items by any of the available fields.
-
Level
-
Name
-
System ID
-
Type name
-
Status
-
Error message
|
Note:
Ensure the execution does not have failed items before executing. |
8.2.1. Items Details
Double-click the item that you want to view more details. A dialog opens displaying the item details on four tabs: Properties, Migration Analysis, Data, and Error Messages.
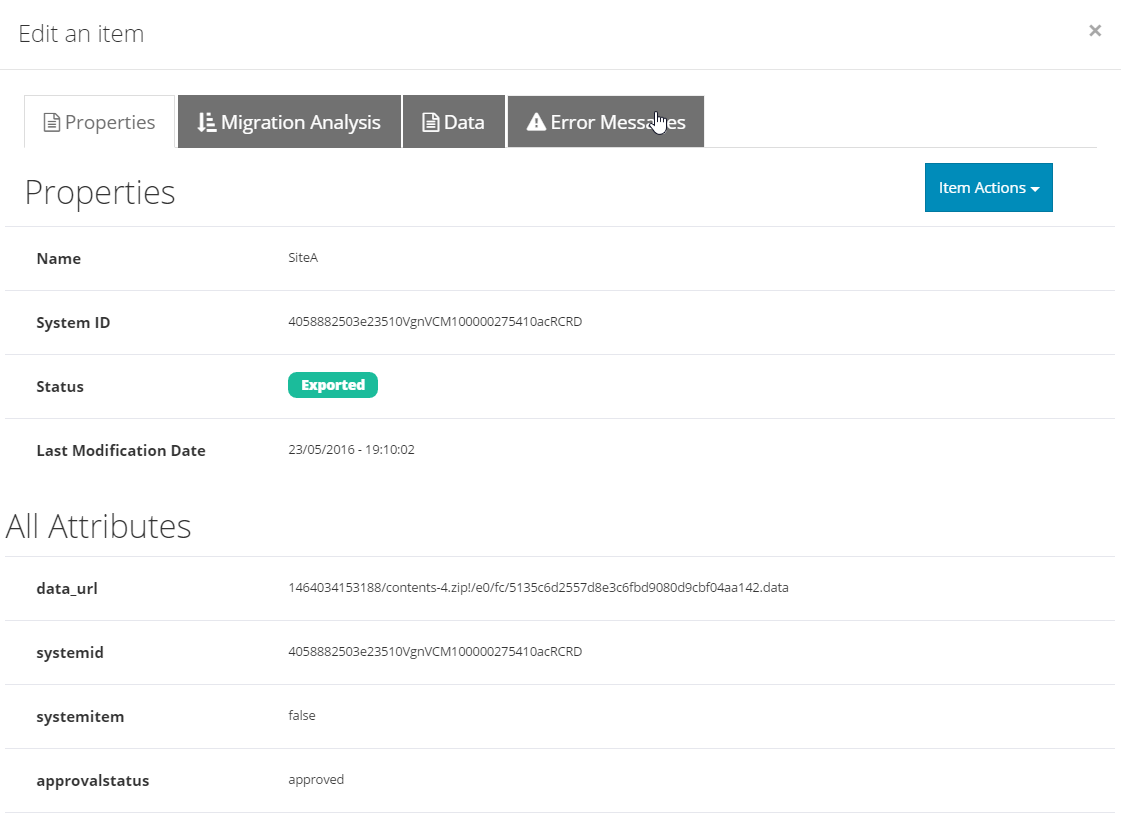
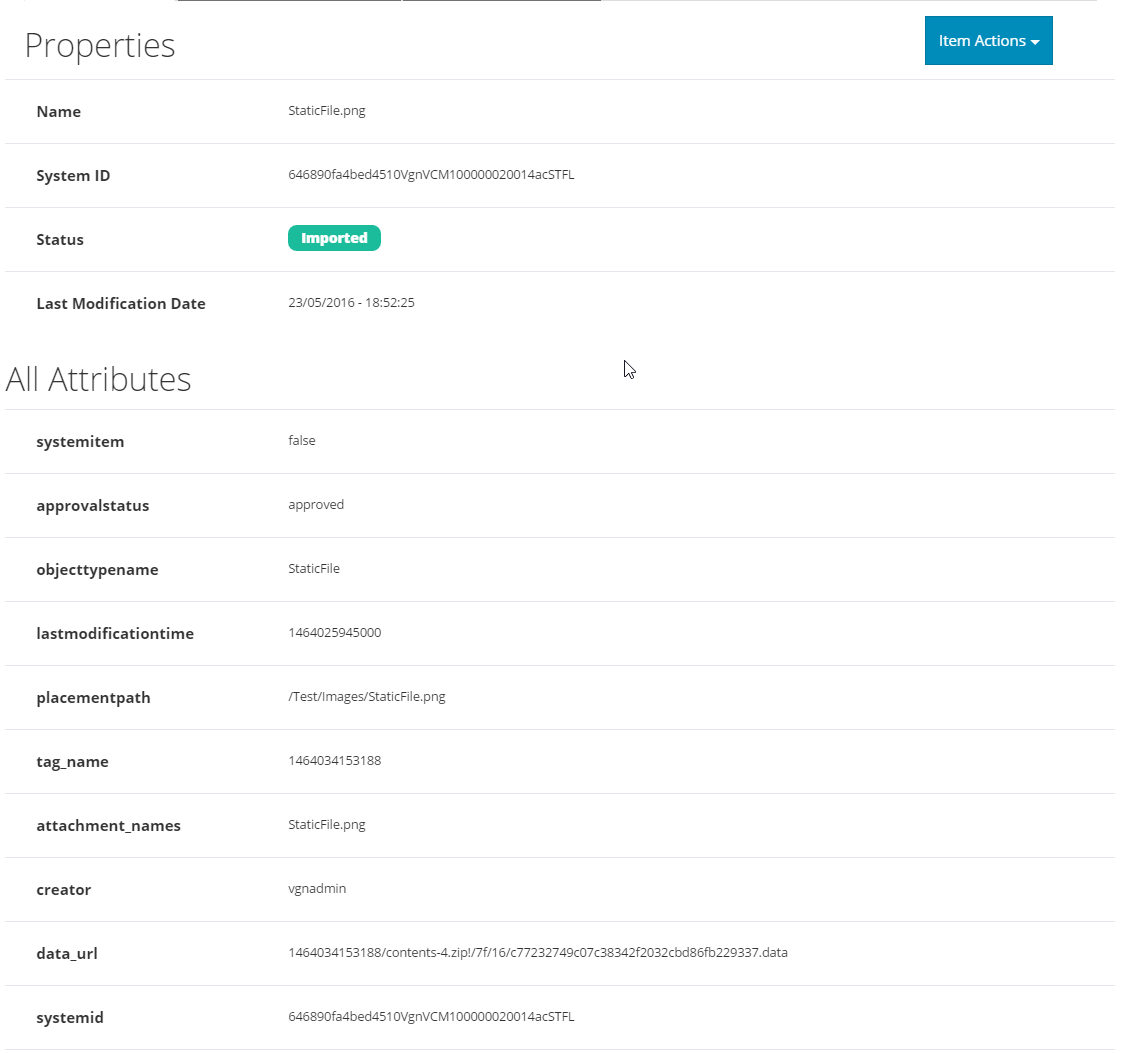
Properties tab
The Properties tab displays all the properties and attributes of an item.
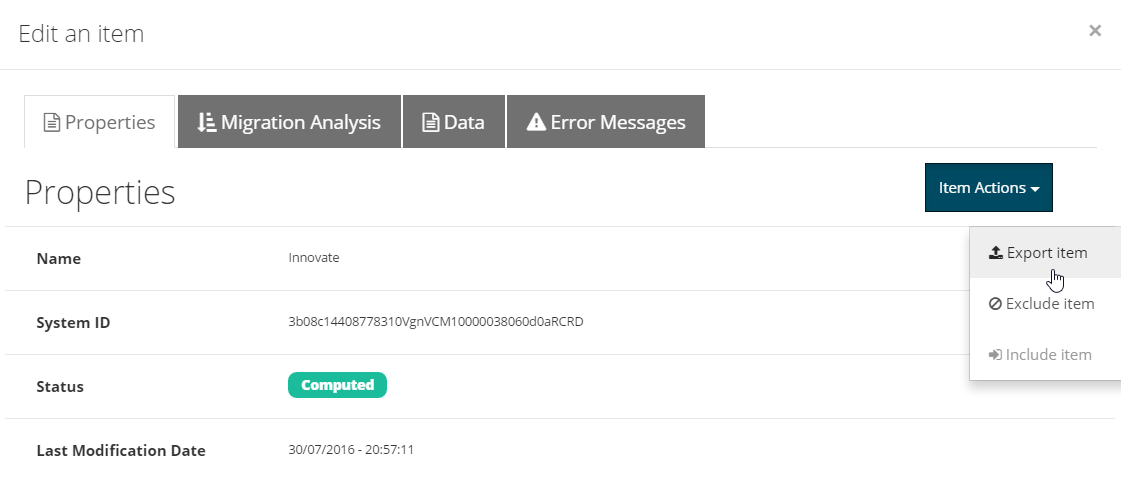
You can perform the following actions for the selected item:
-
Export item - (pre-condition) The item status is not Imported.
-
Exclude item - (pre-condition) The computation phase is finished and the item status is Computed.
-
Include item - (pre-condition) - The item status is Excluded.
|
Note:
These actions can be disabled or enabled depending on the status of the item |
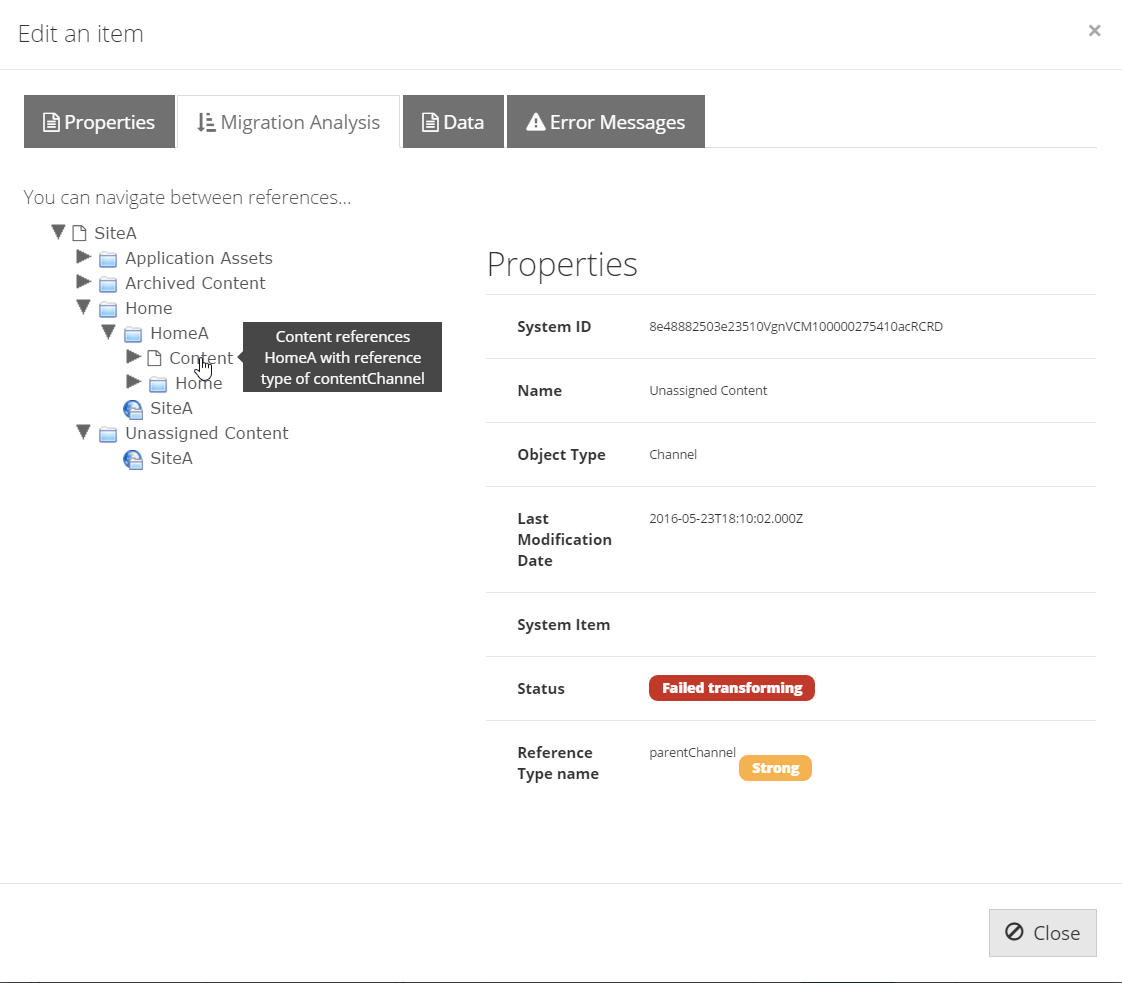
Migration Analysis tab
On the Migration Analysis tab, you can navigate between references of the item and see why the item is being included in the migration.
There are two panels:
-
The navigation tree (left) allows you to navigate between the different elements.
-
The Properties panel (right) allows you to see the properties and attributes for the element selected in the navigation tree.
Data tab
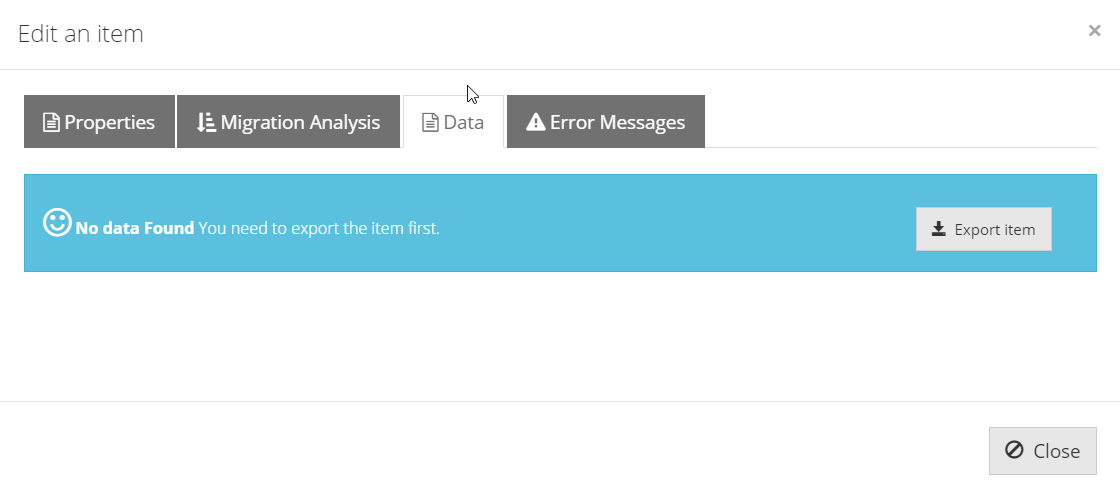
The Data tab is only visible when the execution is in the computation phase. When an item has the status Computed, you can export it in order to view or edit the data before launching the migration.
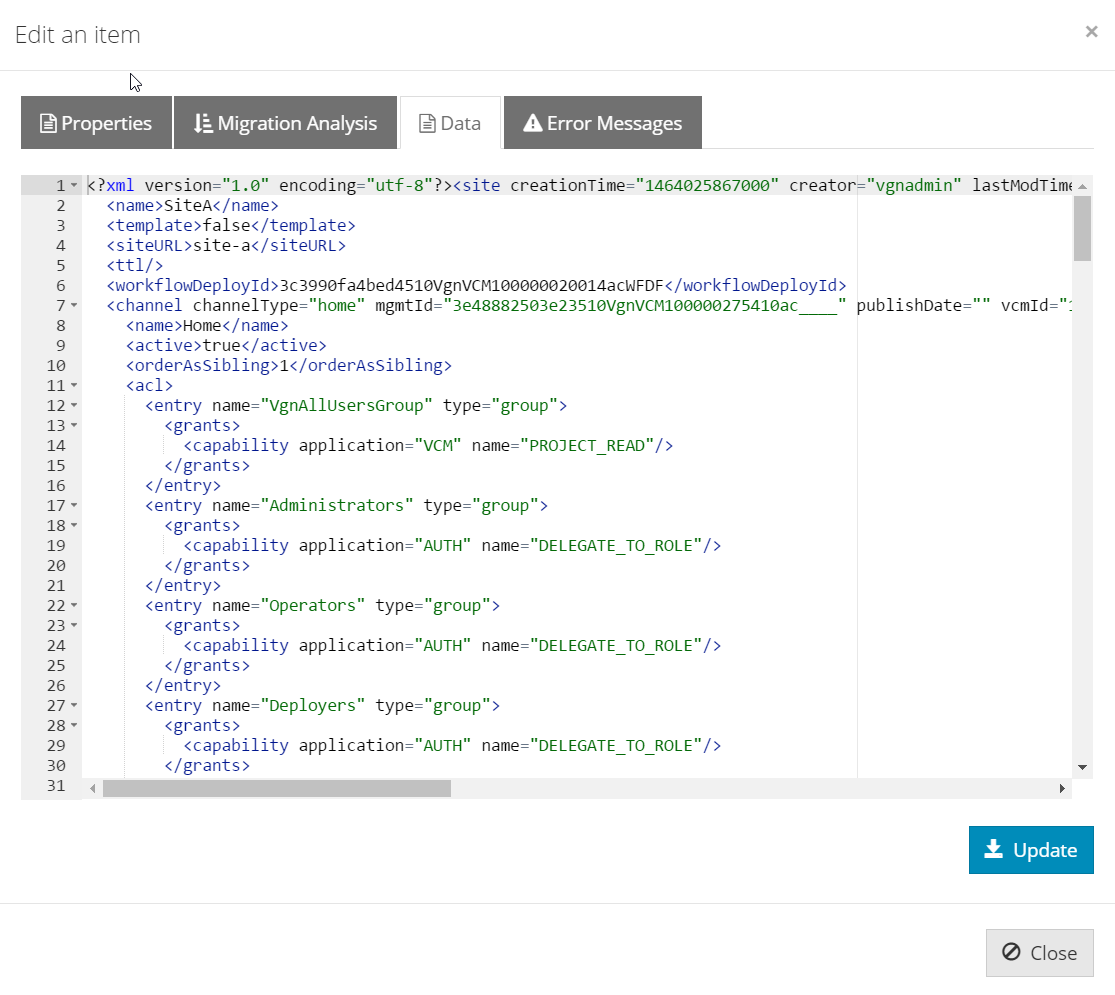
After exporting the item, this tab displays its associated data in XML or JSON format. This allows you to edit items manually before running a migration, which is similar to running a migration script. This is useful if you have very specific one-time changes to just a few items.
|
Important Ensure that you do not introduce syntax errors when modifying the item data. An error is indicated as a red X on the left side of the editor as shown below: 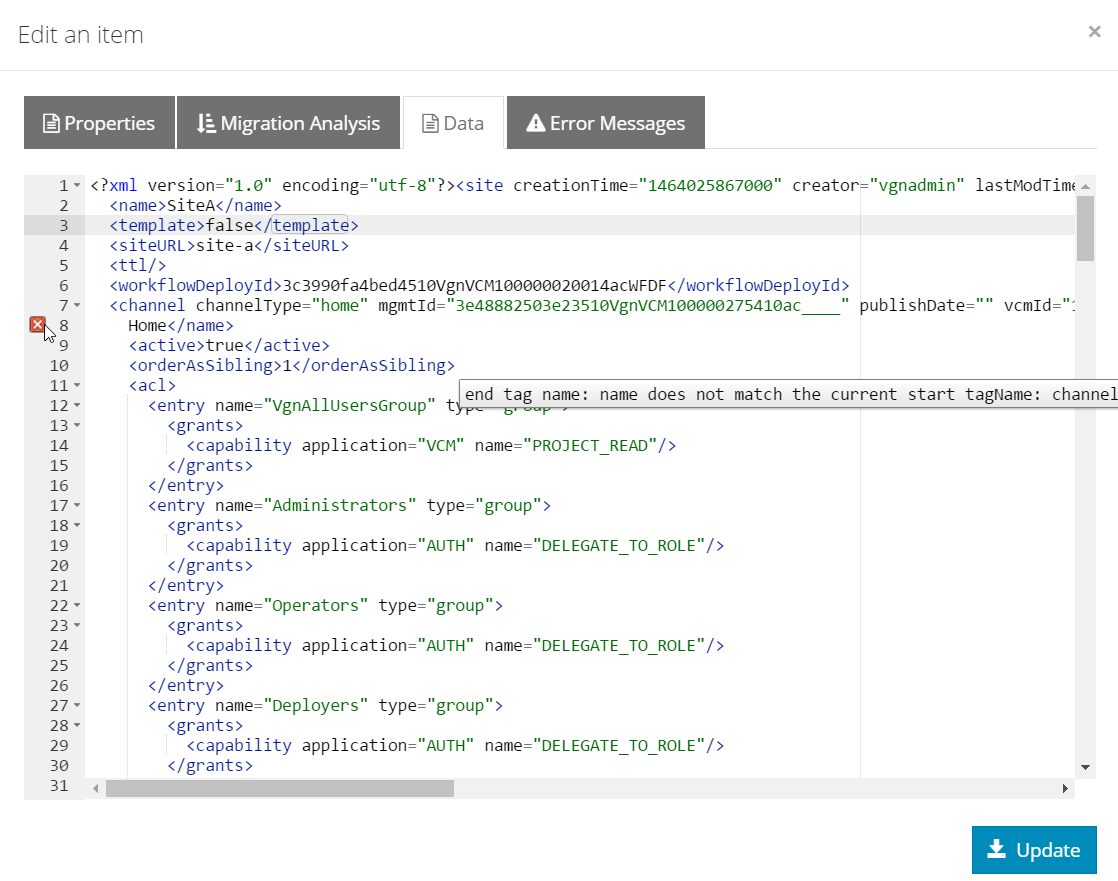
Figure 49. Item data with error after editing
|
Error Message tab
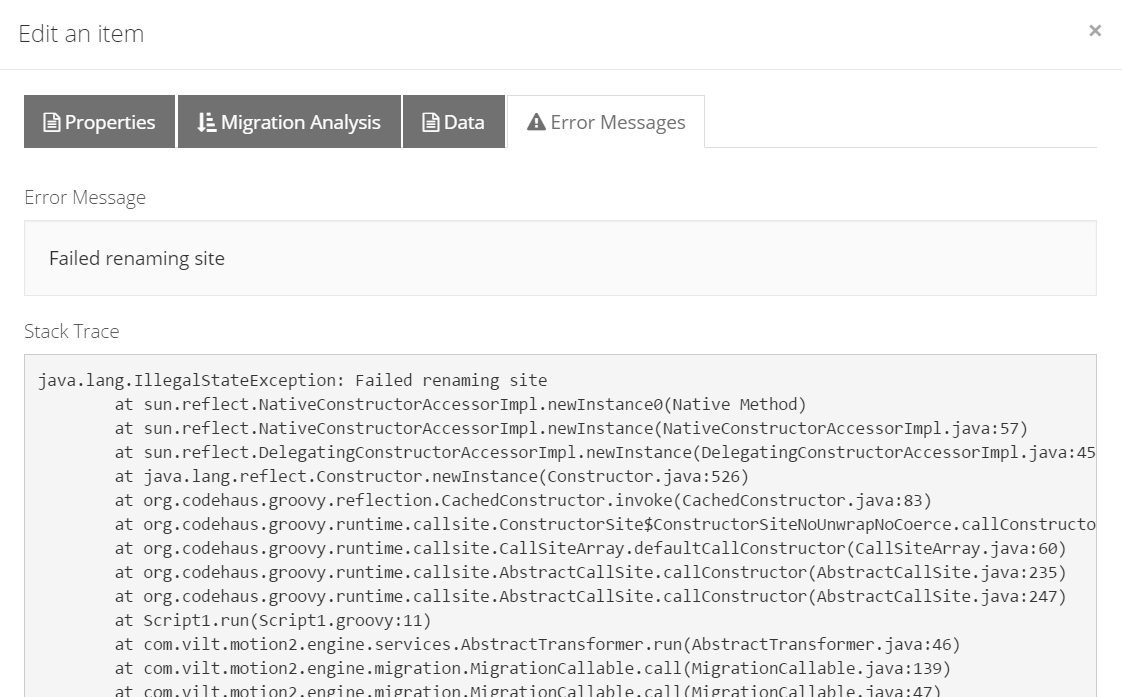
The Error Message tab displays the detailed information about an error of the item, if there are any.
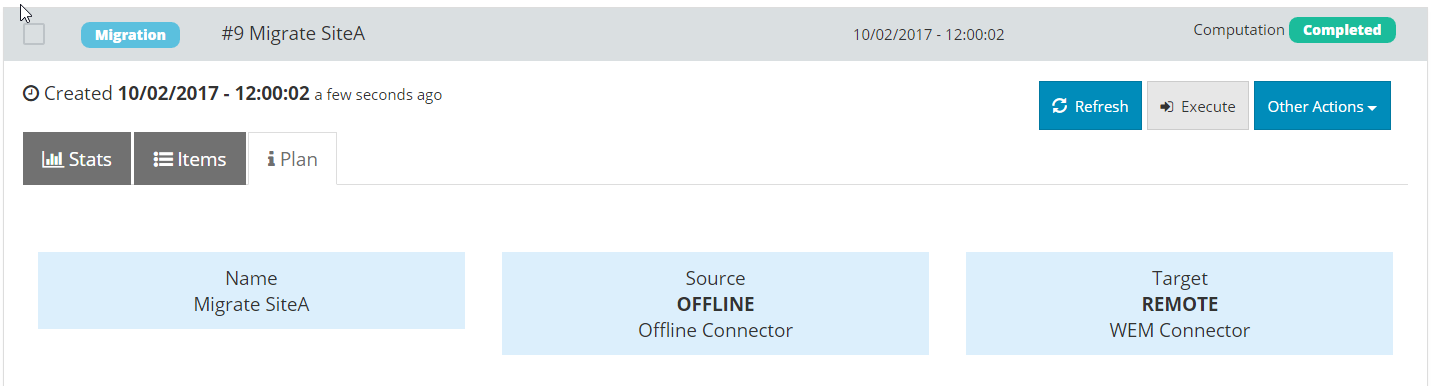
8.3. Plan tab
The Plan tab displays a summary of the configuration job.
9. Working with Executions
You can perform several actions from the Executions tab.
You can abort an execution in progress while its on the computation or migration phase.
To abort an execution:
-
Click Other Actions > Abort Migration

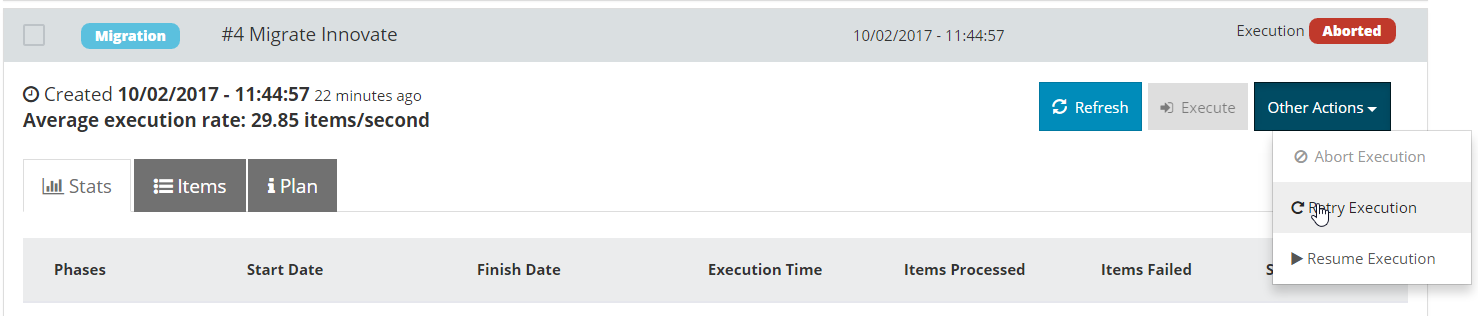
To Retry/Resume Execution:
-
Click Other Actions > Retry Migration or Resume Migration for an execution that was cancelled or had items marked as
failed.
The difference between Retry Migration and the action Resume Migration is that when you resume an execution, it starts from the point where the execution was aborted. Retrying a migration resets the failed items and re-launches the phase.
To export items data:
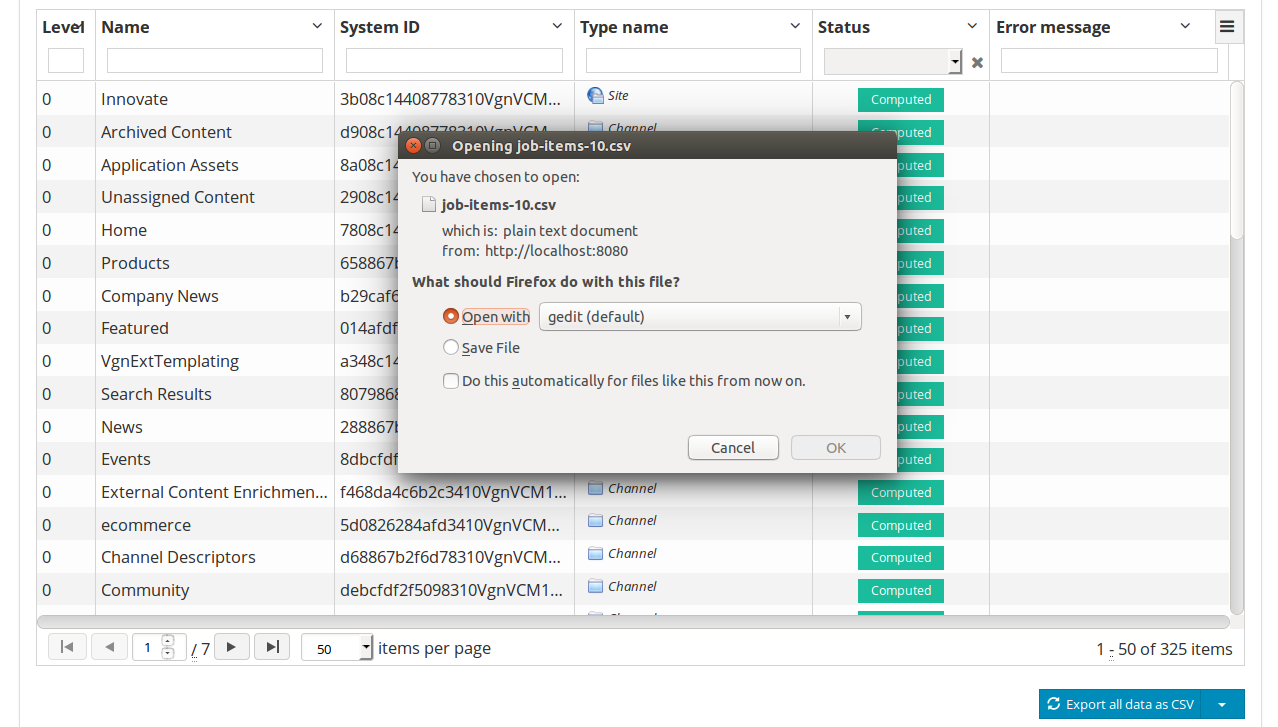
On the Items tab, select to export the items of an execution to either comma-separated value (CSV) or Excel (XLS) formats. The resulting file contains all the information of the items.
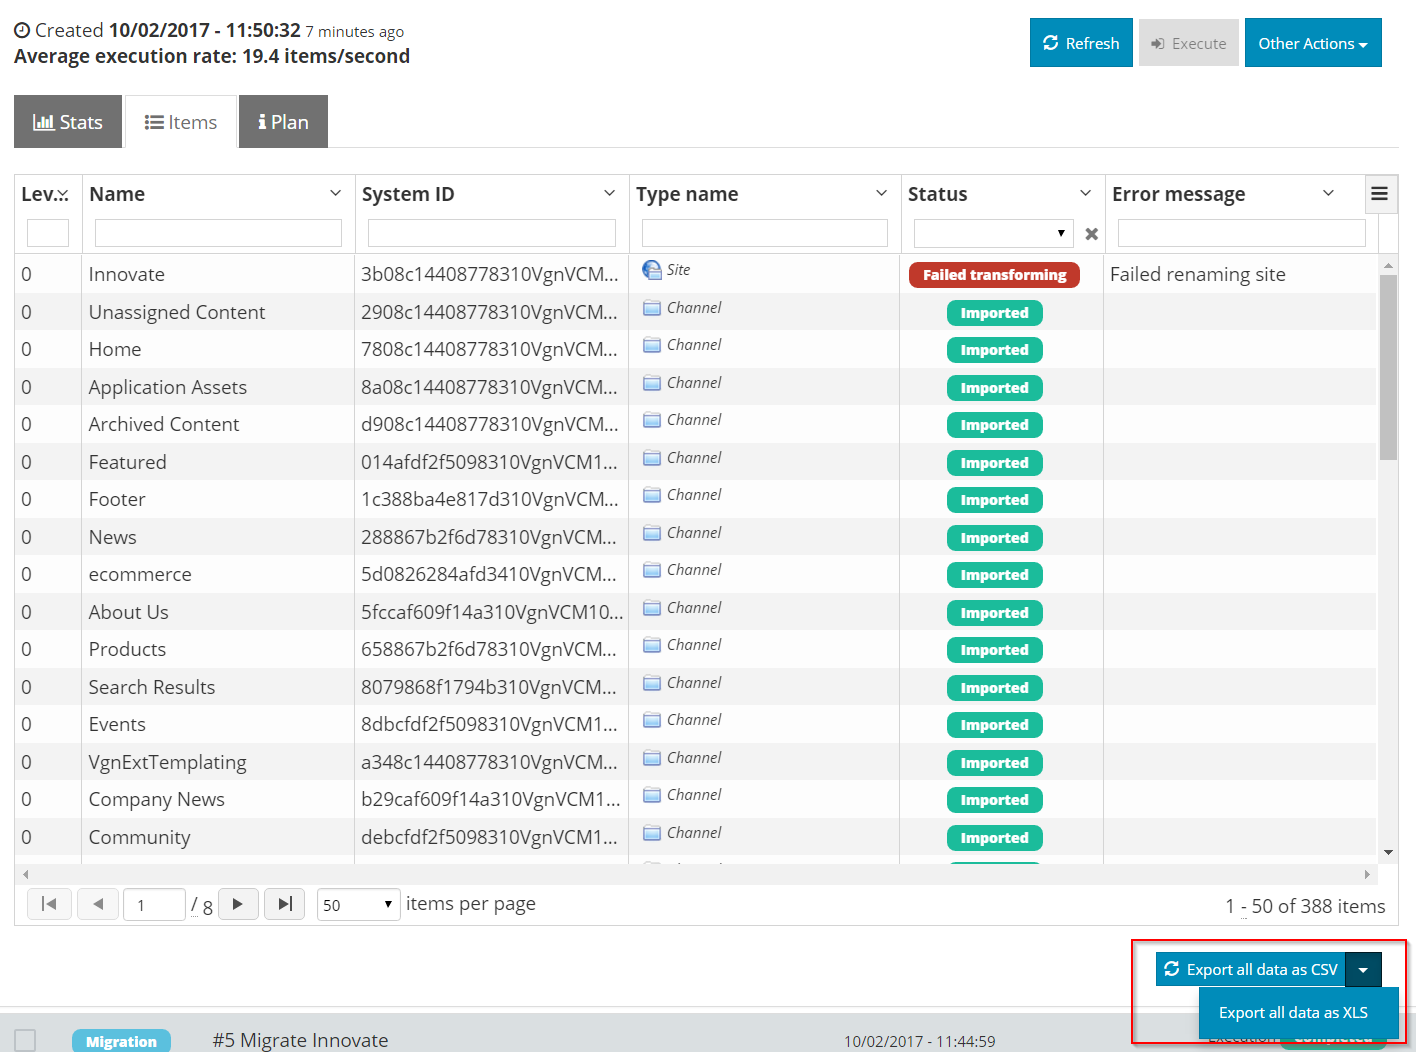
The result is a file with all the information of the items.
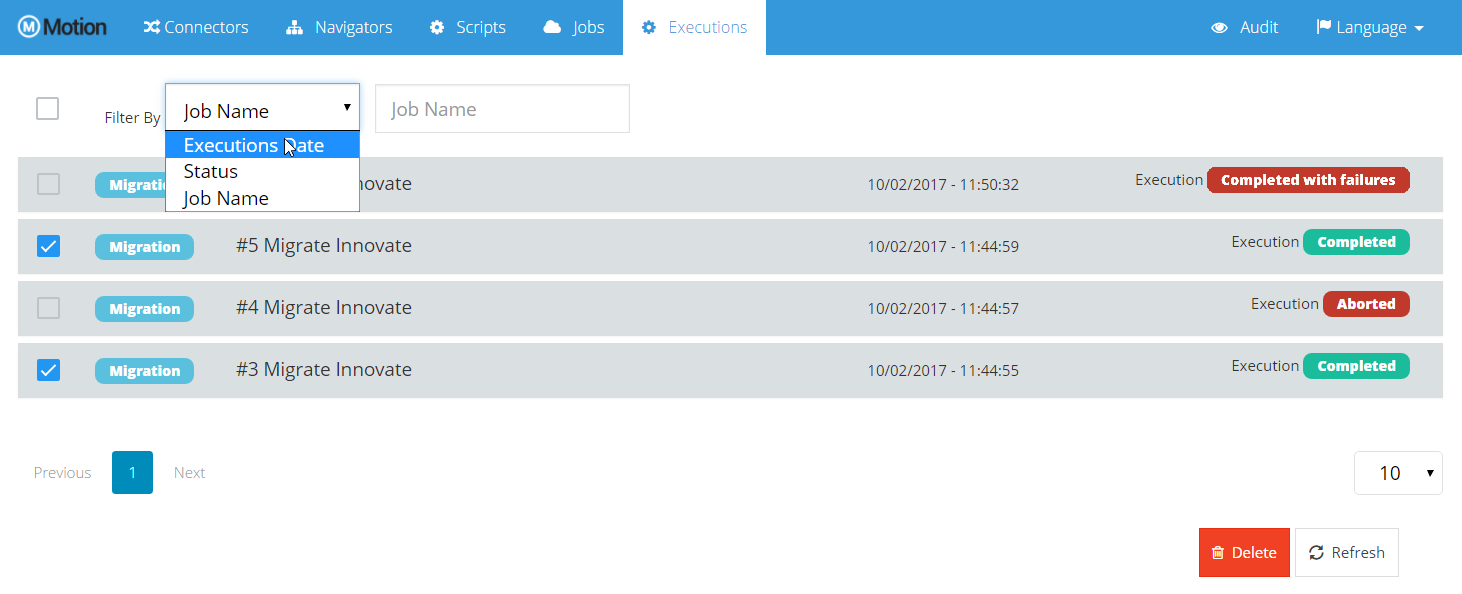
To filter executions:
-
On the Executions tab, filter executions by Execution Date, Status or Job Name.
To delete one or more executions:
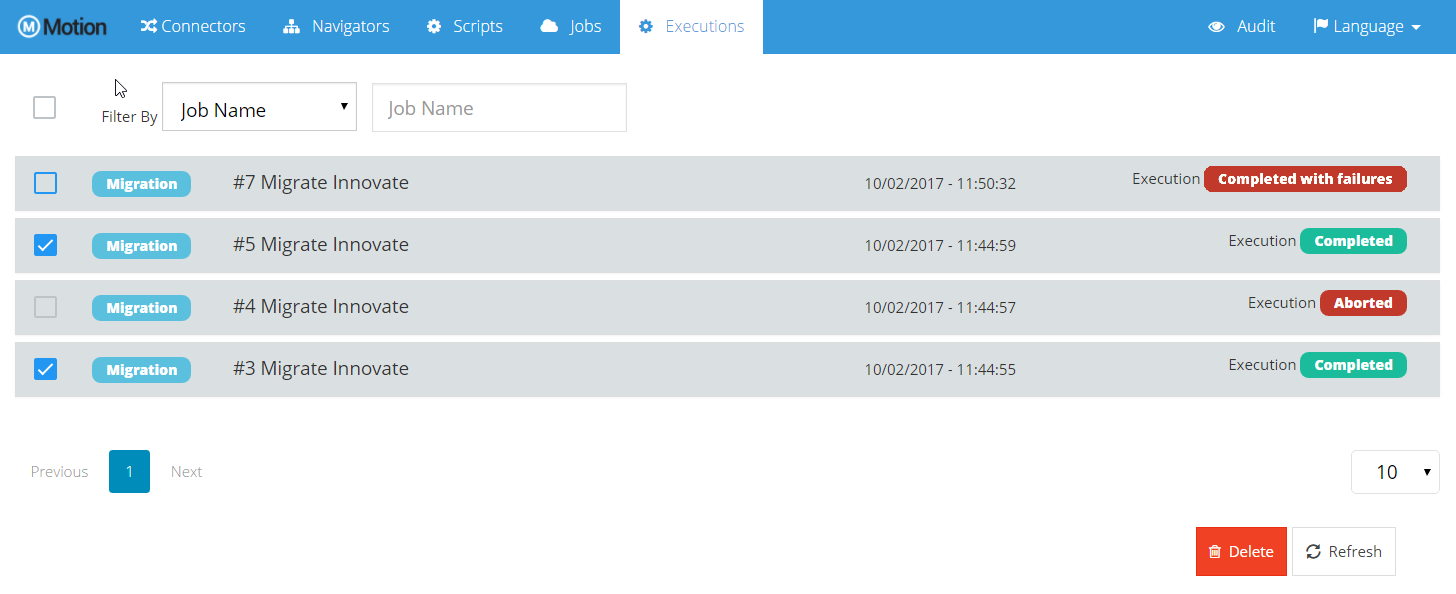
-
Select the executions from the list, and then click Delete.
To troubleshoot a failed computation or migration:
-
If the phase fails or completes with failures, open the Items tab and filter the items with status Failed. The Error message column can help determine the error.
-
After you have fixed the problem, select More Actions > Retry Migration to retry the phase where the execution is.
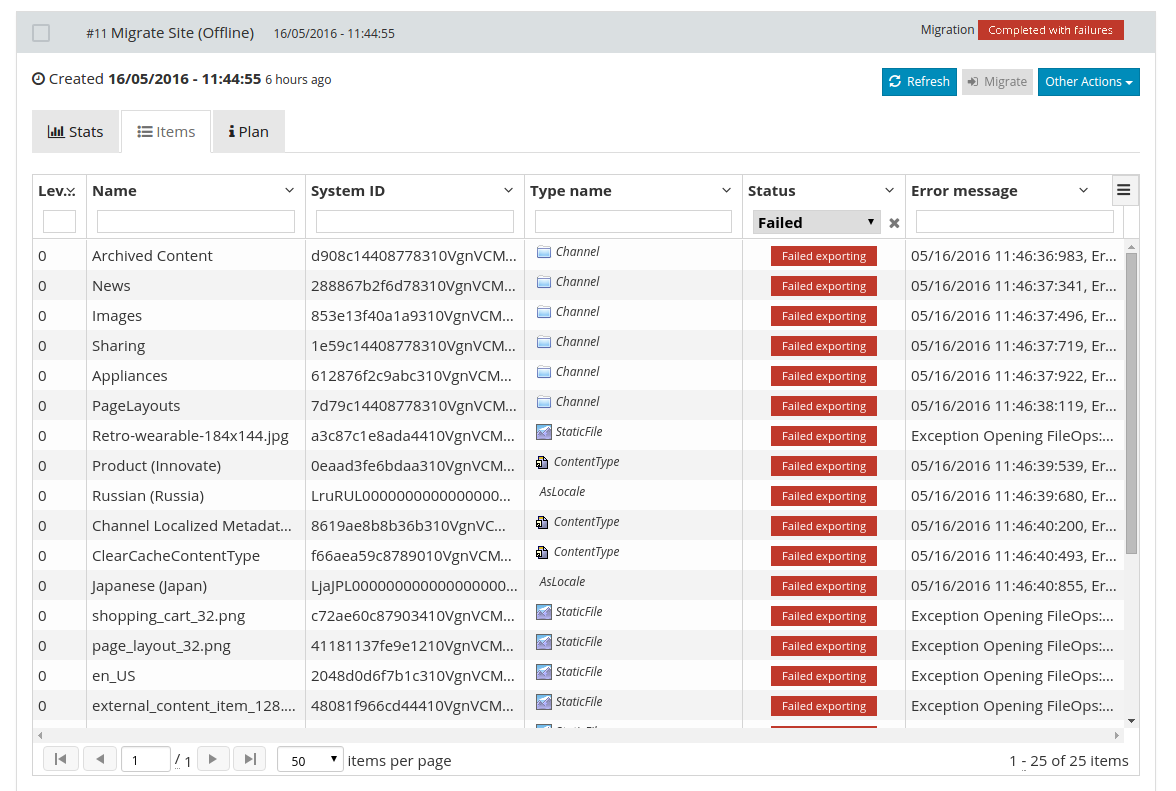
When the problem is fixed, execute Retry and it will retry the phase where the execution is.
10. Audit
Motion has an Audit functionality where the users can track what is being done in Motion. They can see what is being created, modified and deleted.
When a user creates, modifies or deletes an entity in WEM Motion, an audit item is created with information about that operation. Then these can be seen in the Audit tab.
There are six entities being audited in motion:
-
Connectors
-
Job Execution
-
Job Items
-
Jobs
-
Navigators
-
Scripts
When one of these entities is created, modified or deleted is created an audit item.
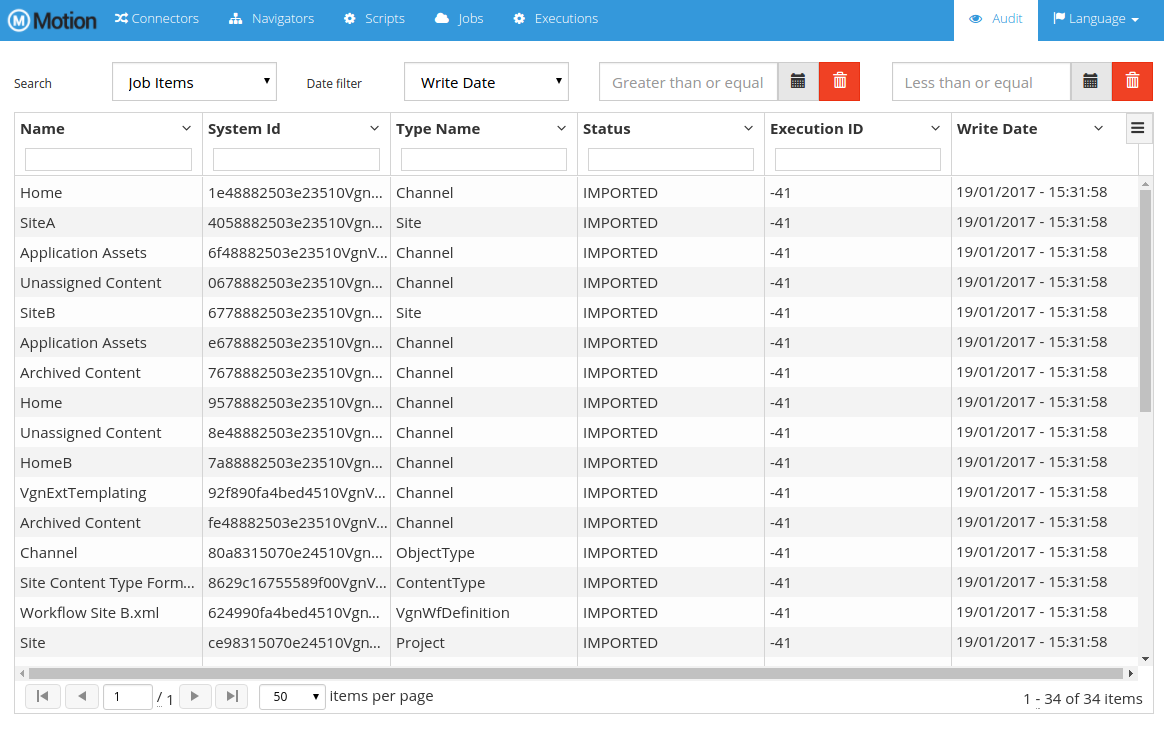
By default the audit items presented are from the Job Items entity. To see the audit items from other entities select the desired entity in the search selector.
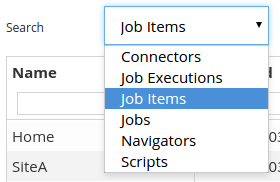
The columns available in the audit items' table change depending on the selected entity. All of them can be used to sort and search, except date columns which can only be used to sort.
For the Connectors, Jobs, Navigators and Scripts the columns available are:
-
ID
-
Name
-
Revision number
-
Revision Date
-
Username
-
Revision Type
For the Job Executions the columns available are:
-
ID
-
Job Name
-
Revision number
-
Revision Date
-
Username
-
Revision Type
And for the Job Items the columns available are:
-
Name
-
System ID
-
Type Name
-
Status
-
Execution ID
-
Job ID
-
Job Name
-
Script ID
-
Script Name
-
Source Tag Name
-
Target Tag Name
-
Computation Date
-
Data Fetch Date
-
Transformation Date
-
Write Date
-
Trace Enabled
Due to the many columns available for the Job Items, only some of them appear by default. The user can change the columns to appear.
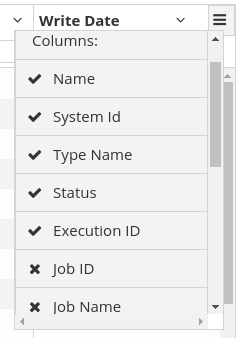
As mentioned previously, it is not possible to use the date columns to filter.
There is instead a date search field above the audit items' table.
As Job Items has many date columns, there is a selection box to choose the date field to filter. For the other entities is used the only date field available, the Revision Date.

10.1. Job Item Trace
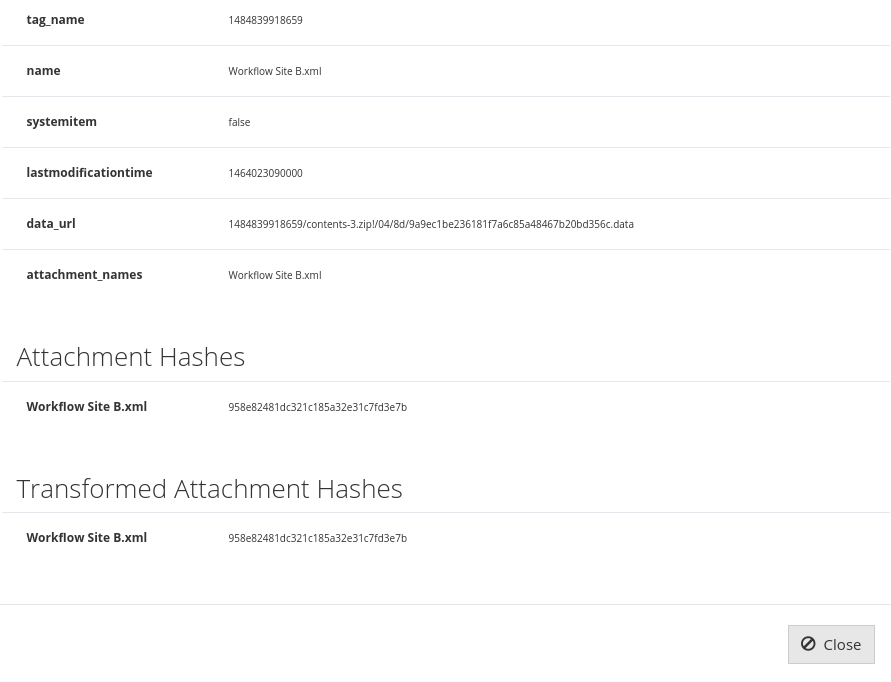
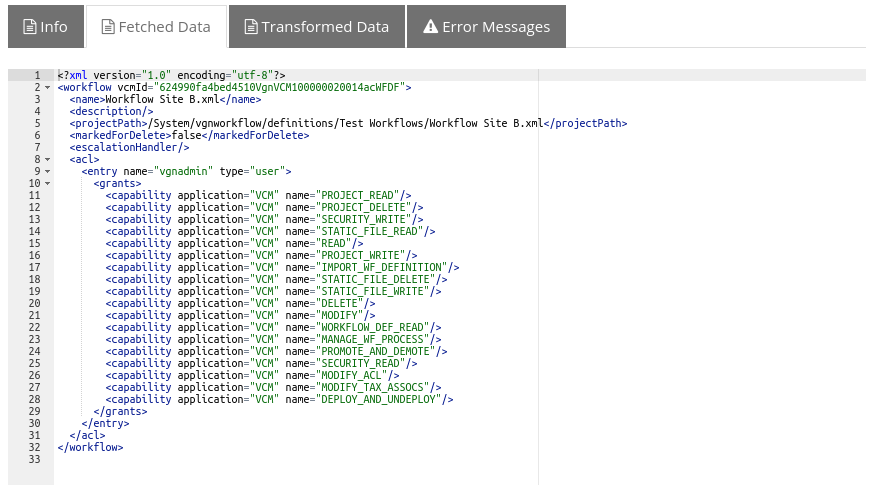
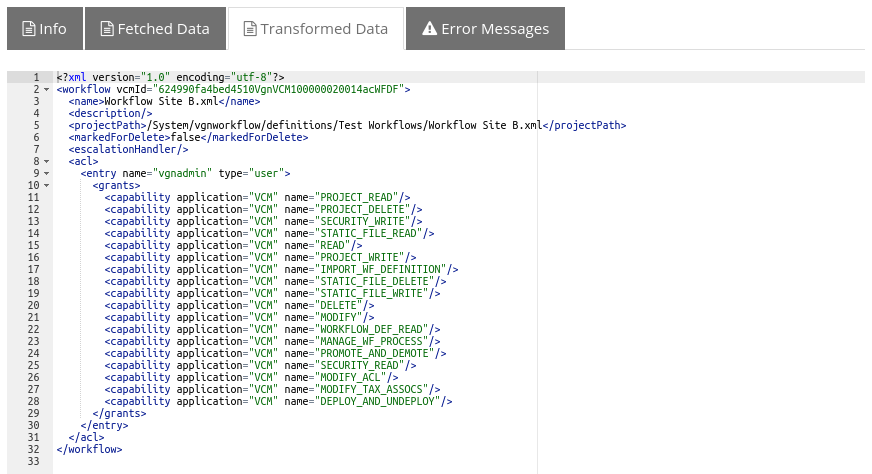
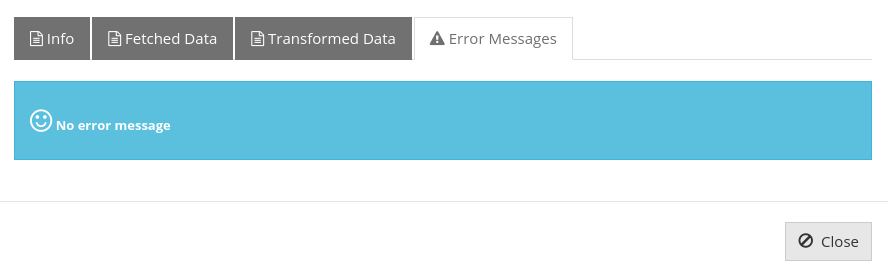
When searching by Job Items, you can double-click an item to view the trace details. If the job was configured with the audit mode trace, a dialog opens displaying the item details on four tabs: Info, Fetched Data, Transformed Data, and Error Messages. The Fetched Data and Transformed Data only appear if there is content to show.
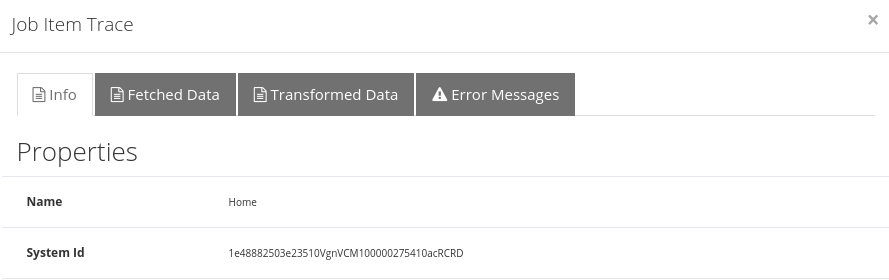
Properties tab
The Info tab displays all the item’s properties, attributes, attachment hashes and transformed attachment hashes.
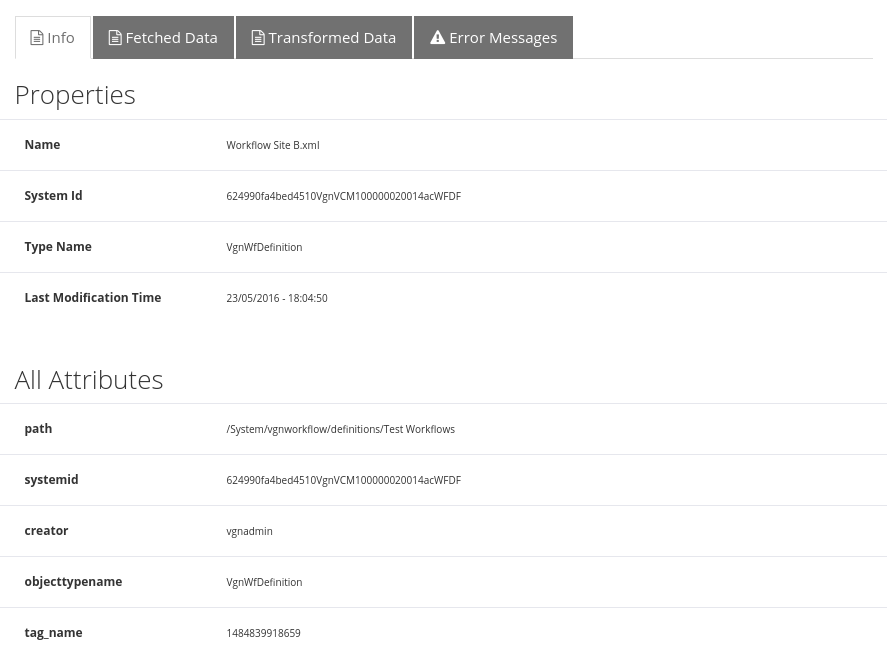
Fetched Data tab
On the Fetched Data tab, you can view the fetched data in the xml format.
Transformed Data tab
On the Transformed Data tab, you can view the transformed data in the xml format.
Error Message tab
The Error Message tab displays the detailed information about an error of the item, if there are any.
Part 2 - WEM Motion Connector
11. Item Types
Motion connector provides items with the following types:
| Type Name | Display Name |
|---|---|
|
Folder |
|
Site |
|
Channel |
|
File |
|
Object Type |
|
Content Type |
|
Category |
|
Role |
|
Workflow Definition |
|
Program Task |
Additionally, Connector supports all WEM content types (both out-of-the-boxpre-configured and custom).
Instances of those content types will have the typeName attribute set to the XML Name of the corresponding content type.
You can use tType names can easily be used to configure root items to expand or filter conditions.
For example:
-
To create a job that migrates all WEM channel pages and their dependencies (strong references):
-
Create a job.
-
Select Filter by Query and set the Root Items Filter value to
objecttypename = 'VgnExtPage'.
-
-
To create a job that migrates all static files and its related folders:
-
Create a job.
-
Select Filter by query and set the Root Items Filter value to
objecttypename = 'StaticFile'. -
Select Expand Strong References.
-
Set the Filter While Expanding Clause value to
objecttypename in ('StaticFile', 'Project')
-
12. Items Columns
Items provide some columns that can be used to filter them while executing jobs.
Motion connector makes the following columns available for all items:
| Column Name | Type | Description |
|---|---|---|
|
|
VCM ID for WEM Managed Objects, Project ID for projects, unique fields for other assets |
|
|
Name of the item |
|
|
Item type name. For Managed Objects, it corresponds to the XML name of the corresponding Object Type |
|
|
Last modification time. This attribute is used to check if item differs from source and target environments |
|
|
last modifier username |
|
|
creation time for this item |
|
|
creator username |
|
|
path for the item. It corresponds to:
|
|
|
Placement path for static files or Workflow definitions |
|
|
ISO-639 code for the item locale (only available for WEM 8.5 or later) |
|
|
flag that indicates is a content is a System Item |
|
|
approval status for contents (only available in Managed Object items) |
You can use these attributes in computation filter clauses such as Root Items Filter, Filter While Expanding Clause and Filter After Expanding Clause. Additionally, migration can use other tables available in the WEM database in conjunction with these attributes.
12.1. Filtering Examples
Filtering for items modified after a specific date:
-
If the WEM database is Oracle:
lastmodificationtime >= to_date('17-04-2016', 'DD-MM-YYYY') -
If WEM database is SQL Server:
lastmodificationtime >= '2016-04-17' -
If WEM database is PostgreSQL:
lastmodificationtime >= '2016-04-17'
|
Note:
lastModificationTime is available for all mgmt stages, but in delivery, it is only available for WEM 10.5 or later. |
Migrating static files under a specific placement path:
objecttypename = 'StaticFile' and (placementpath = '/Some/Path' or placementpath like '/Some/Path/%')Migrating items that have an extended attribute
In this example, you have migrated all channels, but you realize the extended attributes were not migrated because the Channel object type did not have them. After you update the Channel object type, you want to migrate all channels that have a value for that extended attribute.
Assuming that the extended attribute is a String (and it is stored in the stringVal01 column of the vgnAsExtObjAttribs table), you can migrate these channels with the following Root Item Filter:
objecttypename = 'Channel' AND systemid IN (
  SELECT recordId FROM vgnAsExtObjAttribs WHERE stringVal01 IS NOT NULL
)
Exclude all items that belong to a black list table:
If, on your WEM database, you create a black list table containing WEM IDs for items to exclude (lets call it BLACKLISTED_ITEMS), we can enforce corresponding items to be excluded by configuring the following After Expanding filter:
systemid NOT IN (SELECT vcmid FROM BLACKLISTED_ITEMS)12.2. Reference Types
The following reference types are available for reference expansion in Motion connectors:
| Reference | Key | Strength |
|---|---|---|
Children Channels |
|
|
Parent Channels |
|
|
Channel Order |
|
|
Channel Contents |
|
|
Content Channel Association |
|
|
Strong Attribute References |
|
|
Weak Attribute References |
|
|
Page to Channel / Content Instance |
|
|
Page Association |
|
|
Children Projects |
|
|
Parent Projects |
|
|
Project Contents |
|
|
Parent Category |
|
|
Children Categories |
|
|
Content Categories |
|
|
Children Labels |
|
|
Parent Label |
|
|
Content Labels |
|
|
Site Content Types Association |
|
|
Item Object Type |
|
|
Workflow Associations |
|
|
Translations |
|
|
For instance, you can use the following reference types to expand a site to get all its channels and associated contents:
-
Channel Contents
-
Children Channel
13. Option Definitions
Motion connector provides the following option definitions:
| Display Name | Type | Default Value | Description |
|---|---|---|---|
ACLs |
|
|
Specifies whether to import each object ACL information |
Ignore Missing Channels |
|
|
Specifies whether channel associations to channels not found in the target WEM server should be ignored and not cause an error |
Classifications |
|
|
Specifies whether to import each object classification information |
Suppress Workflows |
|
|
Specifies whether to suppress the processing of object workflows during import |
Structural Changes Allowed |
|
|
Specifies whether structural changes to existing ContentTypes are allowed during import |
System Item Overwrite Allowed |
|
|
Allows overwriting system items |
Mark failed by reference |
|
|
When an item migration fails, all items that reference that one with a strong reference will be also marked as failed |
Create Missing Projects |
|
|
When creating or updating a content, first check if its project exists and create it if needed |
Maximum number of threads |
|
|
Maximum number of threads that will be able to access simultaneously to this connector |
|
Note:
Some of these option definitions are similar to the options provided by the vgnimport and vgnexport commands.
|
For instance, Structural Changes Allowed prevents significantly changing a content type when it already has instances to avoid the risk of damaging existing content types. However, there are cases where you actually want to change the content type.
In those cases, you can select Structural Changes Allowed when configuring your target connector.
Some other options, like System Item Overwrite Allowed, do not exist as vgnimport or vgnexport commands. This option when unchecked, for instance, prevents contents from being modified that come pre-configured or in OpenText extensions like Dynamic Site, Dynamic Portal, or Web Media Management.
14. Scripts
You can use the scripts shown in this chapter in migrations between WEM systems.
14.1. Job Script Examples
This script will disable some WEM Listeners:
import com.vilt.motion2.connector.wem.service.RemoteWemConnection
import com.vilt.motion2.connector.wem.common.config.WemServerProperties
import com.vignette.as.server.event.AsPrePersistenceEvent
import com.vignette.as.server.event.AsPostPersistenceEvent

def listenersToDisable = [
    'com.vignette.as.server.event.AdhocEventListener',
    'com.vignette.wmm.listener.MediaObjectListener',
    'com.vignette.ext.templating.client.javabean.VgnExtTemplatingObjectListener'
]
def eventsToProcess = [
    AsPrePersistenceEvent.PRE_CREATE,
    AsPrePersistenceEvent.PRE_UPDATE,
    AsPostPersistenceEvent.POST_CREATE,
    AsPostPersistenceEvent.POST_UPDATE
]

def remoteWemConnection = new RemoteWemConnection(new WemServerProperties())
def appSvcsComponent = remoteWemConnection.appSvcsComponent

logger.info("Disabling listeners {}", listenersToDisable)
for (event in eventsToProcess) {
    logger.info("Disabling on Event {}", event)
    def eventListeners = Arrays.asList(appSvcsComponent.eventContainerComponent.getEventListeners(event)).collect()
    eventListeners.removeAll { listenersToDisable.contains(it) }

    def eventComponent = appSvcsComponent.eventContainerComponent.getEventComponent(event);
    def listenersStr = eventListeners.join(",")
    eventComponent.setVariableValue("LISTENERS", listenersStr);
    logger.info("Listeners for event {} set to {}", event, listenersStr)
}

logger.info("Pushing changes..")
appSvcsComponent.IConfigSpace.push()
logger.info("Changes pushed")
And the following will revert all changes in Configuration Console:
import com.vilt.motion2.connector.wem.service.RemoteWemConnection
import com.vilt.motion2.connector.wem.common.config.WemServerProperties

def remoteWemConnection = new RemoteWemConnection(new WemServerProperties())
def appSvcsComponent = remoteWemConnection.appSvcsComponent

logger.info("Reverting changes to configconsole..")
appSvcsComponent.IConfigSpace.revert()
logger.info("Changes reverted")
14.2. Comparison Scripts Examples
Scripts to compare channel associations references:
sourceData = $(sourceData)
targetData = $(targetData)

def sourceRefs = sourceData.find("channelAssociation referenceId").texts()
def targetRefs = targetData.find("channelAssociation referenceId").texts()

if (!sourceRefs.containsAll(targetRefs) || !targetRefs.containsAll(sourceRefs)) {
    statusInfo.status = JobItem.Status.DIFFERENT
    statusInfo.errorMessage = "Channel associations are different: source = ${sourceRefs}, target = ${targetRefs}"
}
14.3. Migration Scripts Examples
The following script will approve ContentType items in order to be able to import WEM contents of that type:
data = $(data)

switch (item.typeName) {
    case  'ContentType':
        data.attr('vcmStatus', 'approved')
        break
}
15. Helper Queries
As long as a WEM Motion connector is the source in a job, WEM tables can be used in filter queries. However, some information, like channel path or publish status, are not trivially obtained. For that reason, Motion connectors make some helper queries available that can be easily used for filtering items.
These helper queries are available for all supported databases by the WEM Motion connector.
|
Some Oracle Enterprise Release 2 versions have an issue when a nested If you use Oracle Release 2 and you want to use helper queries, you must have version 11.2.0.4 or later! |
Please note that since these queries need to access and process large tables and amounts of data, there might be a performance impact on the database. Depending on the helper query, database indexes may be necessary to improve performance.
15.1. Activation
Activation of helper queries is done on WEM Motion Connector’s config/application.yml.
Make sure the following profile is present:
spring:
  profiles:
    active: helperqueries
Restart WEM Motion Connector.
15.2. Queries
15.2.1. Channel Path
Helper query motion_channel_path makes it easy to find channels by their full path.
For instance, to get descendant channels of channel with path /SomeSite/Home/SomeChannel, the following Root items filter query can be used:
objecttypename = 'Channel' AND
systemid IN (
  SELECT
    systemid
  FROM
    motion_channel_path
  WHERE
    path like '/SomeSite/Home/SomeChannel/%'
)
Performance considerations
This query relies on two possibly large tables: vgnAsChannel and vgnAsMoMap.
15.2.2. Publish Status
Helper query motion_publish_status provides the publishing status per stage for items.
Possible values for column publishstatus are stale and published.
For instance, to get all items that are stale in stage Internet, the following Root items filter query can be used:
systemid IN (
  SELECT
    systemid
  FROM
    motion_publish_status
  WHERE
    stagename = 'Internet' and
    publishstatus = 'stale'
)
Note:
motion_publish_status is only available in the mgmt tag.
|
Performance considerations
The following possibly large tables are part of this query: vgnAsMoMetaData, vgnCMSObject, vgnProject.
15.2.3. Custom Helper Queries
If there is some specific query that is commonly used by WEM Motion then it can be defined as a WEM Motion connector helper query.
To create new helper queries edit the WEM Motion Connector’s config/application.yml such that you have something similar to the following:
motion:
  connector:
    # ...
    # remaining Connector configuration
    # ...
    item-view:
      helper-queries:
        helper-query-identifier: (1)
          name: motion_custom_query (2)
          profiles-expression: "cma && oracle" (3)
          sql: | (4)
            SELECT
              sm.objId as systemid,
              sm.lastPublishDate as lastpublishdate
            FROM
vgnStageManifest sm| 1 | Helper query identifier. This must be a unique key in the helper-queries property. |
| 2 | Helper query name. This is what will be used for WEM Motion Engine queries. |
| 3 | Profiles expression to filter where the query shall be executed. |
| 4 | The SQL query |
|
Note:
After editing config/application.yml, the WEM Motion Connector must be restarted!
|
The motion_custom_query can now be included on WEM Motion Engine queries specific to this WEM Motion Connector.
For example, it can be used on a root items query such as:
systemid IN (select systemid from motion_custom_query where lastpublishdate <= 1498832115000)The profiles-expression property allows further filtering so that the same query name can be defined for different environments.
The available expressions are:
-
Logical operators
-
&&(and) -
||(or) -
!(not)
-
-
Databases
-
oracle -
sqlserver -
postgresql
-
-
WEM versions
-
vcm75 -
vcm76 -
vcm80 -
wem81 -
wem85 -
wem105 -
wem160
-
-
WEM stages:
-
cma -
cda
-
Example of profiles expressions:
cma && !(vcm74 || vcm75 || vcm76)cda && oracle && (wem105 || wem160)sqlserver && !wem16016. Best Practices
- Stages and Preview Application Instances
-
When migrating sites, all stages and preview application instances associated with them in the source environment must exist on the target environment, with the exact name.
If they do not exist, migration will fail for those sites unless you provide a migration script to remove or to change the stage and/or preview application instance to another one.
The following is an example of data XML for the site to transform:
<site ...> <name>Some Site</name> <appInstanceName><![CDATA[PreviewAppInstance]]></appInstanceName> ... <stageAssociation mgmtId="e4fadde0f6c63310VgnVCM1000001a00000a____"> <stageName>Internet</stageName> <ordering>0</ordering> </stageAssociation> ... </site> - Migration script to remove a specific stage
data = $(data) (1)

if (item.typeName == 'Site') { (2)
  data
    .xpath('/site/stageAssociation/stageName').matchText('Internet') (3)
    .parent('stageAssociation').remove() (4)
}| 1 | Parse data using JOOX, for manipulation |
| 2 | Applies this filter for Site instances only |
| 3 | Obtains stageName XML element with text Internet |
| 4 | Removes the parent element stageAssociation for the matching element in (3) |
data = $(data) (1)

if (item.typeName == 'Site') { (2)
  data
    .xpath('/site/appInstanceName').matchText('PreviewAppInstance') (3)
    .text('dsmPreviewAppInstance') (4)
}
| 1 | Parse data using JOOX, for manipulation |
| 2 | Applies this filter for Site instances only |
| 3 | Obtains appInstanceName XML element with text PreviewAppInstance |
| 4 | Changes its text to dsmPreviewAppInstance |
16.1. WEM Listeners
The Motion connector uses WEM APIs to write contents, specifically, migrating to the mgmt stage triggers PrePersistence and PostPersistence listeners.
That means those listeners will have an impact on the WEM Motion migration performance while importing to the target connector (listeners will not impact the source connector).
To improve performance, you can disable custom listeners on the target WEM. Listeners that only change the content state can be disabled because WEM Motion migrates all content data as it was on the source environment. That means that changes done by those listeners in the source environment will be migrated properly to the target environment, and therefore they will not need to run again.
Some pre-configured listeners can have a huge impact during WEM content migration:
-
com.vignette.ext.templating.client.javabean.VgnExtTemplatingObjectListener -
com.vignette.as.server.event.AdhocEventListener -
com.vignette.wmm.listener.MediaObjectListener
In some situations, it may help disable some of those listeners.
For instance, com.vignette.as.server.event.AdhocEventListener, introduced in WEM 8.1, can be temporarily disabled when the source environment also has that listener, because ad-hoc references are also part of the exported data.
In addition, com.vignette.wmm.listener.MediaObjectListener spends a significant amount of time checking if the media (image, video, etc.) associated with contents actually exists.
In cases where an external URL is provided, it can even download it to extract metadata such as size.
If that information was already computed in the source environment, it will compute redundant information.
It can also prevent content migration in cases where its logic throws an Exception (for instance, if the content media is an external URL that returns a 404 HTTP code).
Nevertheless, it is strongly advised that you disable listeners only during the migration.
|
Important
While listeners are disabled, no manual content editing in the target WEM environment should occur. |
16.2. Object Types with Extended attributes
If your source WEM installation has extended attributes for Channels, Sites or Static Files, you must explicitly migrate those object types because they are considered system items, which are always ignored on migration by default.
To have Motion migrate those object types, you must enable the System Item Overwrite Allowed option.
To configure a job for Object Type migration:
-
Create a new job and name it ()Extended Object Types Migration, for instance).
-
Select both source and target connectors.
-
For the target connector, click Option Definitions.
-
Check the System Item Overwrite Allowed option.
-
If your target environment already has instances of the object types you are about to migrate, also check Structural Changes Allowed.
-
Click Save.
-
On the Items tab,
-
Click Add items.
-
Select the Type Navigator navigator.
-
Expand the ObjectType node.
-
Select the object types to migrate.
-
Click Add Items.
-
On the Policies tab, select Overwrite conflict policy.
-
Save and launch the job.
|
Note:
If you have selected Structural Changes Allowed, you may need to synchronize the changes. Go to the WEM Management Console > System Console > Unsynchronized Changes. The Manage Unsynchronized Changes dialog displays any unsynchronized changes and allows you to update them. |
16.3. Dynamic Site and Dynamic Portal
If your source WEM environment uses the Dynamic Site or Dynamic Portal functionality, you must also configure it properly on the target environment to ensure that all required DSM / DPM content types will exist there.
16.4. OpenText(TM) Web Media Management Considerations
If your source WEM environment uses Web Media Management, you must also configure it properly on the target environment to ensure that all required Web Media Management content types will exist there.
16.5. Content Types Considerations
Motion can migrate content types but it does not create the associated database tables.
Those tables must exist prior to content type migration to the target database.
Also, if your content type has an associated custom Java classname, use the configp utility to ensure that the class is deployed properly to WEM.
16.6. Locales Considerations
When migrating localized items, you must activate the corresponding locales on the target WEM instance.
Because locales are considered system items, they are not migrated by default, so you need to create a specific job to migrate them. This way you can activate the ones that are active in the source connector.
To configure a job to migrate locales:
-
Create and name a new job (Locales Migration, for instance).
-
Select both source and target connectors.
-
For the target connector, click on Option Definitions.
-
Check the System Item Overwrite Allowed option.
-
Click Save.
-
On the Items tab:
-
Click Filter by query.
-
In the Root Items Filter field, enter
objecttypename=AsLocale. -
On the Policies tab, select Overwrite conflict policy.
-
Save and launch the job.
17. Content Synchronization
17.1. Overview
Content synchronization is an advanced feature and as such should be used only by advanced users. Since every WEM environment is different, there can be no step-by-step guide to content synchronization but rather a general overview of how it can be achieved.
|
Important:
Make sure you understand all synchronization pitfalls before advancing any further! |
|
Important:
|
A synchronization of two WEM management stages consists of the following actions:
-
Find out which contents were deleted from source
-
Delete the contents from target
-
Find out created or modified content in the source, and migrate them to the target
Depending on the version of the source WEM, some of these steps are directly mapped to a WEM Motion Job while others might require composition of Jobs.
17.2. Limitations
One key limitation of synchronizations is that only WEM management stages are supported. This is because delivery synchronizations require a lot of manual interventions, which can be considerably larger when dealing with large environments or with old data.
The reasons for these limitations are mostly due to the fact that WEM Motion is not in control of how data is organized on WEM. Even though data may seem in a perfectly good state for WEM Motion, when it tries to write to WEM it may fail.
An important aspect to have in mind is that the synchronization is dependent on the WEM APIs, and as such the errors that might appear depend on the WEM version you are using.
As an example, suppose that in the source environment there is a ChannelA under /SiteA/Home, and in the target environment a ChannelA was manually created also under the same path /SiteA/Home. Now both of these ChannelA have the same path, but different IDs. When a synchronization is performed to bring ChannelA from source to target, it will fail because it conflicts with the already existent target channel.
Also keep in mind that WEM listeners will be triggered when importing contents as described on the WEM Listeners section. These listeners will also perform validations that might impact the synchronization process.
17.3. Pre-Requisites
Before advancing any further make sure you have the installed and configured the Deletion Tag and the WEM Motion Listener as described on OpenText™ WEM Motion Installation Guide.
If you your synchronization demands complex job queries, you might want to activate Helper Queries in order to simplify jobs. See Helper Queries for more information.
17.4. Synchronizations between Management Stages
The synchronization between two different management stages is essentially composed of the following WEM Motion Engine jobs:
| Order | Type | Description |
|---|---|---|
#1 |
|
From source’s |
#2 |
|
Delete items from target’s |
#3 |
|
Migrate the added or modified contents on source’s |
|
Important:
This date can be placed on the Root Items Query such as:
Refer to the specific database documentation for more options. |
Following is an exemplification of what the actual job configuration should look like to achieve a management stage synchronization process.
|
Note:
|
- #3 Migrate contents from management
-
-
Create a new Migration Job.
-
Set Source connector as the source’s
mgmt. -
Set Target connector as the target’s
mgmt. -
On the Items tab:
-
Choose Filter by query.
-
On the Root Items Filter enter:
-
for SQL Server:
lastmodificationtime >= '2016-01-01' -
for Oracle:
lastmodificationtime >= to_date('2016-01-01', 'YYYY-MM-DD') -
for PostgreSQL:
lastmodificationtime >= '2016-01-01'
-
-
-
On the Policies tab:
-
Disable Expand strong references.
-
Set the Conflict Policy to OVERWRITE.
-
-
(Optional) Configure any necessary Migration Script.
-
Save the job.
-
- #2 Delete items from target
-
-
Create a new Deletion Job.
-
Set Target connector as the target’s
mgmttag. -
On the Items tab, select Filter by root items parameter.
-
On the Policies tab, disable Expand strong references.
-
On the Trigger Job tab:
-
Set the Job to be triggered to Job #3
-
Do not select any Input Item Status.
-
-
Save the job.
-
- #1 Computed delete items
-
-
Create a new Computation Job.
-
Select source’s
mgmt-deletedtag. -
On the Items tab:
-
Choose Filter by query.
-
On the Root Items Filter enter:
-
for SQL Server:
lastmodificationtime >= '2016-01-01' -
for Oracle:
lastmodificationtime >= to_date('2016-01-01', 'YYYY-MM-DD') -
for PostgreSQL:
lastmodificationtime >= '2016-01-01'
-
-
-
On the Policies tab, disable Expand strong references.
-
On the Trigger Job tab:
-
Set the Job to be triggered to Job #2
-
On Input Item Status select:
-
COMPUTED
-
-
-
Save the job.
-
Now when job #1 is executed, all the management synchronization process will begin.