Fuse Management Central 1.4.0
17-05-2021
VILT Group, S.A.
Rua Ivone Silva, 6 - 7º Esq
1050-124 Lisboa
Portugal
Tel: +351 210 343 399
info@vilt-group.com
For more information, visit http://www.vilt-group.com
Disclaimer
No Warranties and Limitation of Liability
Every effort has been made to ensure the accuracy of the features and techniques presented in this publication. However, VILT Group, S.A. and its affiliates accept no responsibility and offer no warranty whether expressed or implied, for the accuracy
of this publication.
1. Introduction
This guide walks you through the installation and administration of Fuse Management Central 1.4.0.
Fuse Management Central is a centralized web administration console for OpenText ™ solutions, providing to Self-Managed Customers or Managed Service Providers a Unified Management Experience. With Fuse Management Central intuitive user interface, as well as its simplified deployment, OpenText ™ system administrators can quickly and easlily manage OpenText ™solutions components, maintaining the context and understanding of them, always with the option to schedule any operation.
Fuse Management Central also separates system administration from content administration, introducing a new layer of security on top of the traditional OpenText ™ administration tools.
1.1. Document Revision History
| Revision Number | Modification Date | Section Modified | Modifications |
|---|---|---|---|
1.0 |
2021-05-17 |
All |
Initial version |
2. Overview of Fuse Management Central Architecture
The diagram below display and briefly describes Fuse Management Central conceptual architecture, designed for high performance, scalability and security.
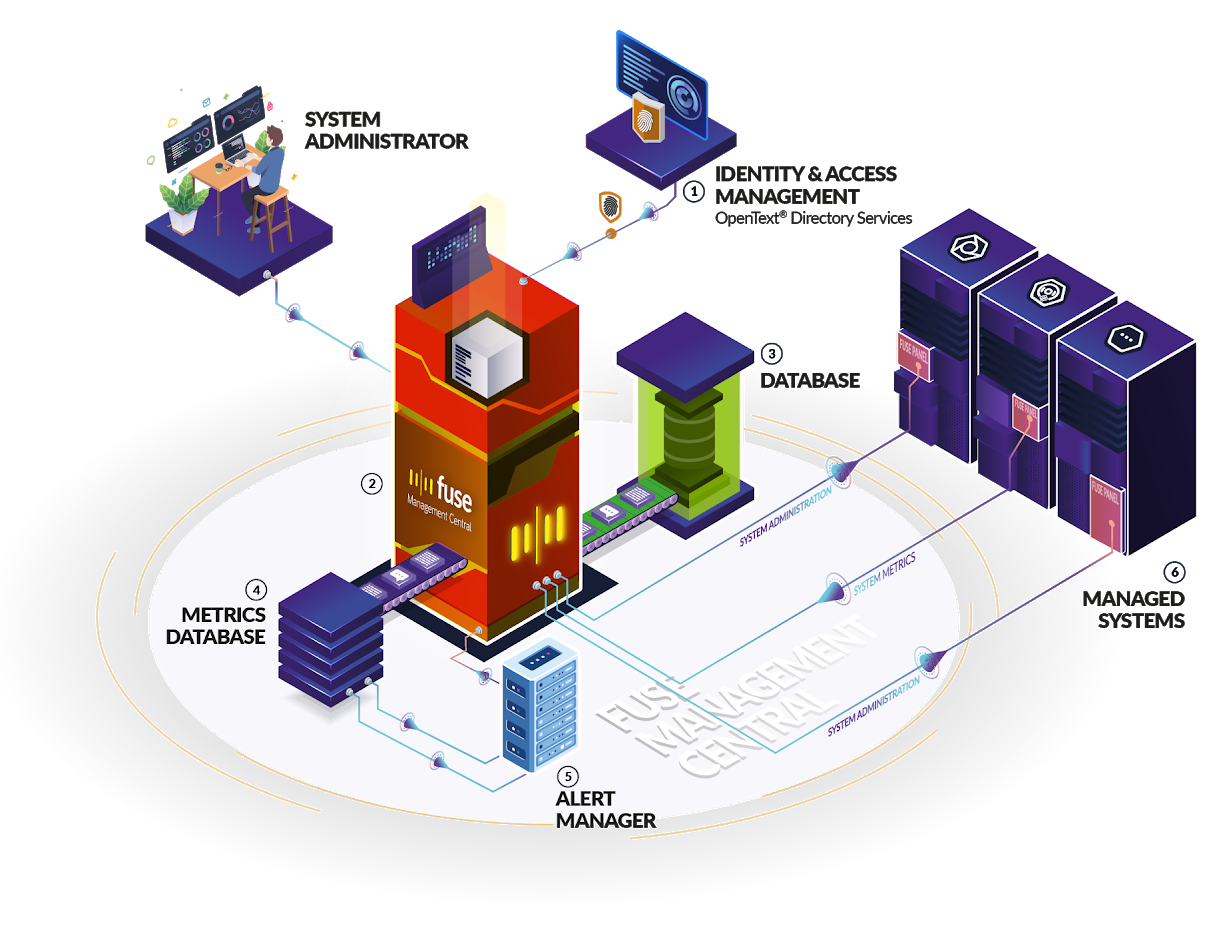
| 1 | Fuse Management Central integrate with OpenText ™ Directory Services to manage and authenticate its users. OpenText ™ Directory Services provides a scalable identity management solution, by integrating multiple authentication services, such as Active Directory or Google. |
| 2 | Fuse Management Central is the secret sauce central piece, responsible for orchestrating all system monitoring and management activities, regardless of its cluster type, whether productive or non-productive. |
| 3 | Fuse Management Central Database stores all application related data, such as administration settings, access roles, etc. |
| 4 | Fuse Management Central Metrics Database is used for long term metric storage, allowing system administrators to perform a temporal search on system metrics, combining them on aggregated system metric snapshots over time. |
| 5 | Fuse Management Central Alert Manager takes care of interpreting, deduplicating, grouping, and routing alerts to Fuse Management Central while allowing the option of silencing and inhibition of alerts. |
| 6 | All managed systems require Fuse Management Client installed and activated. Fuse Management Client is responsible not only for collecting and dispatching all system components metric data but also to make the system management interface available while ensuring the data interchange security. |
3. Install Fuse Management Central
3.1. Pre-Installation Tasks
 Review Operating System Support
Review Hardware Requirements
Review Communication Ports Availability
| Please refer to the Release Notes document for a complete listing of supported systems and compatibility prior starting Fuse Management Central installation process. |
3.1.1. Communication Ports Availability
Fuse Management Central uses designated ports for communication between its internal components. If a built-in firewall exists between any of these elements, you must manually open the required ports.
The following diagram should illustrate the communication ports availability and the relations between the several Fuse Management Central components.
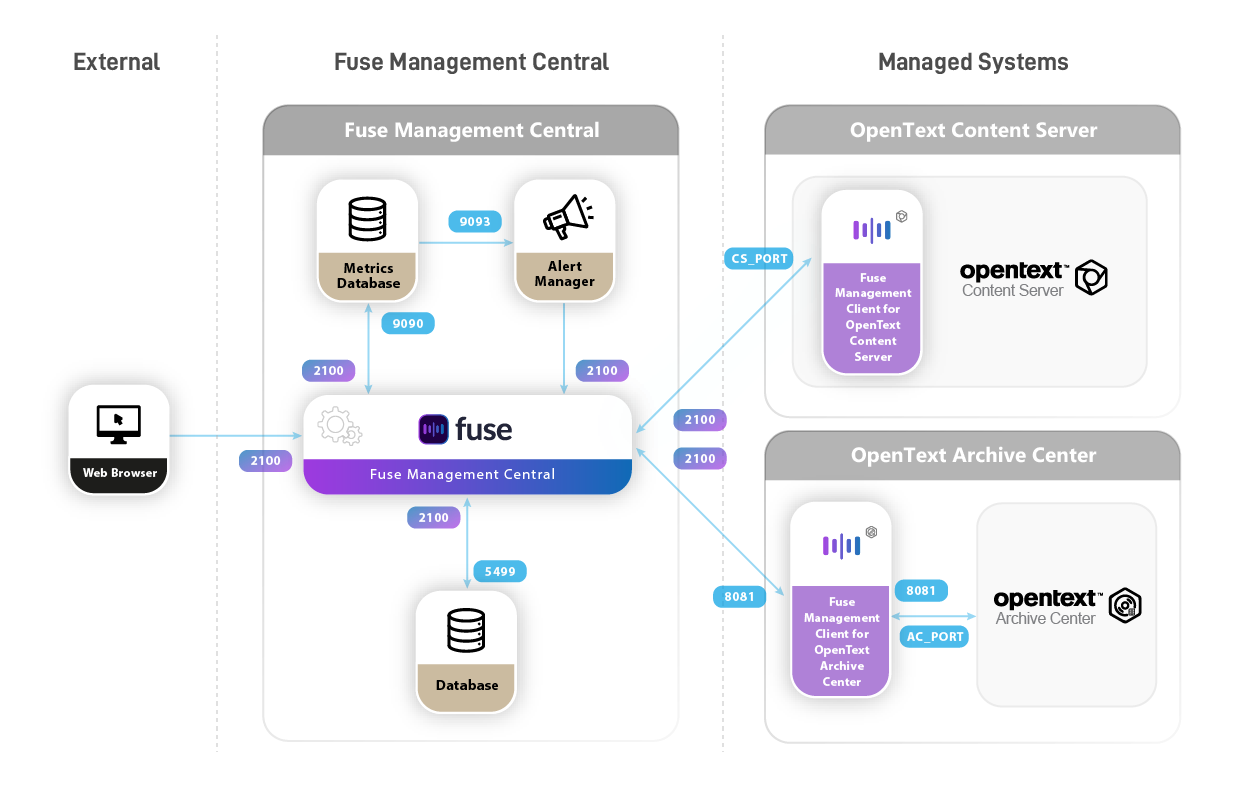
Ports required for communication between components:
| Port | Fuse Management Central Component |
|---|---|
|
Fuse Management Central port, used for both interface access and all APIs access. |
|
Fuse Database |
|
Fuse Metrics Database |
|
Fuse Alert Manager |
|
Default port for Fuse Management Client for OpenText Archive Center. This port can be changed on installation. |
|
Fuse Management Client for OpenText Content Server. This port entirely depends on your Content Server installation.
Usually |
|
OpenText Archive Center port. This port entirely depends on your Archive Center installation.
Usually |
| Fuse Management Client for OpenText Archive Center should be installed in the same system where Archive Center is running. Fuse Management Client for OpenText Content Server runs as a module inside Content Server, so no special port needs to be accessed, other than the actual Content Server port. |
| If any of the above ports are being used by other processes os applications, Fuse Management Central will not be able to properly operate. |
3.1.2. Install Java
Before you start the Fuse Management Central installation, please check whether a supported JDK is already installed.
Please validate your current JDK version:
-
Option 1: On Windows go to Control Panel > Programs and Features to see what JDK version is installed.
-
Option 2: Check if JDK is already installed, by opening a command line and typing the following command:
java -version
-
Check Fuse Management Central Release Notes document to find out which JDK versions are supported for your Fuse Management Central version.
-
If no JDK is installed or the installed version is not supported:
-
Download and install Java with the default option selected and make sure it is available in your
path
-
| Free long term support (LTS) versions of JDK are provided by AdoptOpenJDK and Oracle. We recommend you install a long term support version to use with Fuse Management Central. |
3.1.3. Install NTP (recommended)
To avoid inconsistent metric data, and as a general good practice rule, it is highly advisable to keep the servers clocks synchronized.
For this purpose, installing Network Time Protocol (NTP) is strongly recommended in the Fuse Management Central server and all your configured Systems as well.
NTP helps ensure a consistent time of day across all of the service nodes in the cloud. If you enable NTP in a network, configure the service nodes to obtain their time over the network.
3.1.4. Enabling SSL Security
Optionally, for enabling enabling SSL security on Fuse Management Central, please refer to the Configure SSL section in the Spring Boot Reference Documentation.
3.2. Installation on Microsoft Windows
To run Fuse Management Central installer on Windows:
-
Log on to Windows as a user who is a member of the Local Administrators group.
-
Start Fuse Management Central installation wizard, by double-clicking the installation file (
/Fuse Management Central/Windows/Fuse Management Central 1.4.0-Winx64.exe). -
In the Choose Components dialog box, leave the default values selected and click Next.
-
In the Choose Install Location dialog box, accept the default Destination Folder or click Browse to select a different folder, and then click Next.
-
In the Choose Data Location dialog box, accept the default Data Directory folder or click Browse to select a different folder, and then click Next.
To ensure business continuity, the Data Directory path should have a backup policy applied, enabling data recovery in the event of a disaster. -
In the Choose Start Menu Folder dialog box, click Install.
-
When the installation process is complete, click Close.
-
Open Windows Services console and start Fuse Management Central service, once started all dependency services will start automatically.
The following windows services must be running:-
Fuse Management Central
-
Fuse Management Central (Alert Manager)
-
Fuse Management Central (Database)
-
Fuse Management Central (Metrics Database)
-
3.3. Upgrade on Microsoft Windows
If you have a previous version of Fuse Management Central installed follow the following procedure:
-
Backup your license file and Fuse Data Directory.
-
You license should be installed in folder
<fuse_installation_folder>/license(e.g.C:\Program Files (x86)\Fuse Management Central\license). -
Fuse Data Directory is setup accordingly to the installation instructions on chapter Installation on Microsoft Windows
-
-
Uninstall Fuse Management Central following the instructions in the chapter Uninstall Fuse Management Central.
-
Install Fuse Management Central following the chapter Install Fuse Management Central configuring the same data directory used previously when prompted.
-
Restore your license file after the installation is completed and before starting the services.
3.4. Docker Deployment
3.4.1. Install Docker
Before proceeding, please make sure you have installed the latest version of Docker and Docker Compose, as defined in the official documentation:
-
Docker: https://docs.docker.com/install/
-
Docker Compose: https://docs.docker.com/compose/install/
| Please refer to the Release Notes for the required minimum versions. |
3.4.2. Run with Docker Compose
-
Load the docker image with:
docker load < fuse-docker-image.tarThis will create an image with the tag
vilt-group/fuse-server -
In the same directory as the
docker-compose.ymlprovided, start all the services with:docker-compose up -d
After start up open Fuse Management Central login page in your browser: http://localhost:2100
Make sure that port 2100 is available in your system. Otherwise change the exposed port in the `docker-compose.yml`file to one available.
|
3.4.3. Advanced Configuration
Data Persistence
Data is persisted in volumes, however backups are recommended for all the volumes. For backup recommendations please refer to Docker official documentation.
volumes:
  postgresql:
  prometheus:
  alertmanager:
Alternatively you can also map the data directories to filesystem mount points. Please follow the official documentation for the third-party containers.
JVM Options
To configure advanced JVM options in Fuse service use the JAVA_TOOL_OPTIONS environment variable:
    environment:
      - JAVA_TOOL_OPTIONS=
Third-Party Components
For more information regarding third-party configurations, please refer to the official third-party images documentation:
| For information on running the docker image with kubernetes, please contact us by email product.support@vilt-group.com. |
Upgrade on Docker
To upgrade your Docker installation, you only need to load the updated image and replace your docker-compose.yml file:
-
Copy the new docker files from the release bundle. (
docker-compose.ymlandfuse-docker-image.tar) -
Backup your existing
docker-compose.ymlfile -
Optionally backup the data from all the named volumes, following Docker user guide Docker User Guide.
-
Copy the provided
docker-compose.ymlfile and make any necessary adjustments -
Load the docker image with:
docker load < fuse-docker-image.tar -
In the same directory as the
docker-compose.ymlprovided, start all the services with:docker-compose up -d -
Make sure the new images were pulled correctly and the containers recreated
3.5. Validate Fuse Management Central Installation
To confirm if Fuse Management Central was successfully installed, open Fuse Management Central Administration page by using one of the following methods:
-
On Windows, click Start, point to Programs, point to the program folder name that was entered on the installation process (default: Fuse Management Central), and then click the Fuse Management Central Administration shortcut.
-
Open the following URL:
http://<fuse-management-central-host>:2100/#/admin -
Login with your authentication credentials:
-
Username:
fuseadmin(default) -
Password:
fuseadmin(default)
-
-
On Fuse Management Central Administration area, click Status
If all Fuse Management Central components are green and healthy, Fuse Management Central was successfully installed!
3.6. Next Steps
Once Fuse Management Central is installed is mandatory to perform a set of initial configurations, required for Fuse Management Central to properly operate and for security reasons.
Post-installation checklist:
4. Install Fuse Management Client
4.1. Install Fuse Management Client for OpenText Content Server
-
Extract Fuse Management Client for OpenText Content Server ZIP file (
Clients/Fuse Management Client for OpenText Content Server 1.4.0/fuse-management-client-otcs-1.4.0.zip) outside of the OpenText ™ Content Server® installation folder*. -
Copy all the extracted
fuse-management-client-otcs-1.4.0folder contents to the<Content Server home>directory, overriding thestagingfolder.If you are installing Fuse Management Client on a UNIX/Linux system, make sure that you are performing the setup actions with the user who installed OpenText ™ Content Server® and runs the Content Server service. -
Open Content Server Administration page in a Web browser.
-
If prompted, enter the Administrator password, and then click Log-in.
-
Install or upgrade Fuse Management Client:
-
If you already have a previous version of Fuse Management Client:
-
Select:
-
(OpenText ™ Content Server 16.2.5 and below) Module Administration > Upgrade Modules
-
(OpenText ™ Content Server 16.2.6 and above) Core System > Module Configuration > Upgrade Modules
-
-
-
For new installations:
-
Select:
-
(OpenText ™ Content Server 16.2.5 and below) Module Administration > Install Modules
-
(OpenText ™ Content Server 16.2.6 and above) Core System > Module Configuration > Install Modules
-
-
-
-
From the Installable Modules list, install/upgrade Fuse Management Client module.
-
After the installation of Fuse Management Client module is completed, restart Content Server.
For some Content Server versions, specially earlier ones, we found out that the standard soft-restart is not enough to reload all the loaders required for Fuse Management Client, so we suggest you do a second hard-restart to make sure everything was updated. Please check the troubleshooting section.
(Optional) Install Fuse Management Client for OpenText Content Server using Opentext System Center Manager
Alternatively, Fuse Management Client 1.4.0 module can also be deployed using OpenText System Center Manager (OTSCM):
-
Upload Fuse Management Client ZIP file:
-
Open OTSCM, navigate to Settings and on the left menu choose External Vendor Files.
-
On the top right there is a button named Select external vendor files that allows to upload a new file.
-
Upload Fuse Management Client ZIP file (
Clients/Fuse Management Client 1.4.0/fuse-management-client-otcs-1.4.0.zip).
-
-
Create an installation plan for Fuse Management Client:
-
Navigate to the Plans tab and use the button Add plan to create a new plan for installing Fuse Management Client.
-
Add each configured system where fuse-management-client-otcs-1.4.0 is to be installed, and for each one of them configure the required attributes:
Field Description Module Vendor
Third Party
Thirt party Module
Previously uploaded Fuse Client ZIP (e.g. "fuse-management-client-otcs-1.4.0.zip")
Instance path
Path to OpenText Content Server installation
Admin username
OpenText Content Server Admin user
Host name
OpenText Content Server hostname
Site name
OpenText Content Server site name (configured in mappings.tbl)
-
Save the plan.
-
-
Execute plan:
-
The plan can be executed by pressing the play button under actions.
-
4.2. Install Fuse Management Client for OpenText Archive Center
Before starting Fuse Management Client for OpenText Archive Center installation, please check if a supported JDK is already installed.
-
Check Fuse Management Central Release Notes document to find out which JDK versions are supported for your Fuse Management Central version.
-
If no JDK is installed or the installed version is not supported:
-
Download and install Java with the default option selected and make sure it is available in your
pathin the same host where OpenText Archive Center is installed.
-
| Fuse Management Client for OpenText Archive Center must be installed on the same host as OpenText Archive Center. |
| Free long term support (LTS) versions of JDK are provided by AdoptOpenJDK and Oracle. We recommend you install a long term support version to use with Fuse Management Central. |
Install on Windows
-
Extract Fuse Management Client for OpenText Archive Center ZIP file (
Clients/Fuse Management Client for OpenText Archive Center 1.4.0/fuse-management-client-otac-1.4.0-windows.zip) to the desired installation folder (e.g. C:\Program Files\Fuse Management Client for OpenText Archive Center) -
Inside the new folder location execute the batch file named
install.bat: this will install the client in the current location and add it as a Windows service. -
When the installation process is complete, if needed, close the console window.
-
Open Windows Services console and start the following Windows service:
-
Fuse Management Client for OpenText Archive Center
-
The path to the Java executable can be configured in the file FuseClientArchiveCenter.xml by editing the value of the tag <executable>java</executable>
|
Install on Linux
Installation on Unix Systems supports both Init.d and Systemd to start the process as a service.
Alternatively there is a script to start the process manually in the background, as a daemon.
Systemd
-
Extract Fuse Management Client for OpenText Archive Center ZIP file (
Clients/Fuse Management Client for OpenText Archive Center 1.4.0/fuse-management-client-otac-1.4.0-unix.zip) to the folder/opt/vilt/fuse-client-otac/(The instalaltion instructions assume this installation path). -
Copy the script
/opt/vilt/fuse-client-otac/bin/fuse-client-otac.serviceto the folder/etc/systemd/system/(If the path is different from the previous step this script needs to be changed to reflect the correct path) -
Both the path of the application (default: /opt/vilt/fuse-client-otac/) and the user running the service (default: root) can be configured by editing this script.
-
The application can then be started with the command:
sudo systemctl start fuse-client-otac
To flag the application to start automatically on system boot, use the following command: $ systemctl enable fuse-client-otac
|
For additional configuration options please refer to Spring Boot systemd Service documentation.
Init.d
-
Extract Fuse Management Client for OpenText Archive Center ZIP file (
Clients/Fuse Management Client for OpenText Archive Center 1.4.0/fuse-management-client-otac-1.4.0-unix.zip) to the folder/opt/vilt/fuse-client-otac/. -
Create a symlink, as follows:
$ sudo ln -s /opt/vilt/fuse-client-otac/fuse-client-otac.jar /etc/init.d/fuse-client-otac -
The application can then be started with the command
$ service fuse-client-otac start
You can also flag the application to start automatically by using your standard operating system tools. For example, on Debian, you could use the following command: $ update-rc.d fuse-client-otac defaults <priority>
|
For additional configuration options please refer to Spring Boot init.d Service documentation.
Daemon
-
Extract Fuse Management Client for OpenText Archive Center ZIP file (
Clients/Fuse Management Client for OpenText Archive Center 1.4.0/fuse-management-client-otac-1.4.0-unix.zip) to the folder/opt/vilt/fuse-client-otac/. -
Change to the script directory:
$ cd /opt/vilt/fuse-client-otac/bin/ -
Execute the script to run the client in background:
$ ./startup.sh
Post-installation steps
-
Before starting the service validate that the file config.yml points to the correct Archive Center URL:
archive-center: # Archive Center Instance URL url: http://localhost:8080 server: # Fuse Management Client http port port : 8081 -
Validate that the Fuse Management Client for OpenText Archive Center service is running by opening in a browser http://<ac.server.host>:8081/ and test the login by entering the credentials to OpenText Archive Center.
5. Add New System
This section will guide you through the process of adding a new OpenText ™ system to Fuse Management Central.
Before starting, ensure that:
You have the appropriate OpenText Content Server or OpenText Archive Center Fuse Management Client installed on your system
Fuse Management Central can access your system:
-
OpenText Content Server
-
Fuse Management Client for OpenText Content Server runs as a module installed inside OpenText Content Server, so you need to be able to access OpenText Content Server CGI URL (e.g.
http(s)://otcs.company.com/otcs/cs.exe)
-
| Please note that the first time a OpenText ™ Content Server system is added to Fuse Management Central, it cannot be running under Eclipse (CSIDE). If so, is mandatory to close Eclipse (CSIDE) and run OpenText Content Server service, then wait until Fuse Management Central scans all of your system’s component. |
-
OpenText Archive Center
-
Fuse Management Client for OpenText Archive Center runs as a standalone application, so you need to be able to access Fuse Management Client for OpenText Archive Center URL: (e.g.
http(s)://otac.company.com:8081)
-
Your system can access Fuse Management Central (e.g. http://fuse.company.com:2100)
5.1. Activation Request
-
Access Fuse Management Central:
http://<fuse-management-central-host>:2100 -
Login with your authentication credentials:
-
Username:
fuseadmin(default) -
Password:
fuseadmin(default)
-
-
Click Systems on the navigation menu
-
Click Add System
-
Fill the following fields, following all wizard steps:
Field Description System Type
OpenText Content Server or OpenText Archive Center
System URL
* For OpenText Content Server: URL to Content Server CGI (e.g.
http(s)://otcs.company.com/otcs/cs.exe) * For OpenText Archive Center: URL to Fuse Management Client for OpenText Archive Center (e.g.http(s)://otac.company.com:8081)Username
User account with system login privileges (e.g. "otadmin@otds.admin")
Password
User account password
Environment
Environment name (e.g. "DEVELOPMENT")
Please note that only systems belonging to the same cluster can be added to the same environment. Mixing systems from different clusters on the same Fuse Management Central enviroment will cause system deactivation!System Name
System name or alias (e.g. "LV181")
Advanced Options
(Optional) Description
System description to help system identification (e.g. "Partner sandbox")
(Optional) Owners
System owner(s) email(s) (e.g. "john.doe@company.com"), for event email notifications
(Optional) Tags
System tags (e.g. "front-end")
System tags can be very useful when logically grouping systems, allowing you to filter them when, e.g. applying configurations, performing bulk actions, … -
Click Test Connection to validate that your system fulfills all requirements
If connection test is not successful, please review all system parameters (System URL, credentials, …) and try again. -
Click Finish
-
Next, copy System ID and send it to your system administrator to authorize Fuse Management Central activation request
5.2. Authorize Activation
5.2.1. For OpenText Content Server:
-
Open Content Server Administration page in a web browser.
-
If prompted, enter the Administrator password, and then click Log-in.
-
Select Fuse System Administration > Fuse System Activation.
-
Insert the provided System ID and click Activate
-
Your system is now activated and Fuse Management Central can start manage and monitoring it
5.2.2. For OpenText Archive Center:
-
Open Fuse Management Client for OpenText Archive Center web page in a web browser.
-
If prompted, login with OpenText Archive Center authentication.
-
You should see a pending activation request
-
Insert the provided System ID and click Activate
-
Your system is now activated and Fuse Management Central can start manage and monitoring it
| If the authorize activation process fails, please check if all requirements are fulfilled and review the procedure. |
6. Fuse Management Central Administration
This chapter explains how to configure Fuse Management Central interactively using its Administration pages, allowing Fuse administrators to adjust all of the application features.
To access Fuse Management Central Administration area:
-
Open Fuse Management Central:
http://<fuse-management-central-host>:2100 -
Login with your authentication credentials:
-
Username:
fuseadmin(default) -
Password:
fuseadmin(default)
-
-
Click Fuse Administration on the navigation menu
6.1. Security
By default, Fuse Management Central has a built-in administrator user account named fuseadmin, which cannot be deleted.
This chapter describes how to change this user account password and email.
6.1.1. Change fuseadmin password
For security reasons, is highly recommended to change the fuseadmin user default password.
To change fuseadmin default password:
-
On Fuse Management Central Administration area, click Security
-
Fill the following fields and click Change Password:
-
Current password (Default:
fuseadmin) -
New password
-
Confirm password
-
6.1.2. Change fuseadmin email
To change fuseadmin email address:
-
On Fuse Management Central Administration area, click Security.
-
Insert or update the email address and click Submit.
6.2. General
To allow your systems to communicate with Fuse Management Central, the API Endpoint URL must be updated with its FQDN URL.
| To allow systems to dispatch their metrics to Fuse Management Central, the API Endpoint URL must be accessible by all managed systems. |
To update the API Endpoint URL:
-
On Fuse Management Central Administration area, click General.
-
Under the Fuse Management Central URL section, update the API Endpoint URL and click Update:
|
Please note that API Endpoint URL is built-in on your license, changing it will invalidate your current license. Before changing Fuse Endpoint URL please request an updated license providing the new license data. |
6.3. License
A valid license is required for Fuse Management Central to properly operate. By default, when installed for the first time, Fuse Management Central has no license applied.
Please note that under the following license scenarios, Fuse Management Central will have limited functionality:
-
Not Licensed (No license file found in the
licensefolder) -
Invalid License (License data mismatch Fuse Management Central API Endpoint)
-
Trial License Expired (The current trial license period has expired)
-
Subscription License Expired (The current subscription license period has expired)
Fuse Management Central can support multiple OpenText system types, currently OpenText Content Server and/or OpenText Archive Center, each one requiring its own license key file to enable its management functionalities.
6.3.1. Fuse Management Central for Content Server License
Fuse Management Central for Content Server has the following license models available:
| Type | Description |
|---|---|
Perpetual License - Per User |
Limited to OpenText Content Server/Extended ECM total Standard Named Users. |
Perpetual License - Per Managed System (For MSP Only) |
Limited to a total of managed systems. |
Subscription License - Per User |
License issued monthly and limited to OpenText Content Server/Extended ECM total Standard Named Users. |
Subscription License - Per Managed System (For MSP Only) |
License issued monthly and limited to a total of managed systems. |
6.3.2. Fuse Management Central for Archive Center Server License
Fuse Management Central for Archive Center has the following license models available:
| Type | Description |
|---|---|
Perpetual License - Per Managed System |
Limited to a total of managed systems. |
Subscription License - Per Managed System |
License issued monthly and limited to a total of managed systems. |
6.3.3. Request License
When requesting your license, either for OpenText Content Server and/or OpenText Archive Center, please provide the following information when contacting the software Support channel or your Account Executive:
-
System Type (OpenText Content Server or OpenText Archive Center)
-
Trial Period (Trial License Only)
-
Customer Name
-
Total Managed Systems (For "Per Managed System" license models)
-
Total System Named Users (Total OpenText Content Server/Extended ECM total Standard Named Users)
Please note that each OpenText solution requires it’s own Fuse Management Central license key file in order to enable that solution functionalities. Once you receive your license file(s) you must ensure that each solution license file has the proper name:
-
OpenText Content Server license file:
otcs-key.license -
OpenText Archive Center license file:
otac-key.license
| Please be aware that when a license is issued all the above data will be hardcoded in it, meaning that any change on this data requires an updated license. |
6.3.4. Apply License
To apply your license, please execute the following steps:
-
Copy the provided license file to folder
<fuse_installation_folder>/license(e.g.C:\Program Files (x86)\Fuse Management Central\license). -
Restart Fuse Management Central Windows service or process.
-
Validate on License Information if the license was updated successfully, if not please review this procedure.
If you are using Fuse Management Central Docker image, please mount the license file directly to /opt/fuse/license/.
|
License file for OpenText Content Server must be named otcs-key.license. License file for OpenText Archive Center must be named otac-key.license
|
6.3.5. Validate License Status
To validate your license status:
-
On Fuse Management Central Administration area, click License.
-
Validate if your License Information data is correct and if Fuse Management Central license status is valid.
| When Fuse Management Central is running using an invalid license (trial expired, Fuse Management Central URL mismatch, …), will cause all managed systems to automatically deactivate, limiting Fuse Management Central functionality. |
6.4. OTDS Integration
Fuse Management Central has a built-in administrator user account (fuseadmin), which cannot be deleted.
In order to allow other users to access Fuse Management Central it must be integrated with OpenText ™ Directory Services (OTDS).
Fuse Management Central has a native OTDS integration, leveraging its authentication capabilities while allowing a centralized user management.
6.4.1. Create OTDS Resource
For Fuse Management Central to integrate with OTDS, a resource is required to be created on OTDS.
To create the OTDS resource:
-
Open OTDS Administration (e.g.
http(s)://otds.company.com:8080/otds-admin) -
From the web administration menu, click Resources.
-
On the button bar, click Add. The New Resource wizard will guide you through the steps to create a new resource.
-
On the General page:
-
In the Resource Name box, type a descriptive name for this resource (e.g. Fuse Management Central).
Please note that the name you type here cannot be edited later. -
(Optional) In the Display Name box, you can optionally type a different resource name.
-
(Optional) In the Description box, you can optionally type a short resource description.
-
Leave all other options with default values and click Next.
-
-
On the Synchronization page, make sure that User and group synchronization option is not checked, and click Next.
-
On the Principal Attribute page, leave all options with default values and click Save.
-
In the Resource Activation window, copy or write down the resource identifier.
Add users and/or groups to the created Resource
Once the OTDS Resource for Fuse Management Central is created, OTDS will automatically create an Access Role named "Access to <ResourceName>". Users and/or groups who will be able to login to Fuse Management Central must be added to this Access Role.
| For more detailed information regarding OTDS functionality, please refer to OpenText ™ Directory Services documentation. |
6.4.2. Activate OTDS Resource
To activate Fuse Management Central with OTDS:
-
On Fuse Management Central Administration area, click OTDS Integration
-
Fill the following fields and click Activate:
-
OTDS URL: The FQDN address of the OTDS Server (e.g.
http(s)://otds.company.com:8080) -
OTDS Resource ID: The ID of the resource that has been created in OTDS
-
Once activated, the OTDS resource activation status will only be displayed when authenticating in Fuse Management Central using an OTDS account with administrative privileges (e.g. otadmin@otds.admin).
|
6.4.3. Configuring Fuse Management Central Access Roles
To manage user privileges a set of access roles are available in Fuse Management Central, each one with specific privilege sets:
| Access Role | Privilege Description |
|---|---|
Fuse Admin |
Permits access Fuse Administration area, allowing full control over Fuse Management Central. In addition to these privileges this role also has all privileges of System Admin role. |
System Admin |
Can manage all systems, allowing to perform actions on them e.g. Restart, Apply Configurations, etc… |
Guest |
Limited privileges role, for users with "read-only" access, meaning that no management actions can be performed allowing only to observe monitoring metrics. |
To allow users to authenticate in Fuse Management Central using OTDS, these access roles must be mapped with one or more OTDS groups from both synchronized or non-synchronized partitions, depending on your OTDS partition scenarios.
To map an OTDS group with a Fuse Management Central access role:
-
Login using to Fuse Management Central using the
otadmin@otds.adminOTDS user account. -
On Fuse Management Central Administration area, click OTDS Integration.
-
Map each role by selecting or inserting one or more OTDS groups to each role field.
-
click Save roles.
|
Please note that all OTDS groups mapped with Fuse Management Central access roles must be added to Fuse Management Central OTDS Access Role. This access role is automatically created when the Fuse Management Central resource is created in OTDS. |
6.5. Integration Channels
Integration channels allow Fuse Management Central to integrate with SMTP and/or 3rd Party incident management or alert systems, to easily notify teams about OpenText performance or health issues.
6.5.1. SMTP
To enable email notifications for Fuse Management Central alerts, operations, etc… you must first configure the SMTP Settings.
-
On Fuse Management Central Administration area, click Notification Channels
-
On the SMTP Settings panel, fill in the following information:
-
Sender Email: Type the email address that will be used as the “From” address in all email notifications sent by Fuse Management Central
-
SMTP Host: The FQDN hostname of the SMTP server to which Fuse Management Central will connect in order to send email.
-
SMTP Port: The port number used by the SMTP server.
-
(Optional) SMTP Username: If your SMTP server requires it, type the user name to be used in the connection to the SMTP server.
-
(Optional) SMTP Password: If your SMTP server requires it, type the type the password for the user name you typed in the previous step.
-
Enable StartTLS: Enable this option if your SMTP server requires TLS.
-
Enable SSL: Enable this option if your SMTP server requires SSL.
-
-
Click Send test email and validate if you have received a test email notification.
The test email notification will be sent to the email defined on your user account. If you are authenticated with the fuseadminuser account, this user account email must be properly set. -
Click Update to save your STMP configurations.
6.5.2. Checkmk Integration

Checkmk is one of the leading tools for Infrastructure and Application Monitoring, offering both Open Source and Enterprise license models.
Fuse Management Central offers a seamless integration with Checkmk, with an agent plug-in specifically designed to connect your Fuse Management Central instance to Checkmk.
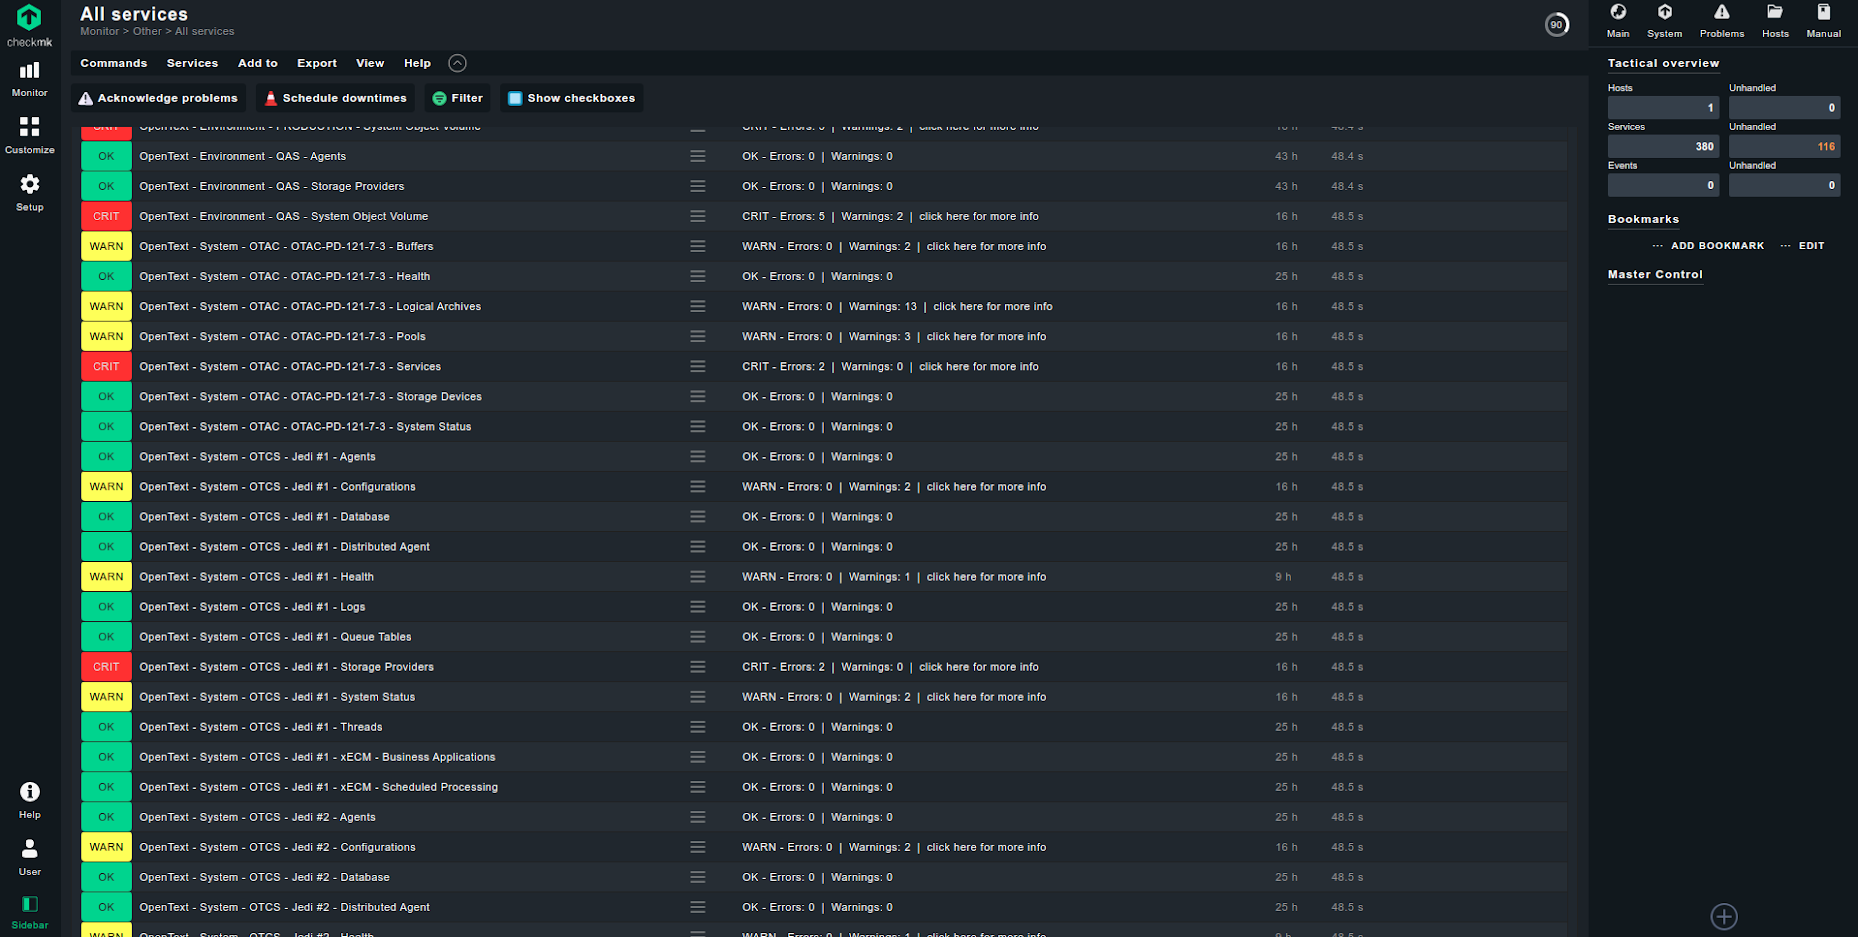
Using the data provided by the Alerts API, the plug-in will add a complete list of Services to be monitored in Checkmk, from your OpenText Content Suite.
The shared information is related to active alerts and it is grouped by System Type, System Name and Component. It also offers alert monitoring for specific Environment scope alerts, as well as Fuse Management Central instance and administration alerts.
Checkmk Plug-in Download
To download the Fuse Management Central plug-in for Checkmk go to Checkmk Exchange and download the following package:
Checkmk Plug-in Installation and Configuration
To install the Fuse Management Central plug-in in Checkmk follow these steps:
-
Go to Setup > Extension packages.
-
Click in Upload package and upload the recently downloaded Fuse Management Central package.
-
Click in Upload & Install.
Configuration steps
Now you have the Fuse Management Central plug-in in your Checkmk and you can configure it:
-
Go to Setup > Other integrations > Fuse Management Central
-
Create a new rule with the Fuse Administrator credentials (username and password) and the URL for the alerts API.
-
The Alerts API URL should be
http://[fuse-host]:[fuse-port]/api/v1/alerts/.
-
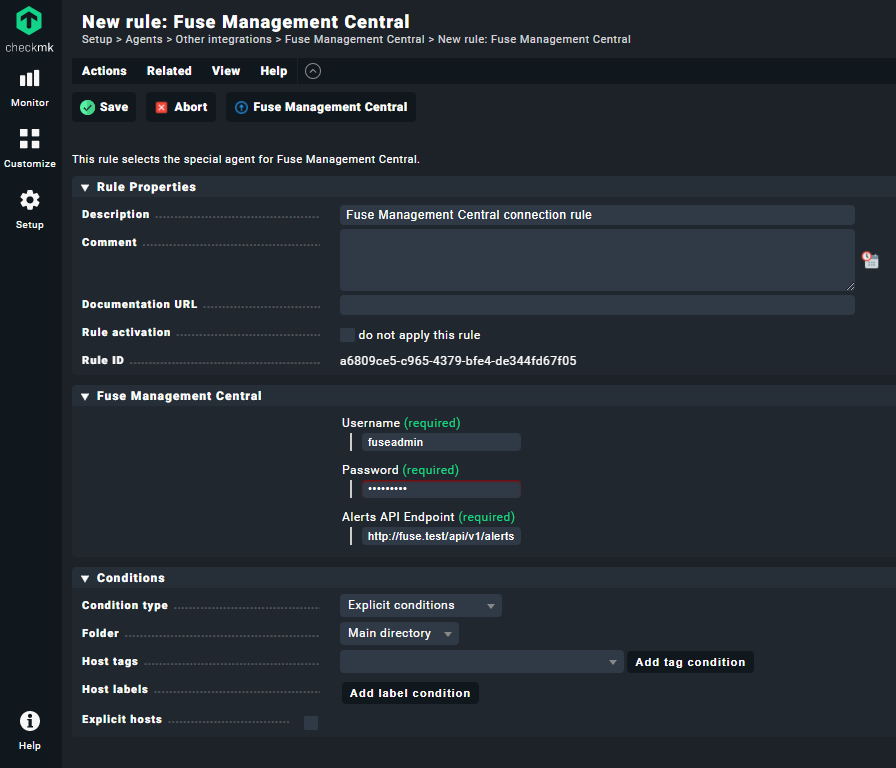
After creating the rule for the Fuse Management Central plug-in, create a host or go to one of your hosts, and in the Service Configuration page you can discover the Fuse services and add them to be monitored.
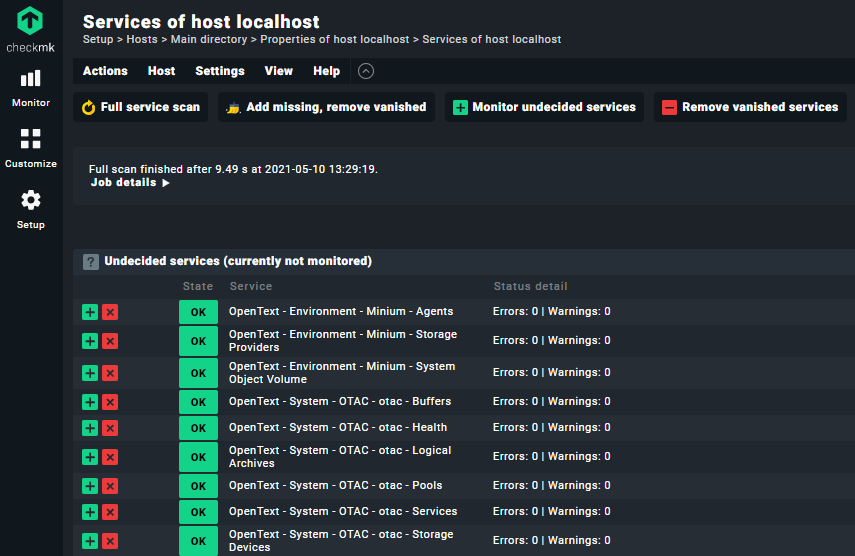
| In order to correctly see the Fuse services summary, you need to go to Setup > Services > Service monitoring rules > Escape HTML in service output and create a rule for the host with the Fuse services to don’t escape html. |
Instance Service
The Fuse Management Central instance service has the name Fuse Management Central - Instance, this service will always appear.
If Checkmk can connect to the configured Fuse, it will have the state OK. If it can’t connect to Fuse, it will have the state CRIT and the summary will have more information about why it could not connect to Fuse.
Other Services
For each pair System - Component type, you will have a service with the name OpenText - System - [system type] - [system name] - [component type name].
The same happens for the Environments, for each pair Environment - Component type, you will have a service named OpenText - Environment - [environment name] - [component type name].
For the Admin component types, you will have one service for each, named Fuse Management Central - [component type name].
In these services you will be able to see the number of errors and warnings in their summary.
Regarding the state, they can have one of the following states:
-
OK - there are no errors or warnings
-
WARN - there are some warnings but no errors
-
CRIT - there are errors

If a service is in the state WARN or CRIT, you will have a link to Fuse Managemt Central in its summary. The link will redirect you to the Fuse Management Central Alerts page with the correct filters selected, so you can see more details of the errors/warnings.
6.6. Alert Manager
Fuse Management Central uses an Alert Manager to automatically detect system anomalies and consequently triggering real-time alerts. These alerts are used to report on warning or error situations, such as performance degradations, failing agent schedule, lack of resources, among others…
6.6.1. Integration Channels
The current supported integration channels are:
| Channel | Description |
|---|---|
User Interface (Default) |
Notification events are displayed on Fuse Management Central user interface, being displayed on the events list and adjusting the failing component style, providing real-time feedback to users. |
SMTP |
If the SMTP Settings are properly set, alert notifications will be sent by email to system owners. |
To manage an alert integration channel:
-
On Fuse Management Central Administration area, click Alert Manager.
-
Click on the ON/OFF toggle button to fully disable the alert for all integration channels.
-
Click on the specific integration channel (e.g. "SMTP") toggle button to disable it from being dispatched to that integration channel.
-
-
Click Update to save your new settings.
6.6.2. Metric Thresholds
Fuse Management Central system monitoring is based on numerous built-in, predefined metric thresholds. These default thresholds are set based on common usage scenarios but can be adjusted to fit your organization requirements.
To change the default metric thresholds:
-
On Fuse Management Central Administration area, click Alert Manager.
-
Adjust each alert threshold, to fit your requirements.
-
Click Update to save your new settings.
6.6.3. Alert Dismissals
Fuse Management Central allows to dismiss alerts for specific components inside a specific system or environment.
On Alert Manager page, Fuse Administrators can check existent dismiss rules for any alert. These rules are listed inside each alert section and can be removed easily by clicking in the Trash icon.
It is possible to filter the alerts list by alerts which have any Dismiss Rules, by using the Dismissed Alerts filter on the top of the list, selecting the option With Dismissed Rules. This should facilitate searching for a Dismiss Rule.
6.7. Alerts API
Fuse Management Central provides a REST API to deliver a summary of all active alerts, allowing alerts integration with third-party centralized monitoring solutions.
Fuse Management Central Alert API is available in the following endpoints:
| Endpoint | Description |
|---|---|
|
Layout Endpoint - Layout and details of the existent Environments, Systems and Component Types |
|
Summary Endpoint - Summary of all alerts, grouped by Environment, System and Component Type |
6.7.1. Alerts API Endpoints
Layout Endpoint
The Layout API endpoint provides an overview on the existent Systems, Environments and Component Types, as well as the Component Types used to classify Fuse Administration alerts.
This information works as metadata to be cross-referenced by other endpoints of the API.
Summary Endpoint
The Summary API endpoint provides a summary list of current active alerts, grouped by Environment, System and Component Type.
The following attributes are provided for each entry:
| Attribute | Description |
|---|---|
|
Unique identifier of the Environment |
|
Unique identifier of the System |
|
Unique identifier of the Component Type |
|
Total number of error alerts |
|
Total number of warning alerts |
|
Link to Fuse Management Central alert details page, with pre-configured filters for the alerts included in the summary entry |
Summary entry use cases
Each summary entry can have one or multiple attributes missing, acconrdingly to which type of alerts is representing:
| Attributes | Description |
|---|---|
|
These are Environment alerts, exclusive to the Environment scope. |
|
These are Administration alerts, exclusive to Fuse Administration scope. |
|
No error alerts to report. |
|
No warning alerts to report. |
Systems
List of all Systems in Fuse Management Central.
The following attributes are provided for each System:
| Attribute | Description |
|---|---|
|
Unique identifier of the System |
|
Name of the System in Fuse Management Central |
|
Type of the System (OTCS or OTAC) |
|
List of Component Types existent in that System, identified by |
Environments
List of all Environments in Fuse Management Central.
The following attributes are provided for each Environment:
| Attribute | Description |
|---|---|
|
Unique identifier of the Environment |
|
Name of the Environment in Fuse Management Central |
|
List of Component Types existent in that Environment, exclusive to the Environment scope,
identified by |
Admin
Fuse Administration alerts metadata.
The following attributes are provided:
| Attribute | Description |
|---|---|
|
List of Component Types existent to classify Admin alerts,
identified by |
7. Uninstall Fuse Management Central
This chapter describes how to remove Fuse Management Central from a host server.
If you are upgrading to a newer version of Fuse Management Central, it may be necessary to uninstall the older version.
7.1. Uninstall on Microsoft Windows
Fuse Management Central uses a Windows Installer to remove components from a Windows platform. The program is designed to remove all program files installed at the time of the Fuse Management Central installation.
|
The uninstall process will not remove any configuration and long term metric data. This is beneficial because you can retain these data files for use if you upgrade your Fuse Management Central software. To force the deletion of all Fuse Management Central data files, please contact product.support@vilt-group.com. |
To uninstall Fuse Management Central on Windows:
-
Stop all Fuse Management Central services.
-
Using the Windows application for removing programs (for example, Programs and Features), select Fuse Management Central installer and then click Uninstall.
-
Use the uninstall wizard automatically to remove all Fuse Management Central installed components.
8. Appendix A - Troubleshooting
8.1. Known Issues and Workarounds
This section describes scenarios that users may run into and how to troubleshoot and workaround or fix them.
8.1.1. Metrics not available after installation or upgrade
In some Content Server installations, after installing/upgrading and activating a system, the metrics might not be available and your System will appear offline. In that case there are several things to check:
-
If the instalaltion / upgrade of the Fuse Management Central module does not complete the system restart correctly. Try restarting Content Server manually.
-
Check if the firewall is blocking http requests between Fuse Management Central installation and the System being activated.
-
Check Content Server logs to make sure metrics are being dispatched:
-
Change the log level for Thread Logs to
INFOin the Content Server with the problem (<content_server_url>/?func=admin.configurelogging). -
Check the log file in the OTCS log directory with the name
fuseclient<date>.log
-
8.1.2. Error when adding a new System with https
When adding a new system with https an error message similar to the following one might be displayed:
Failed to connect
Resource not reachable: I/O error on POST request ()...) unable to find valid certification path to requested target
In this case, the public SSL certificate from the system must be imported to the JVM truststore used to run Fuse Management Central: example guide on how to import the certificate
8.1.3. Fuse Metrics Database corrupted files
Sometimes some data files in Fuse Metrics Database can get corrupted, preventing the Metrics service to start. We found that this commonly happens in these scenarios:
-
Fuse Metrics Database service was not shutdown correctly
-
Disk ran out of space
If this happens we suggest to shutdown Fuse Management Central (all services) and then restart Fuse Management Central (all services).
At this point some errors may appear when restarting Fuse Metrics Database, in case there are corrupted data files. If an error appears when starting Fuse Metrics Database, please check the Fuse Metrics Database logs. Errors like these should be being logged:
err="opening storage failed: block dir: \"data\\\\01E270EBZ1YPKF7BB2WZ38H5SV\": open data\\01E270EBZ1YPKF7BB2WZ38H5SV\\meta.json: The system cannot find the file specified."
or
err="opening storage failed: found unsequential head chunk files 23 and 25"
In order to fix this, the folder or file specified in the log message, for example 01E270EBZ1YPKF7BB2WZ38H5SV or chunk files 23 and 25, should be deleted. These folders can be found in the Fuse Metrics Database installation folder, inside the data or data/chunks_head folders.
This process should be repeated for each folder or file that appears on the logs until Fuse Metrics Database is able to start with no errors.
8.1.4. Uninstall Fuse Management Client for OpenText Content Server (16.2.2, 16.2.3, 16.2.4)
For the Content Server versions 16.2.2, 16.2.3 and 16.2.4, we found out that the standard soft-restart is not enough to reload all the loaders required for Fuse Management Client, so we suggest you to restart the processes/services of Content Server to make sure everything was updated.